This gives you maximum flexibility while ensuring that VOLIXTA retains control over how bookings, deposits, invoices, and taxes are calculated and managed.
🔗 How It Works
When enabled, VOLIXTA passes the final booking total to WooCommerce at checkout. The customer completes the payment using any available WooCommerce method — and once the transaction is confirmed, the booking is validated and finalized inside VOLIXTA.
You benefit from:
- 🧾 Advanced tax and invoice generation from VOLIXTA
- 💰 Full compatibility with partial payments and deposits
- 🌐 Multi-currency and multilingual support via WooCommerce add-ons
- 🧩 Compatibility with WooCommerce Subscriptions, Memberships, and more
If WooCommerce is installed on your WordPress site, you can activate the online payment option directly from Settings > Payment Methods inside VOLIXTA .
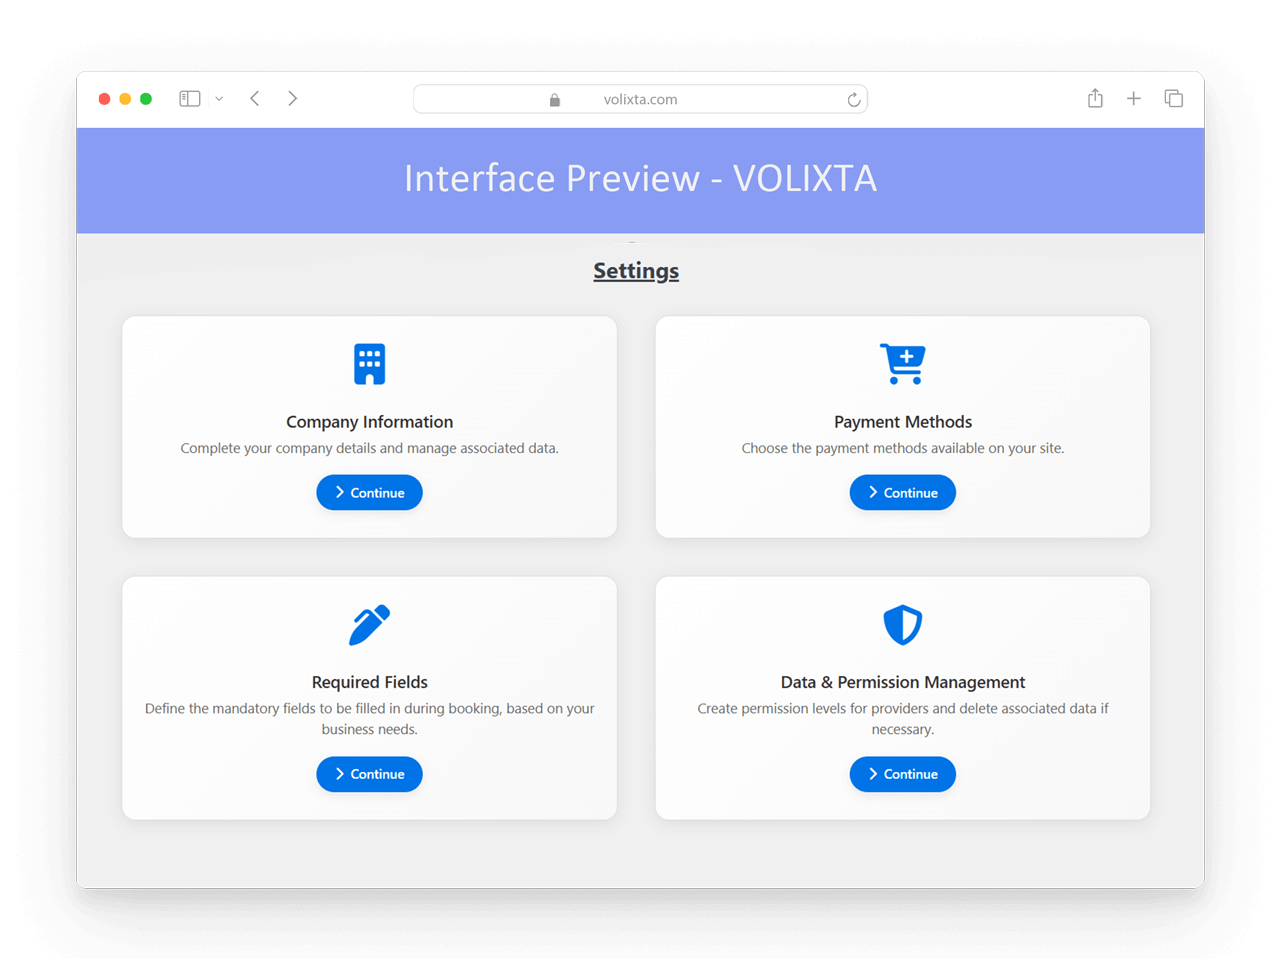
🛠️ Linking WooCommerce: Step-by-Step Setup
Inside the Payment Methods section of VOLIXTA , you’ll find three payment options. The card payment option (via WooCommerce) will be unavailable unless WooCommerce is installed and configured.
Here’s how to link VOLIXTA with WooCommerce in just a few minutes:
To accept online payments while keeping full control over booking and billing logic, follow these 6 simple steps:
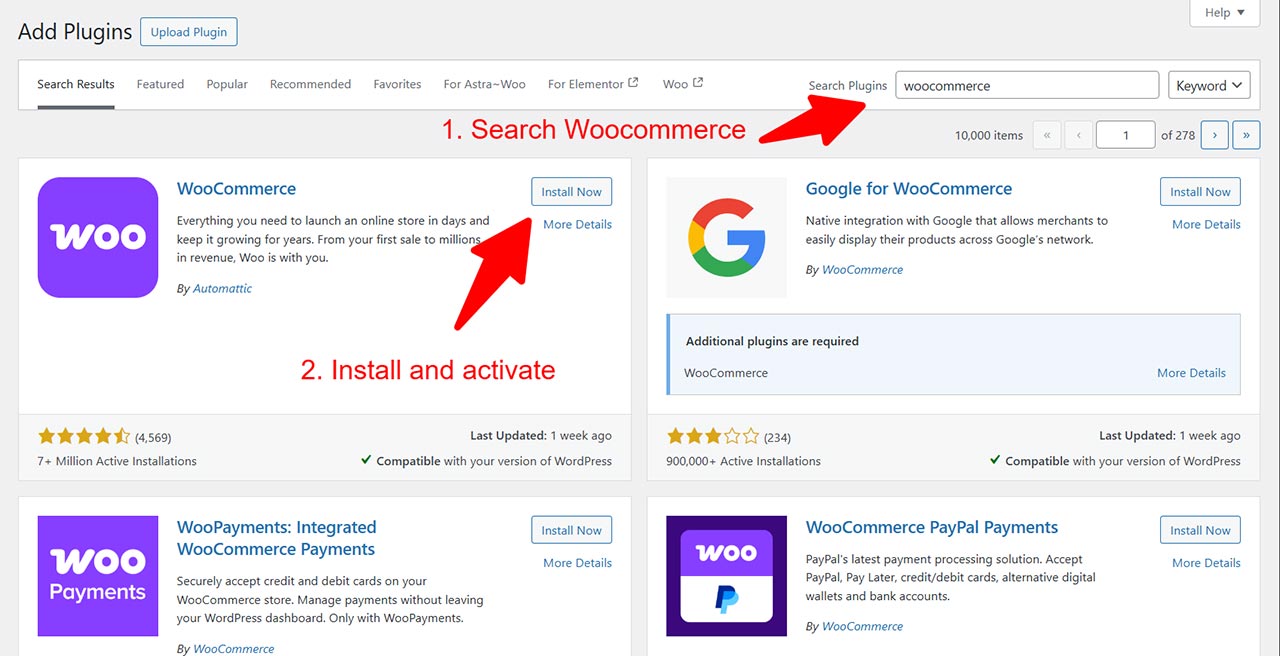
1️⃣ Install WooCommerce
Go to your WordPress dashboard and install the WooCommerce plugin (if not already present).
You can skip most of the initial setup wizard —
👉 VOLIXTA handles services, taxes, invoices, and client accounts independently.
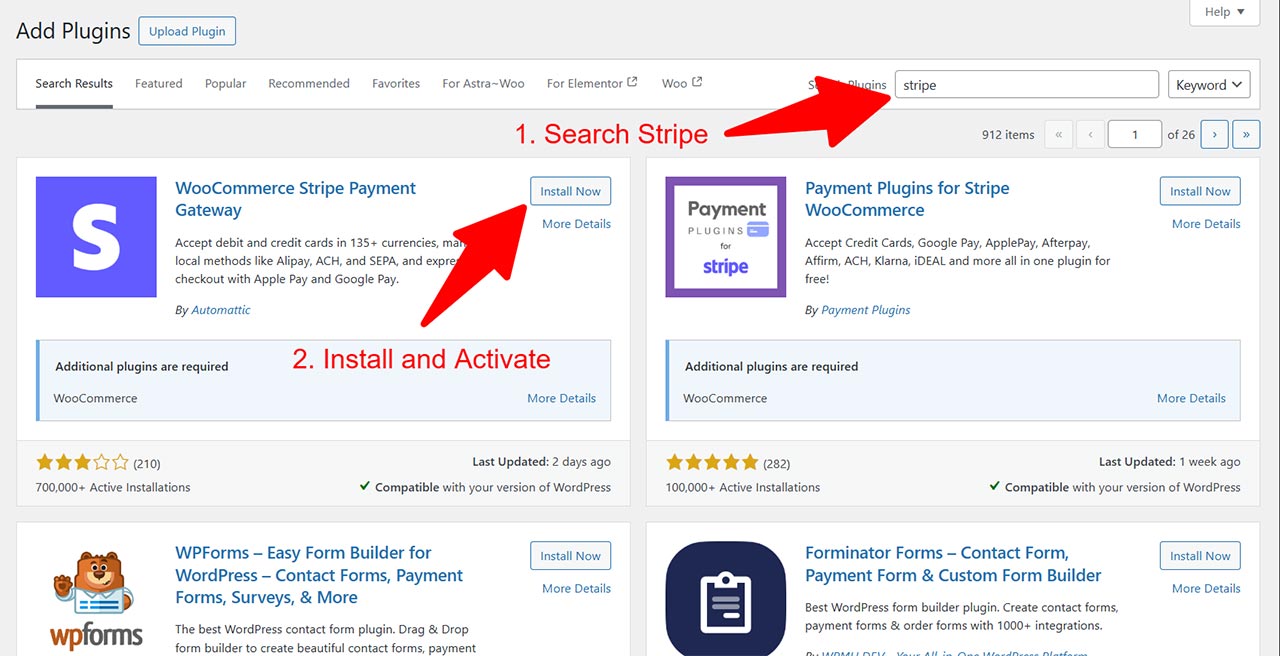
2️⃣ Add a Payment Gateway (e.g., Stripe)
Once WooCommerce is installed, you’ll need to add a payment method such as Stripe, PayPal, or any other preferred gateway:
- Go to Plugins > Add New.
- Search for “WooCommerce Stripe Payment Gateway” (or another gateway of your choice).
- Install and activate the plugin.
- Go to WooCommerce > Settings > Payments.
- Enable the payment method and configure it with your account credentials (API keys, etc.).
💡 VOLIXTA will route bookings through WooCommerce and automatically apply the correct prices, taxes, deposits, and packages — no need to create WooCommerce products manually.
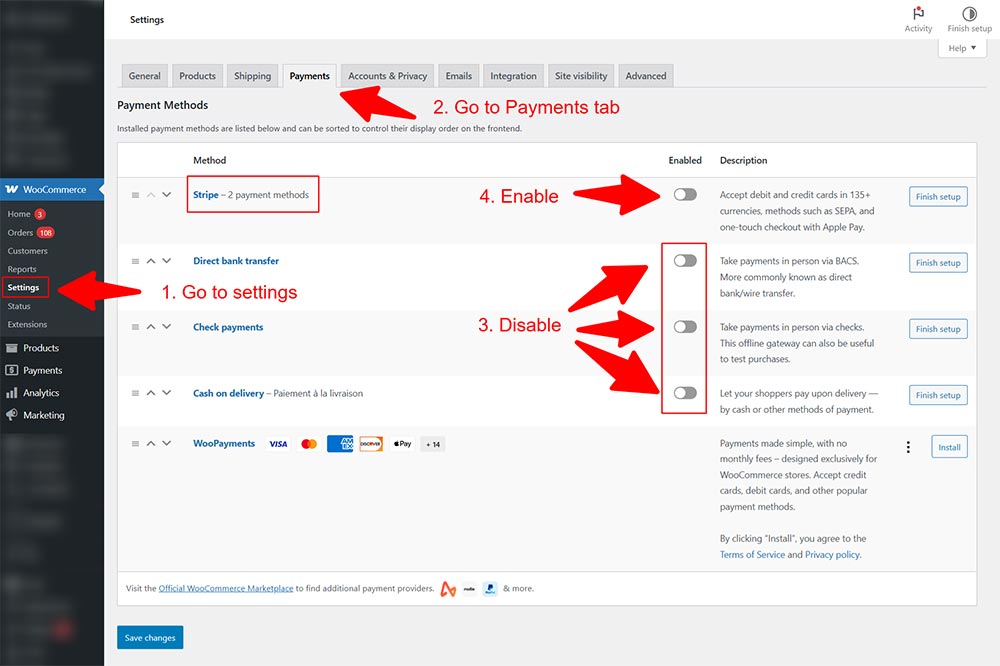
3️⃣ Disable Default WooCommerce Payment Methods
WooCommerce enables some basic methods like:
- Cash on Delivery
- Direct Bank Transfer
- Check Payments
These must be disabled, as VOLIXTA already supports native cash and bank transfer logic.
To disable them:
- Go to WooCommerce > Settings > Payments
- Disable the methods listed above
- ✅ Keep only the payment gateway(s) that will be used (e.g., Stripe, PayPal)
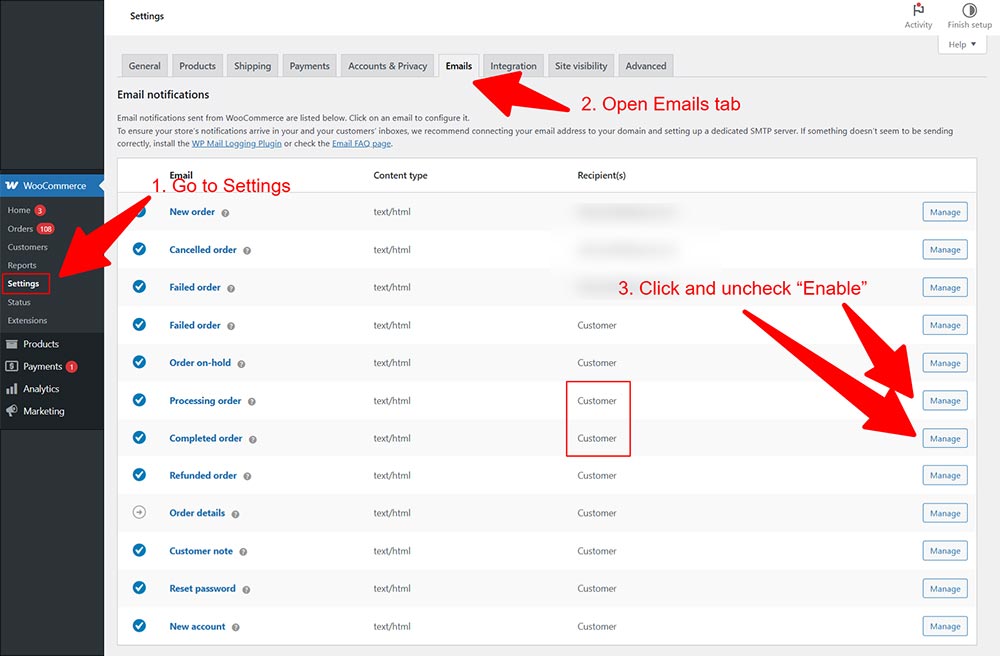
4️⃣ Disable Redundant WooCommerce Emails
WooCommerce sends various order-related emails (like “New Order”, “Processing Order”, etc.).
Since VOLIXTA already sends dedicated booking confirmations, reschedules, and cancellations, it’s best to avoid duplicate messages.
To disable WooCommerce email notifications:
Go to WooCommerce > Settings > Emails.
Click Manage on each of the following and uncheck “Enable this email notification”:
- New Order
- Customer Invoice / Order Details
- Processing Order
- Completed Order
Leave only:
- Cancelled Order
- Failed Order
- Refund emails (optional)
- Admin or payment error notifications (if useful for your workflow)
✅ This ensures only VOLIXTA controls booking communications, and WooCommerce is used purely for secure payments.
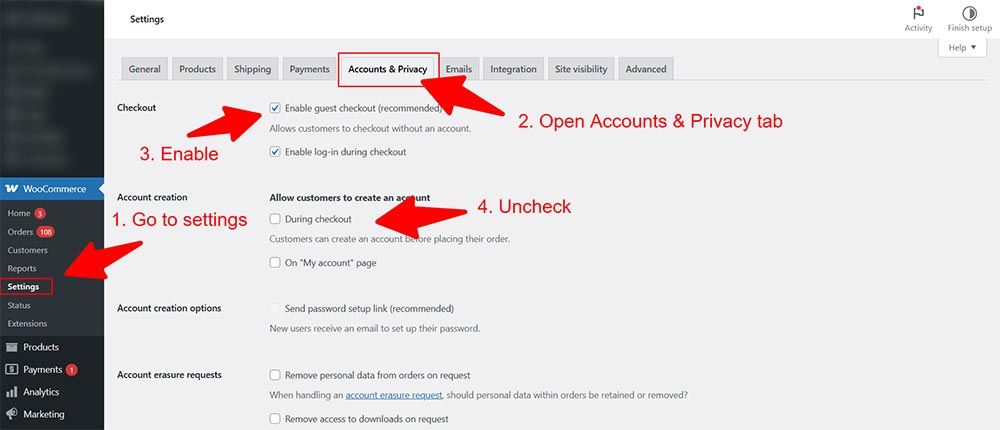
5️⃣ Allow Guest Checkout & Disable Account Creation at Checkout
Since VOLIXTA manages client accounts and profiles internally, WooCommerce account creation should be disabled to avoid conflicts or confusion.
To configure this:
Go to WooCommerce > Settings > Accounts & Privacy
- ✅ Enable “Allow customers to place orders without an account” (guest checkout)
- ❌ Uncheck all options related to “Allow customers to create an account”
This setup ensures:
- Clients can pay for their bookings without creating a WooCommerce account
- VOLIXTA stays in full control of user accounts and booking history
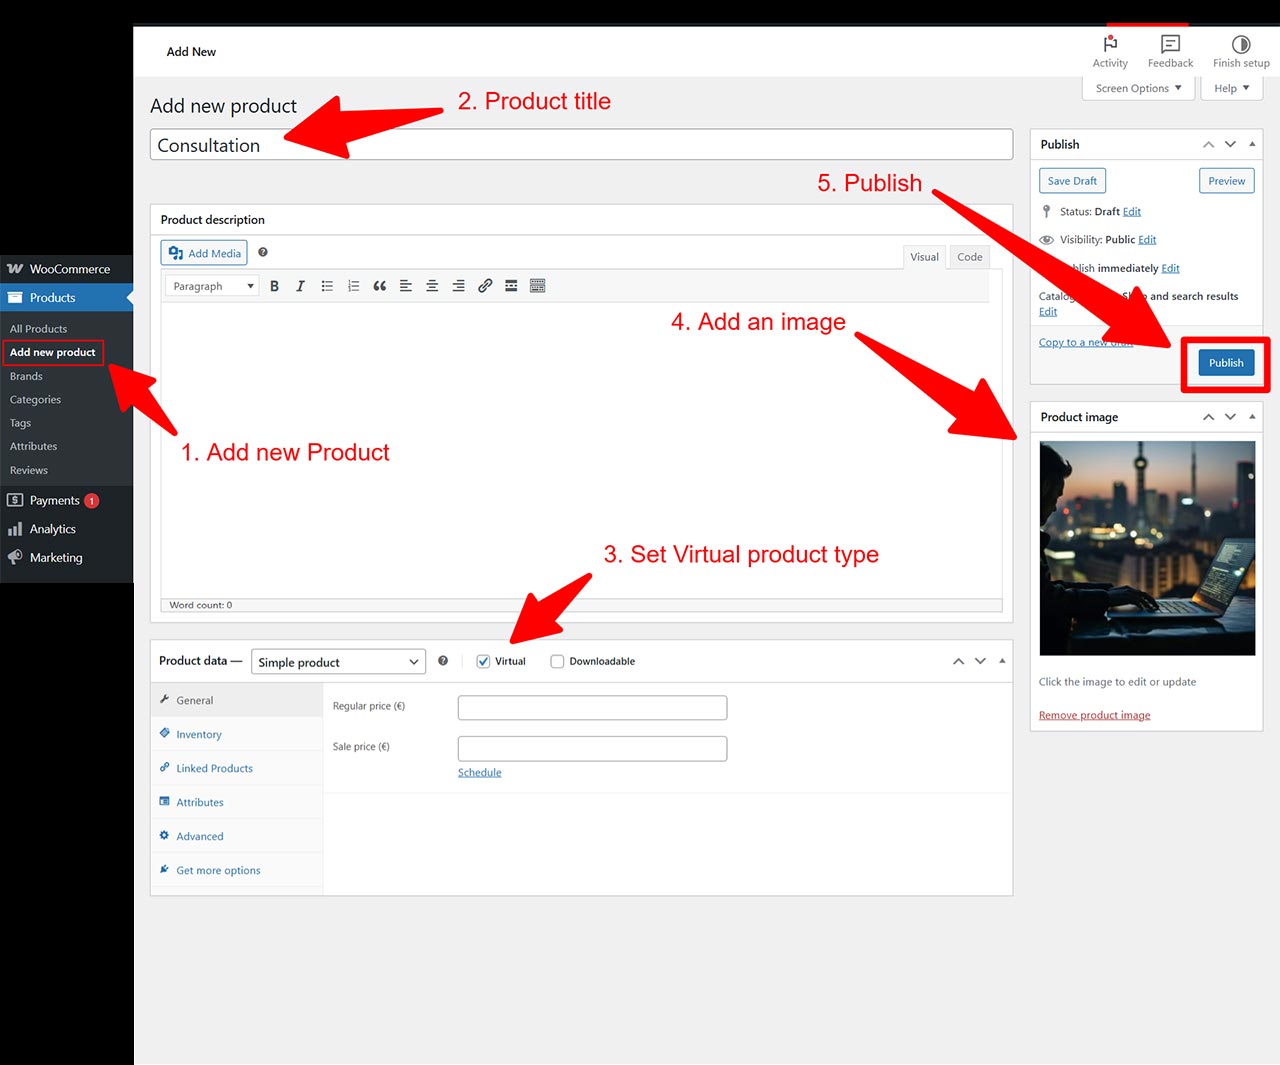
Step 2: Create a Product for Checkout
Once WooCommerce is active:
Navigate to Products > Add New.
- Give it a name like Booking or Consultation (you can use any name).
- Set the product type to Simple product > Virtual.
- Optionally, upload a product image to improve its visual display.
- Click Publish.
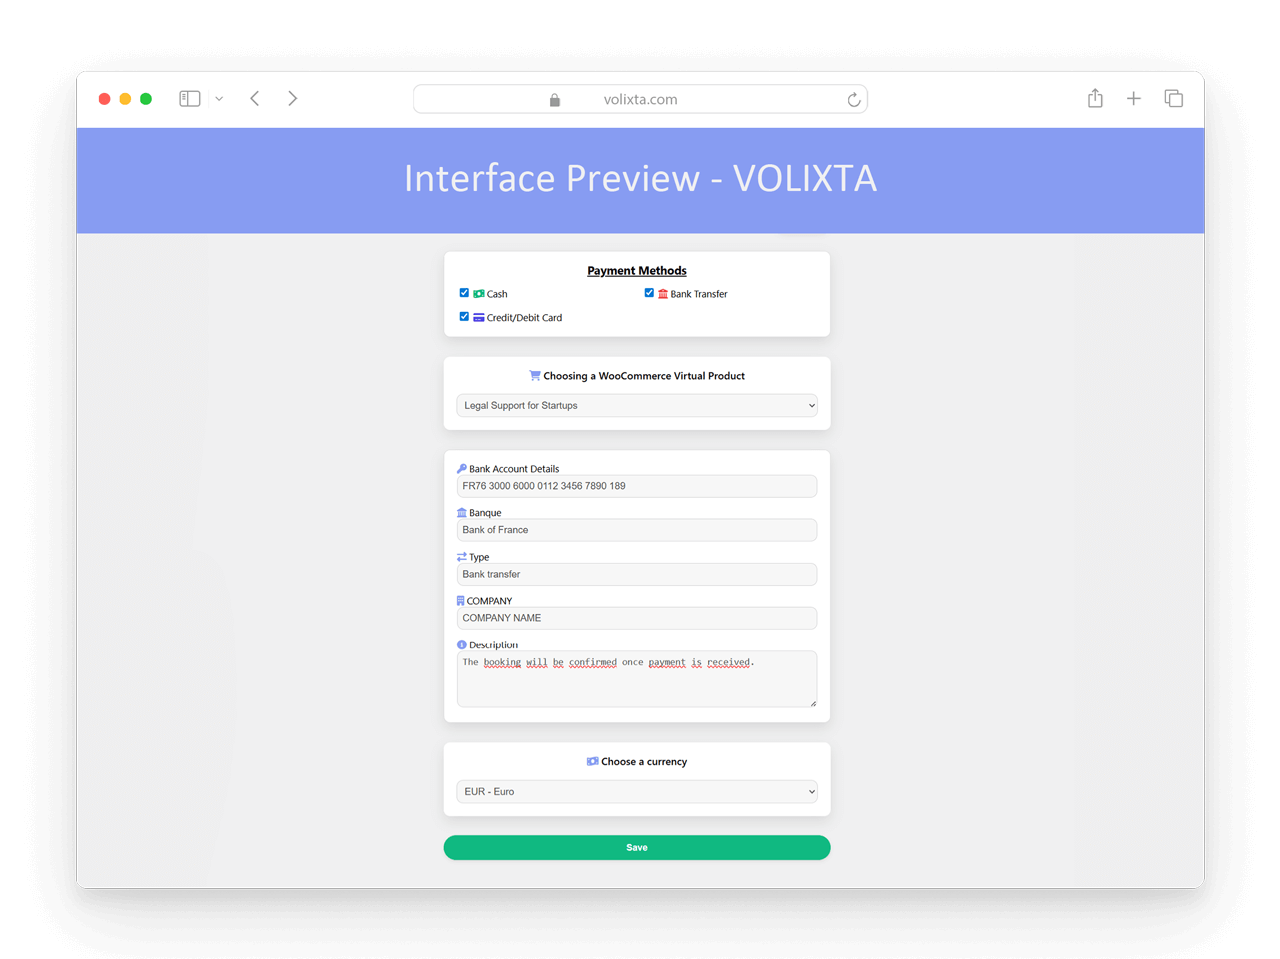
Step 3: Enable Online Payment method
Return to VOLIXTA > Settings > Payment Methods and enable the Online Payment method.
- Select the WooCommerce product you just created (if it doesn’t appear, refresh the page).
- Choose the correct currency (euro, dollar, etc.).
- Click Save or Update Settings.
That’s it — WooCommerce is now connected and ready to handle your booking payments!
⚠️ Important: Company Information Must Be Filled
While not directly related to WooCommerce, it’s essential to complete your business details in Settings > Company Information inside VOLIXTA.
Why? Because this information is used for generating invoices. Missing company data may result in incomplete or invalid invoice documents. Always ensure these fields are properly filled to keep your billing professional and compliant.

What Remains in VOLIXTA Control
Even though the payment is processed via WooCommerce, all core booking logic stays in VOLIXTA:
- Dynamic pricing (based on service, location, participant count, optional services, etc.)
- Deposit logic (fixed or percentage-based, with rules per service)
- Invoice generation with breakdowns and taxes
- Customer and employee dashboards remain fully functional and synced
- Booking statuses and availability are updated instantly
VOLIXTA does not create a WooCommerce product per booking — the integration is direct and clean.
💼 Order Flow Summary
When using online payments (via WooCommerce), the booking and payment process is fully integrated — but seamless for your clients. Here’s how it works:
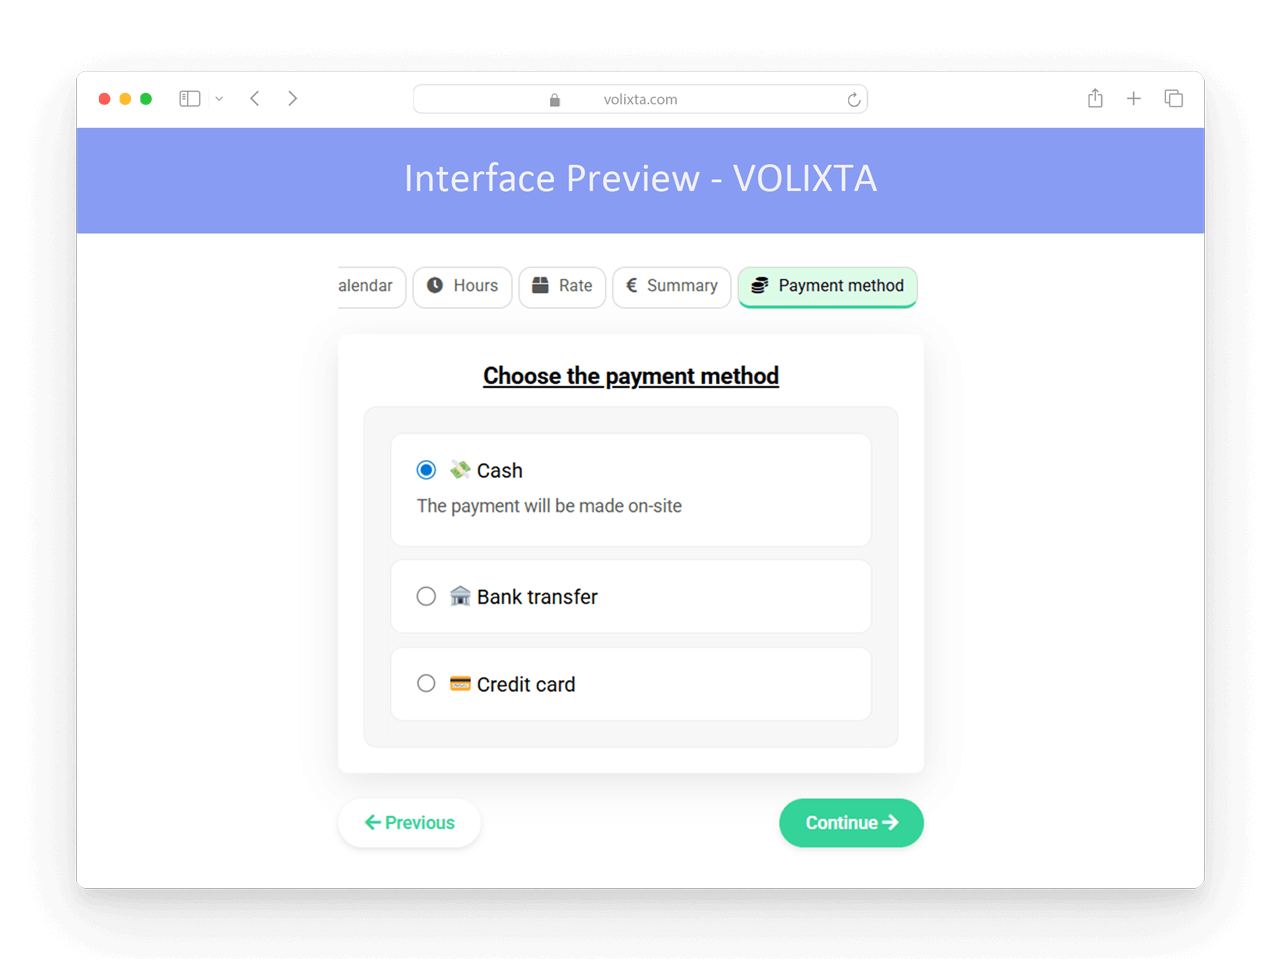
Step 1: The client fills out the booking form
In the Payment method step, they choose their preferred payment method — such as Credit Card or Online Payment (the WooCommerce name is never shown to the user).
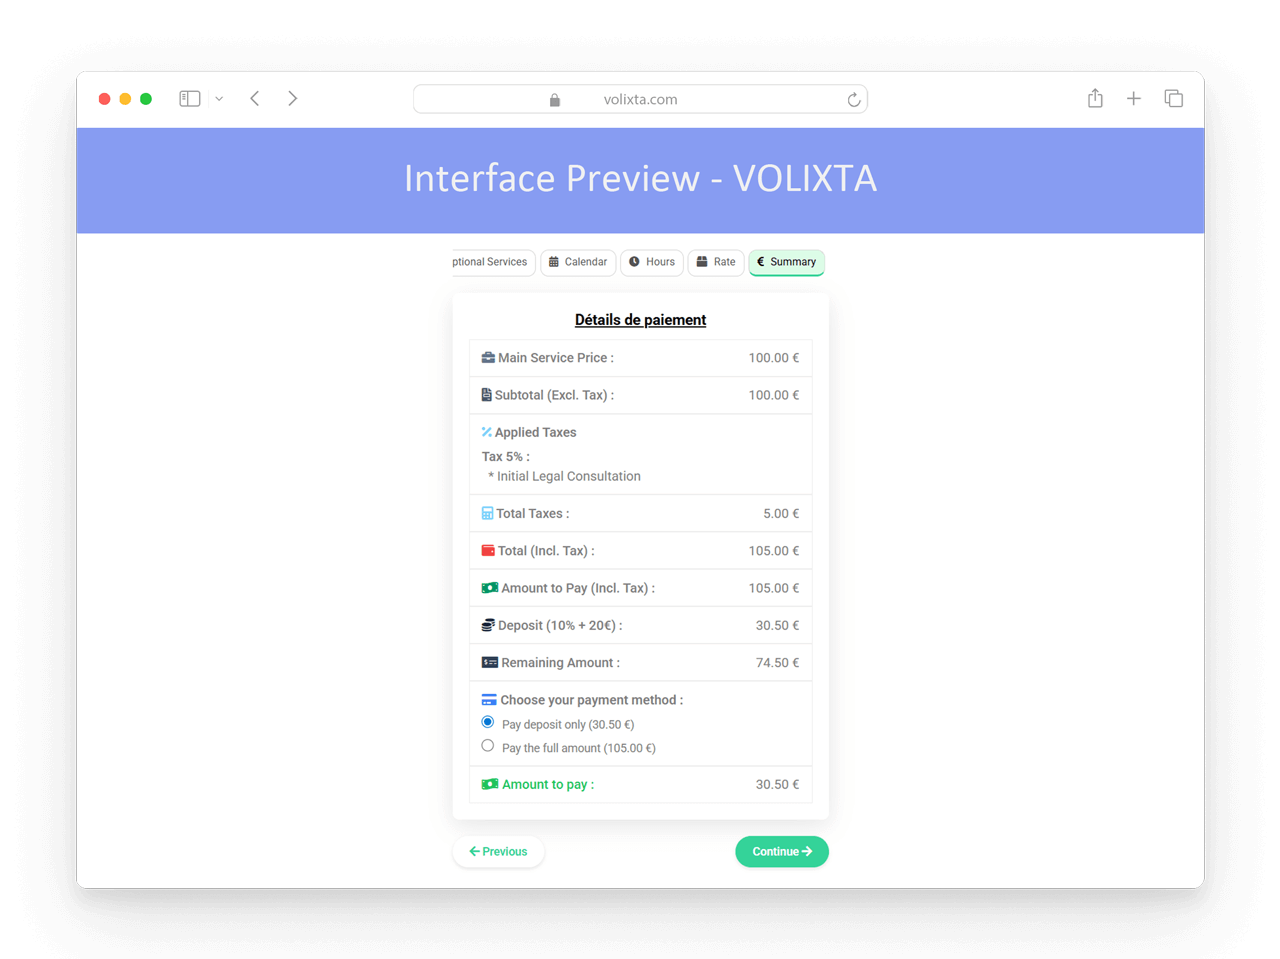
Step 2: Booking Form Completion
VOLIXTA calculates the total.
This includes:
- Service price
- Optional services
- Taxes
- Deposit (if enabled)
The system handles all calculations automatically.
Step 3: Booking confirmation
Once confirmed, the booking is temporarily added to the cart — along with its details (amount, taxes, deposit, etc.).

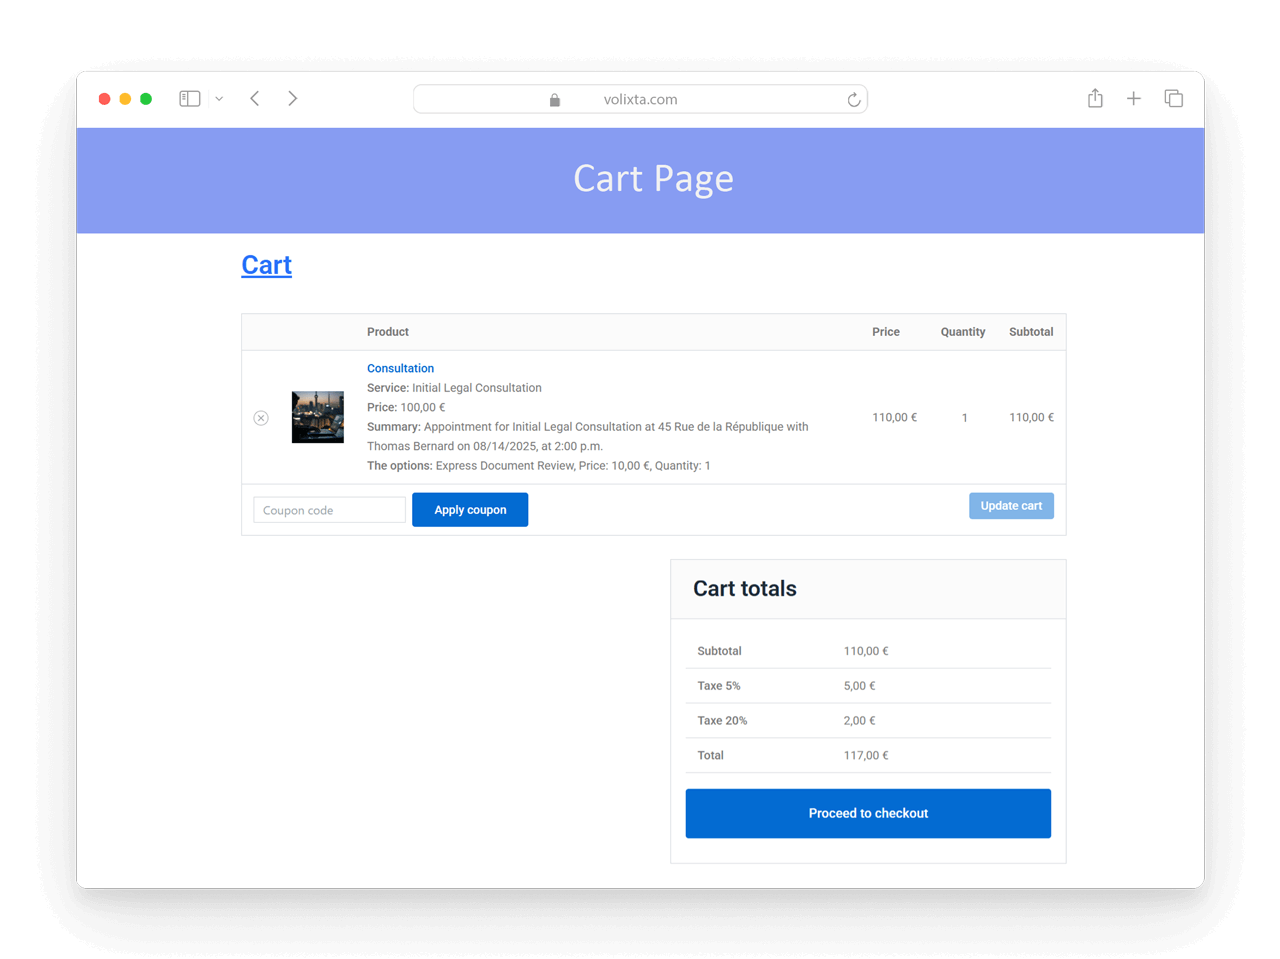
Step 4: Cart Display
The client is redirected to the cart page.
Here they will see:
- The name and image of the product you’ve set in WooCommerce (e.g., “Consultation”)
- A clear description of the booking ( employee name, location, date, time, etc … )
- Price breakdown: taxes, deposit, and total amount
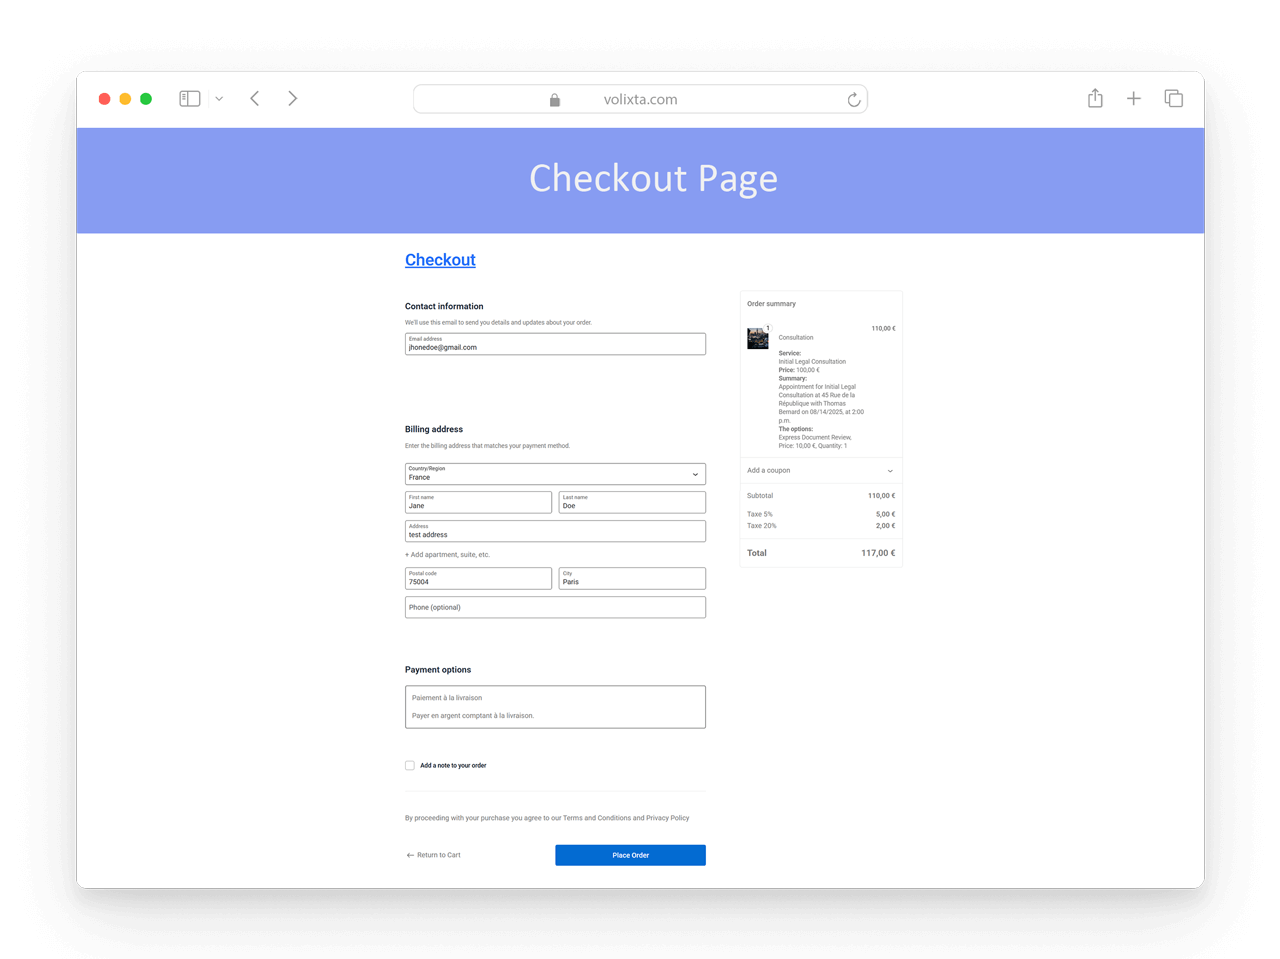
Step 5: Checkout Process
Payment is completed via the WooCommerce checkout page
This page can be customized just like any WooCommerce checkout. The client uses any supported payment method: card, wallet, Apple Pay, Klarna, etc.
Step 6: Payment received
Once payment is confirmed by WooCommerce
- The booking is marked as paid in VOLIXTA
- An invoice is generated using VOLIXTA’s billing system
- The employee is notified (if notifications are enabled)
- The booking is locked and confirmed in the dashboard
⏱️ About Booking Timeouts
When a booking is added to the cart, it is reserved for 15 minutes by default.
If the client does not complete the payment within that time, the pending booking will be automatically canceled, and the cart will be emptied to free the slot for others.
🧾 Billing & Invoices Still Handled by VOLIXTA
Even when payment is processed through WooCommerce, VOLIXTA remains the source of truth for all billing logic, ensuring consistency across bookings.
VOLIXTA is responsible for:
- Invoice creation and numbering
- Applying VAT and tax rules based on service type and customer location
- Handling deposit calculations and credit usage
- Integrating payment details with customer wallets and packages
This approach keeps your billing logic centralized and avoids conflicts with WooCommerce product data.
❓ Frequently Asked Questions – WooCommerce integration
Do I need to install WooCommerce to accept online payments?
Yes. The online payment (card) option in VOLIXTA is only available if WooCommerce is installed and active on your site.
How do I link VOLIXTA with WooCommerce?
You simply need to:
- Install the WooCommerce plugin
- Create a digital product (e.g. “Booking” or “Consultation”)
- Enable the online payment method from Settings > Payment Methods in VOLIXTA
What kind of WooCommerce product should I create?
Create a simple digital product with a name of your choice (e.g. “Consultation”). You can leave most fields empty, but adding an image is recommended for a better cart appearance.
What happens after the client books and selects online payment?
VOLIXTA adds the booking to the WooCommerce cart. The client proceeds to checkout and completes payment. Once payment is confirmed by WooCommerce, the booking is finalized in VOLIXTA .
Will WooCommerce create a separate product for each booking?
No. VOLIXTA uses a single product as a payment placeholder. Each booking is passed directly as order data without duplicating products.
What happens if the client doesn’t complete the payment?
The booking is held in the cart for 15 minutes. If payment is not completed in that time, the booking is automatically canceled and the cart is emptied.
Who handles invoices and billing?
All billing logic — including invoice generation, tax rules, and deposit breakdowns — is managed by VOLIXTA, even when WooCommerce is used for payment.
Do I need to configure my company information?
Yes. You must fill in your business details in Settings > Company Information inside VOLIXTA. These details are used for invoice generation. Missing data may lead to invalid invoices.
Can I use WooCommerce add-ons like Subscriptions or Klarna?
Yes. VOLIXTA is compatible with most WooCommerce extensions — including multi-currency, multilingual, Klarna, Stripe, Apple Pay, WooCommerce Subscriptions, and Memberships.
Why should I use WooCommerce with VOLIXTA?
Use WooCommerce if:
- You need more payment gateway options
- You already use WooCommerce for e-commerce or subscriptions
- You want to keep VOLIXTA advanced booking and billing logic, but use WooCommerce’s payment ecosystem
💬 Need help?
Visit our Help Center or Contact Support for technical assistance.