From adding new clients to assigning packages, managing bookings, handling e-wallet credits, or viewing full appointment history, everything is streamlined through a clean admin interface. The system clearly separates profile data from booking activity, allowing managers to handle each aspect with speed, clarity, and full control.
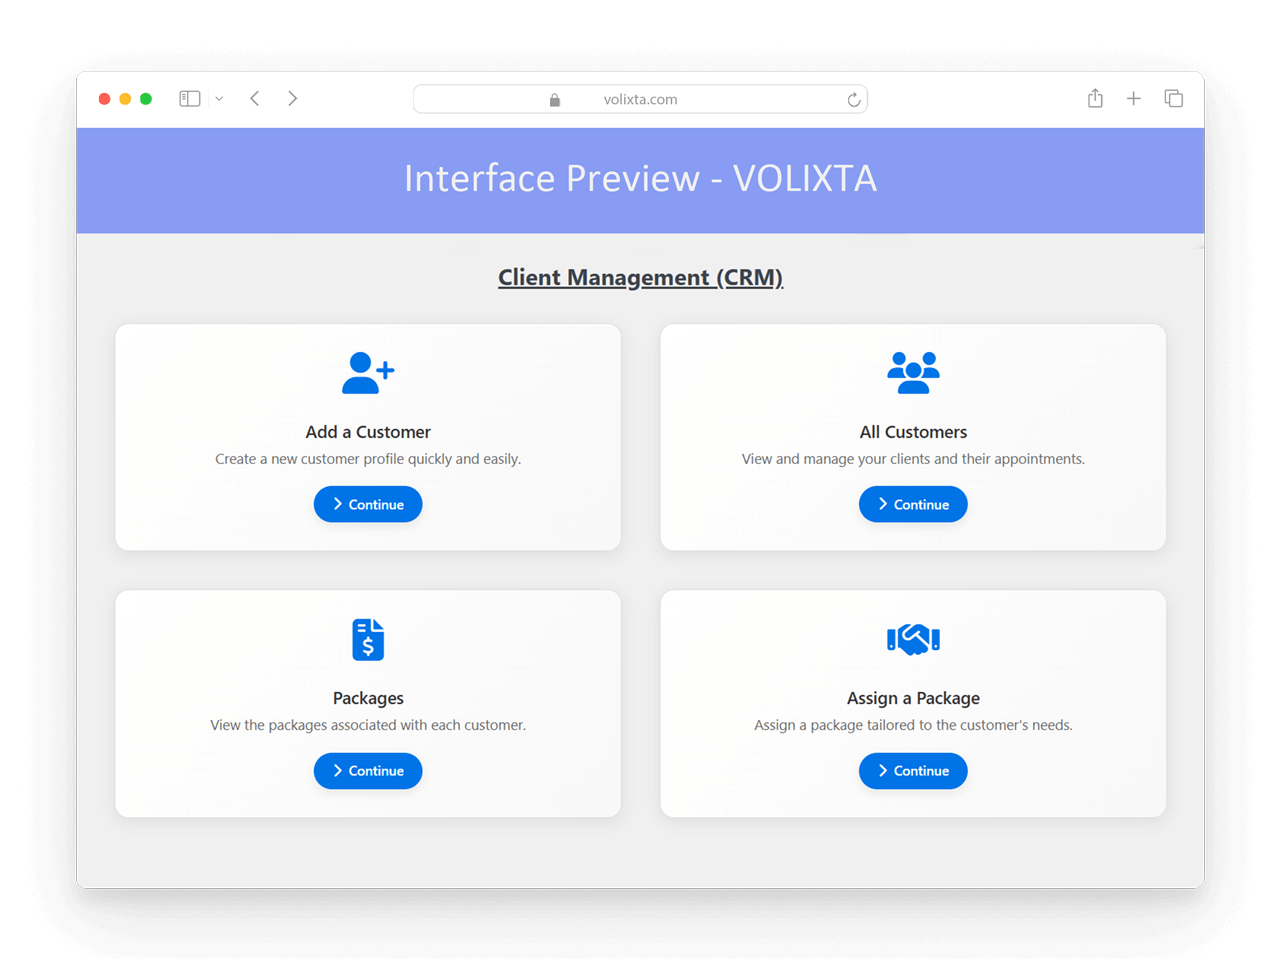
👥 Creating and Managing Clients — Simplified
No more juggling external CRMs or complicated WordPress user setups. VOLIXTA offers a streamlined process to add or manage clients directly from your admin interface:
- Create a new client from scratch
- Or link an existing WordPress user account
- Assign them directly to bookings or packages
- Automatically generate their private portal login
🧠 Each client receives access to their own personalized client portal — no backend access needed.
🪪 Step-by-Step Client Setup
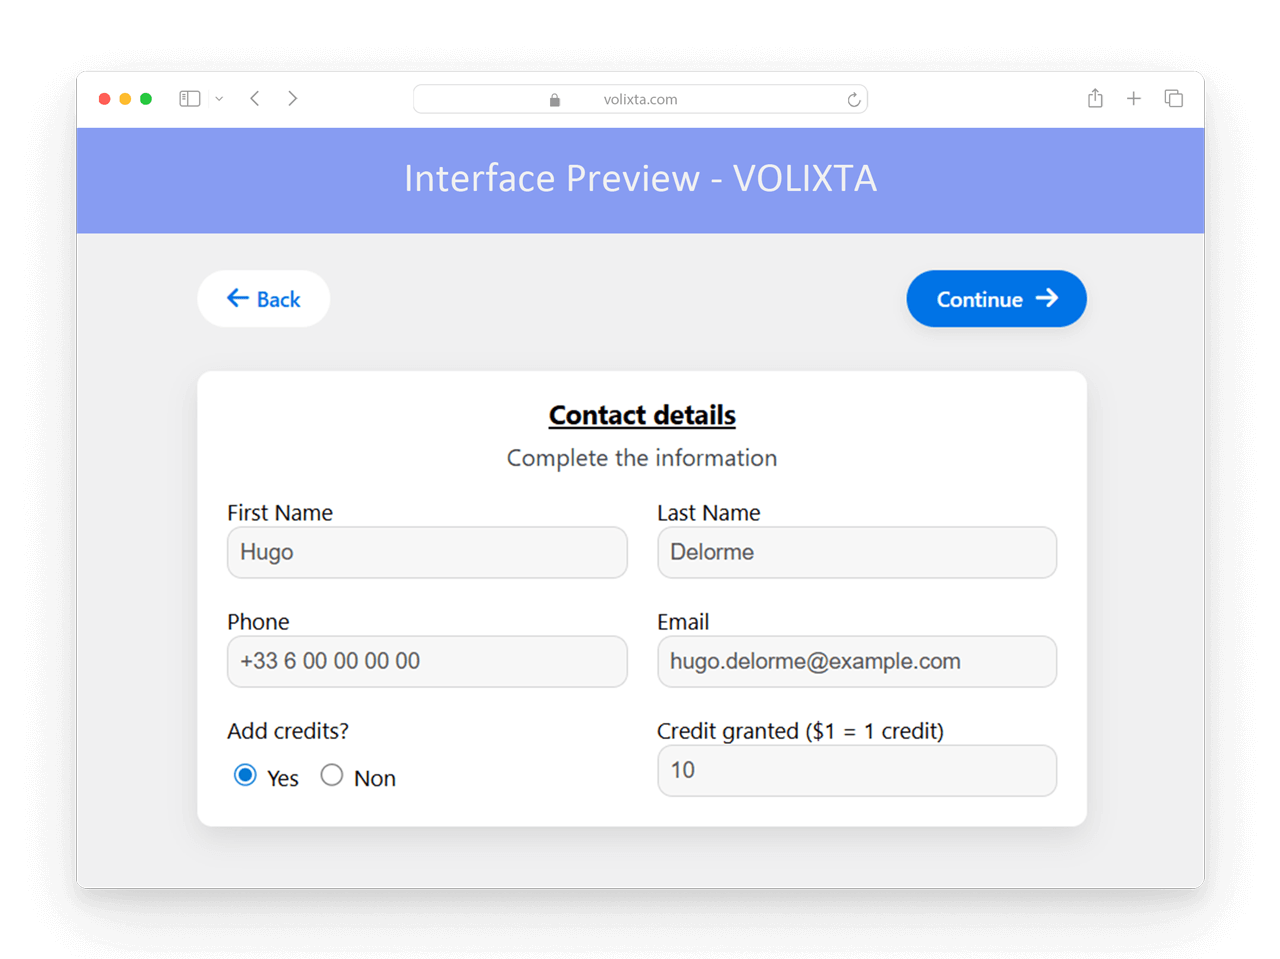
Step 1: Basic Info
Collect essential client details:
- Full Name (First & Last)
- Phone Number
- Email Address
- Optional: Preload Credits
You can assign credits directly to the client’s e-wallet. These credits can later be used as full or partial payment during bookings — ideal for loyalty systems or resolving canceled appointments.
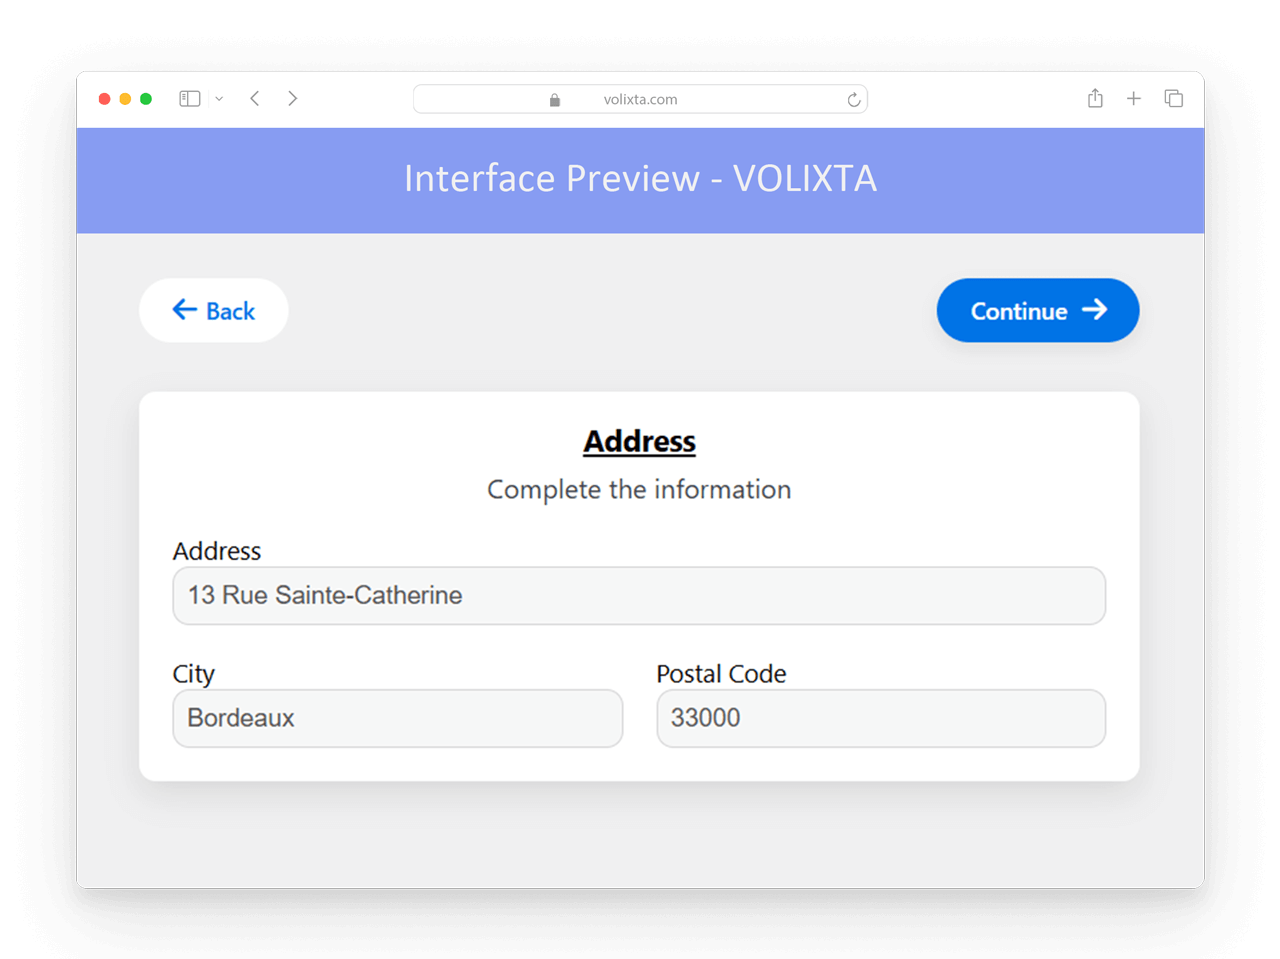
Step 2: Address
Optionally add location details to complete the client profile:
- Street Address
- ZIP Code
- City
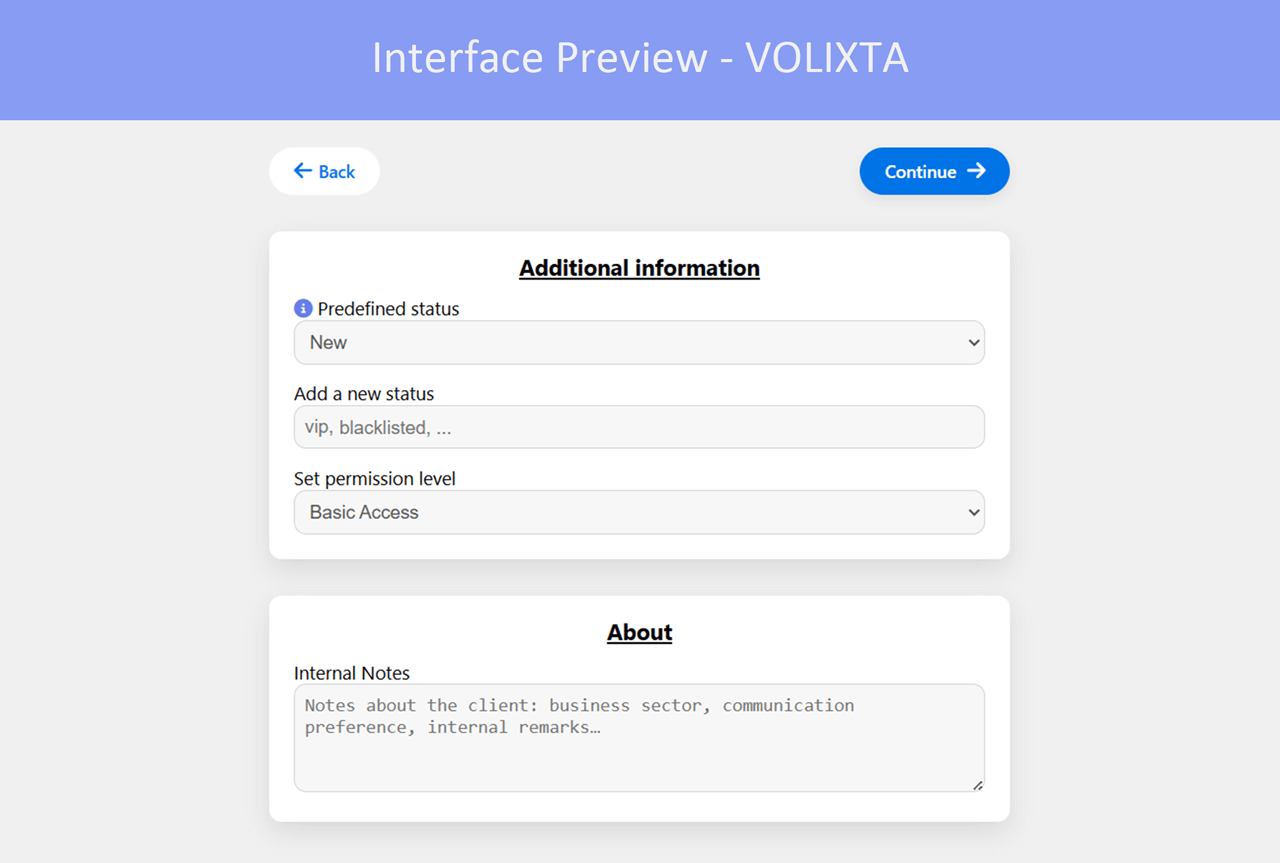
Step 3: Status & Permissions
Categorize and control the client’s relationship with your business:
- Client Status (e.g. New, VIP, Returning)
You can define a custom status during creation — it will be saved and available for future clients. - Permission Level
Set how much this client can manage from their personal portal — such as booking, rescheduling, or viewing invoices. - Internal Notes (About)
Example: “Client prefers email communication only. Avoid phone calls unless urgent.”
These notes help your team personalize their service and stay aligned internally.
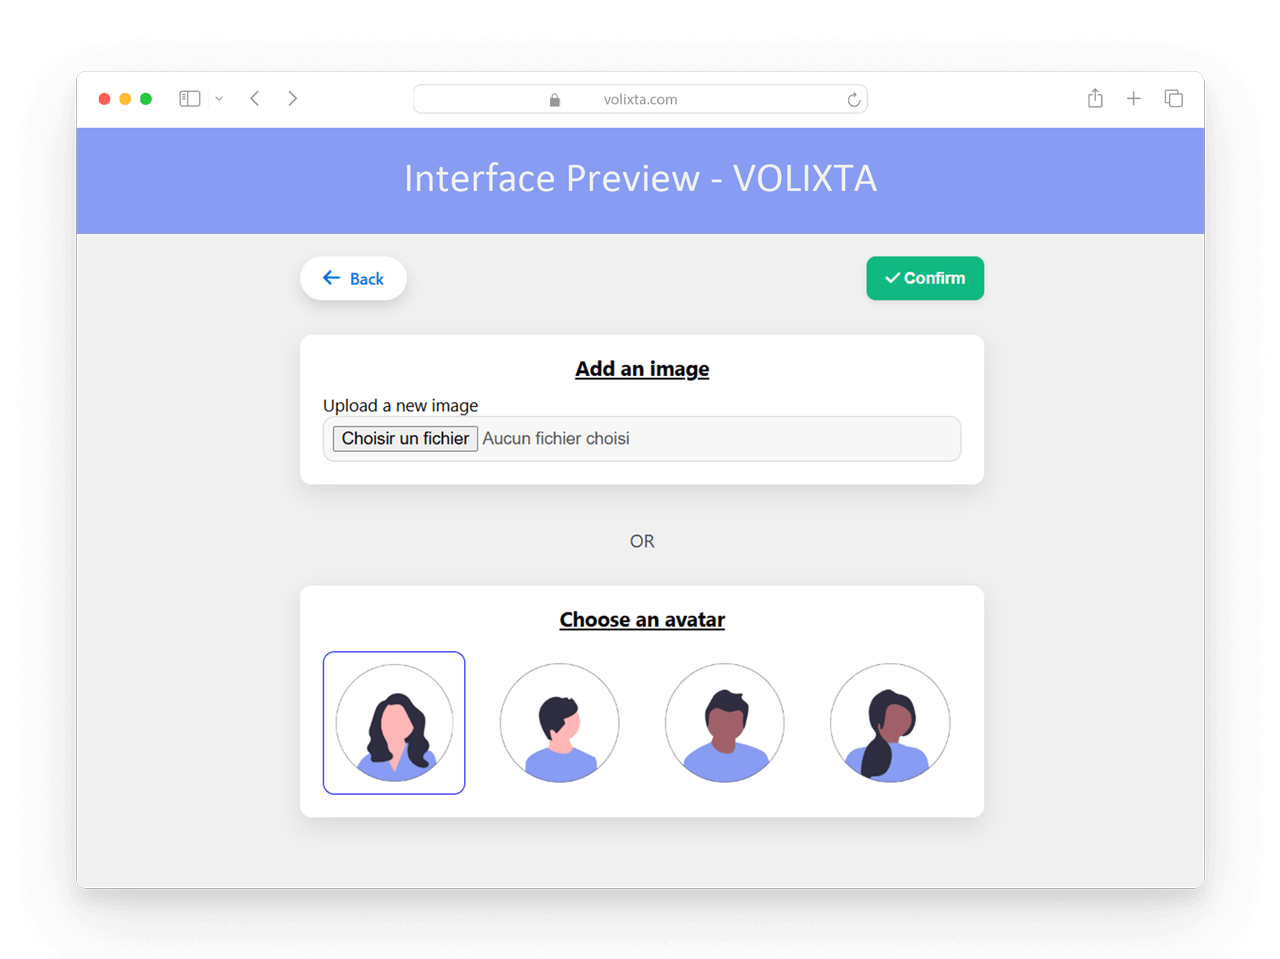
Step 4: Add Profile Picture (Visual Identity)
Give the client a recognizable identity by:
- Choosing from a set of default avatars
- Or uploading a custom photo
Their profile image is visible to managers and admins — not public. It’s especially useful in large organizations for quick recognition and better CRM handling.
Step 5: Post-Creation Options
Once the client is created, you have two choices:
- Edit Profile to add more details or make adjustments
- Add Another Client to streamline onboarding in batch workflows
This setup is optimized for both quick entries and detailed client onboarding — all from within the VOLIXTA dashboard.
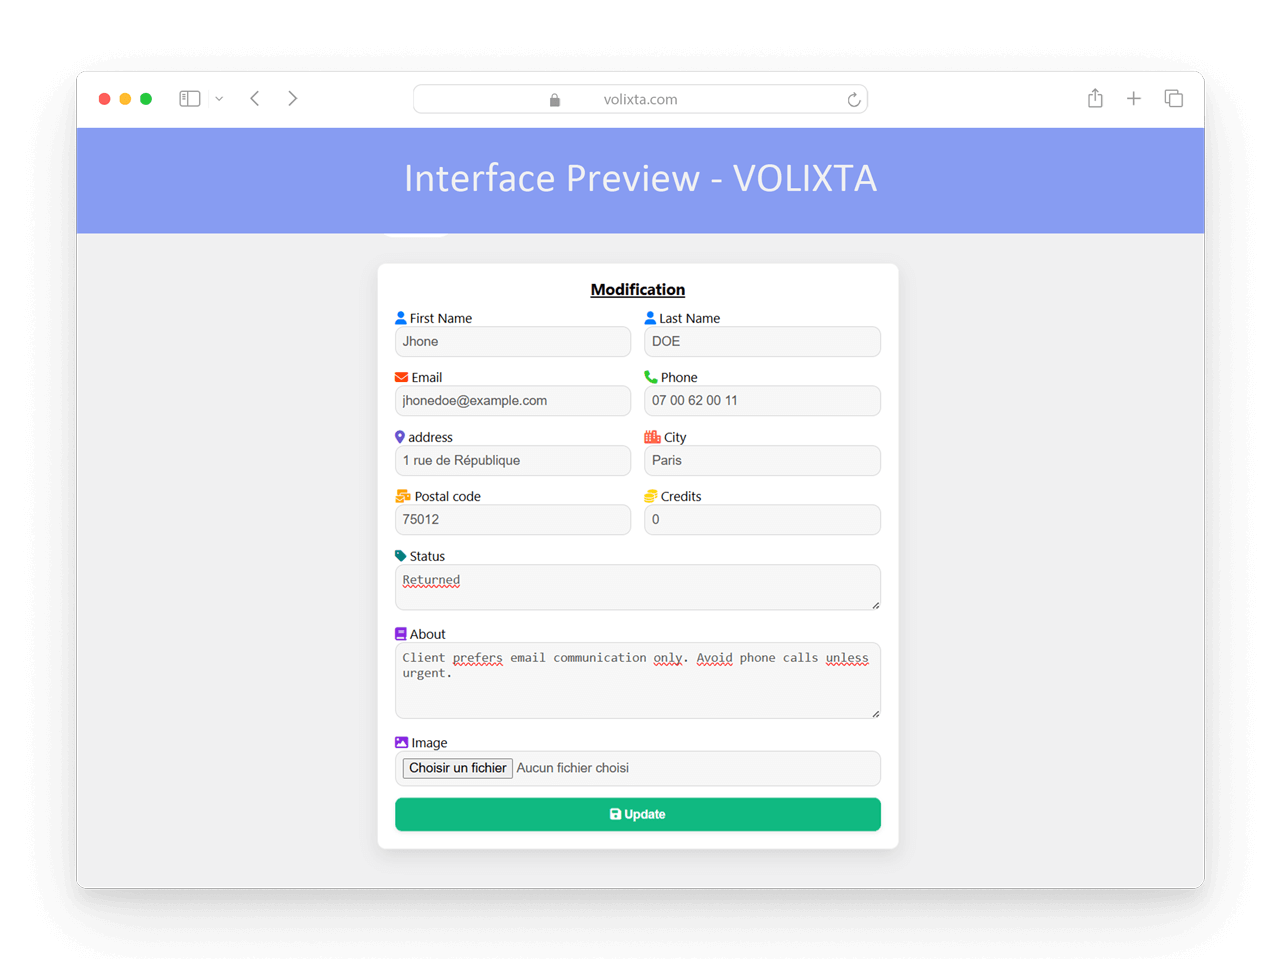
📇 Client Profiles
Each client has a structured profile that includes:
- Full name and contact information
- Profile picture
- Billing address
- E-wallet balance
- Purchased packages
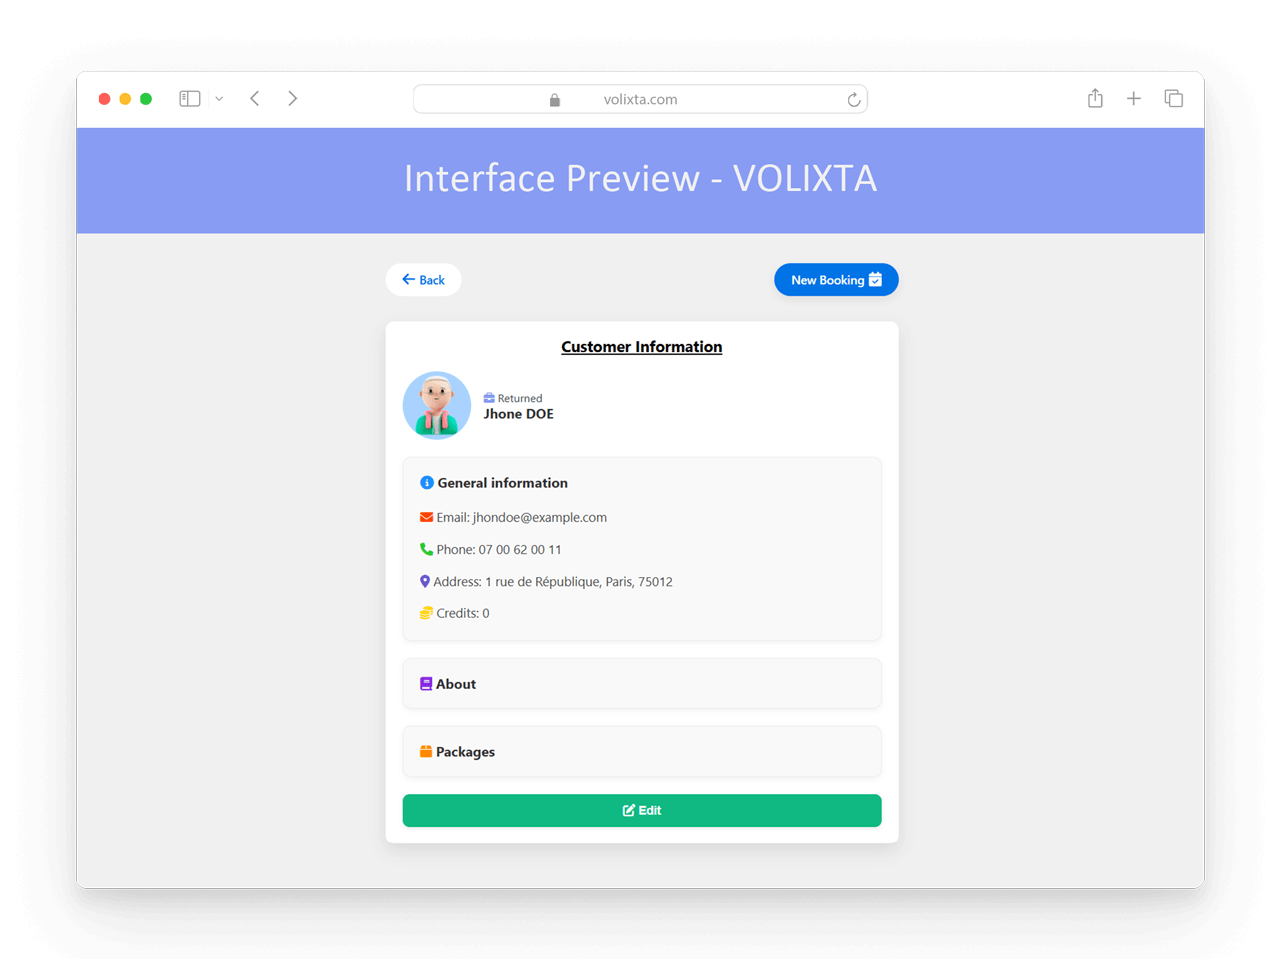
📝 Booking history is not displayed directly in the profile view.
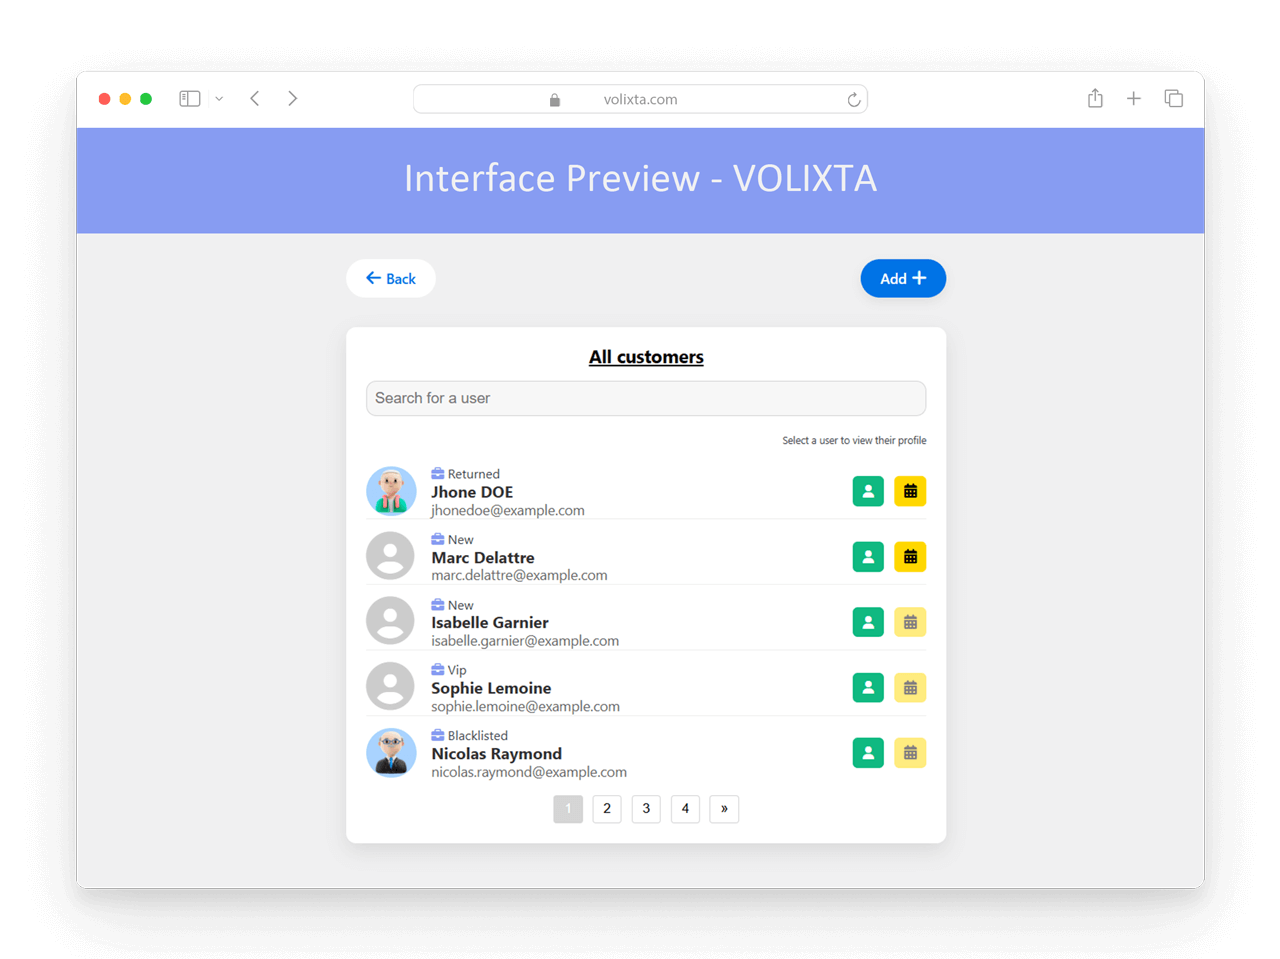
To access a client’s appointments (past or upcoming), use the dedicated action icon.
On the Customer List, two action icons are available for each client:
- 👤 View Profile — opens the editable client profile with personal, billing, and package details
- 📅 View Bookings — opens a separate view listing all bookings for that client, with filters and optional calendar mode
This clear separation keeps the interface clean and efficient — allowing you to focus on either customer data or their appointment activity.
🧾 Client Booking Management & Overview
From each client’s profile, managers can:
- 🆕 Create a new booking on their behalf
- 🎁 Apply a package or discount
- 💳 Add credits to the e-wallet
- ✏️ Cancel or reschedule upcoming appointments
All actions are synced instantly with staff dashboards and calendars.
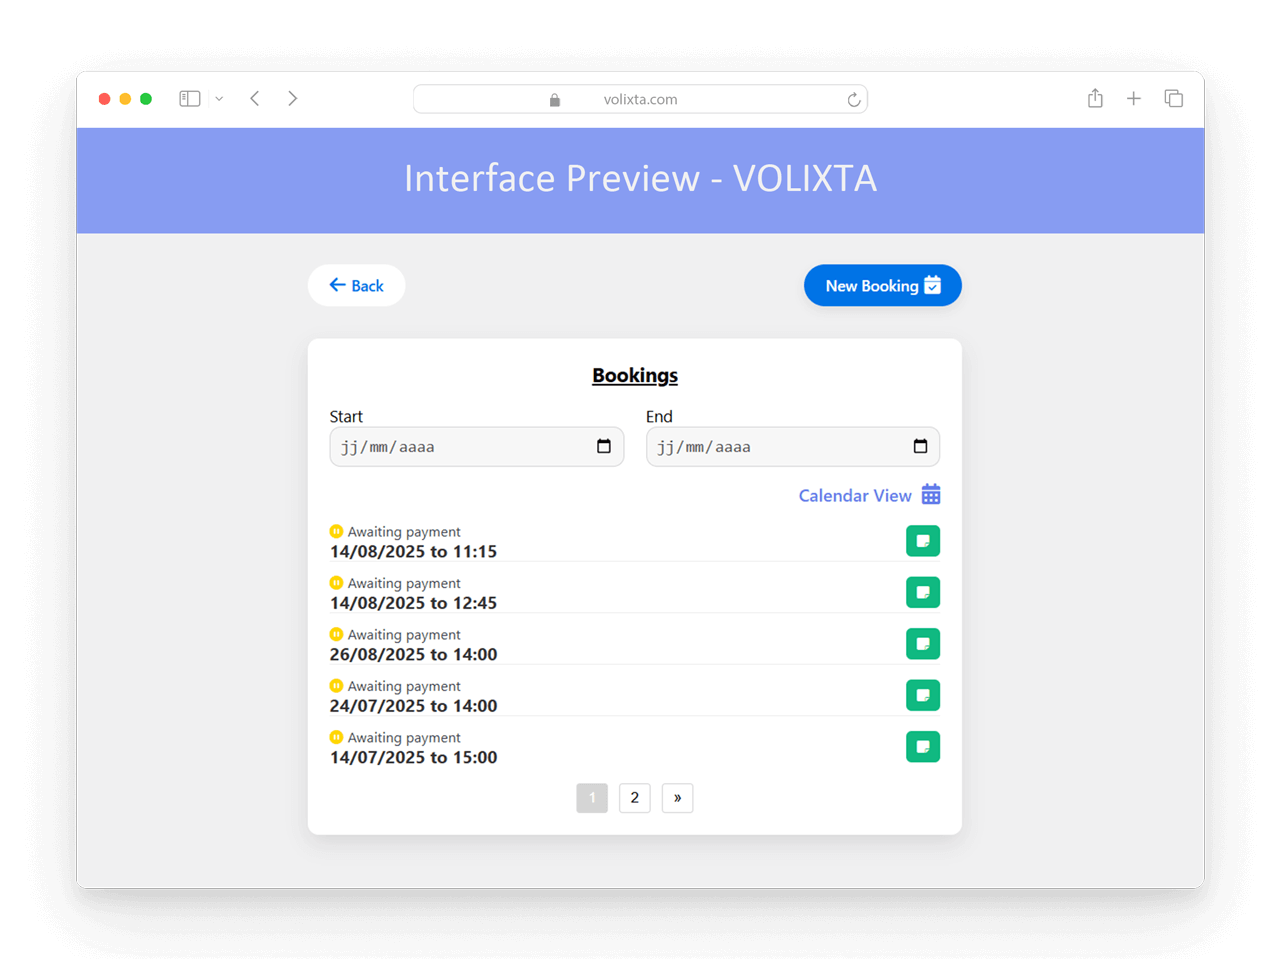
📋 Viewing Client Bookings — List & Calendar Views
From the Customer List
Each client row includes an action icon:
- 📅 View Bookings — shows a filtered list of that client’s upcoming appointments
- Includes key info: service, staff member, date, time, and payment status
- You can also filter by date to narrow down results
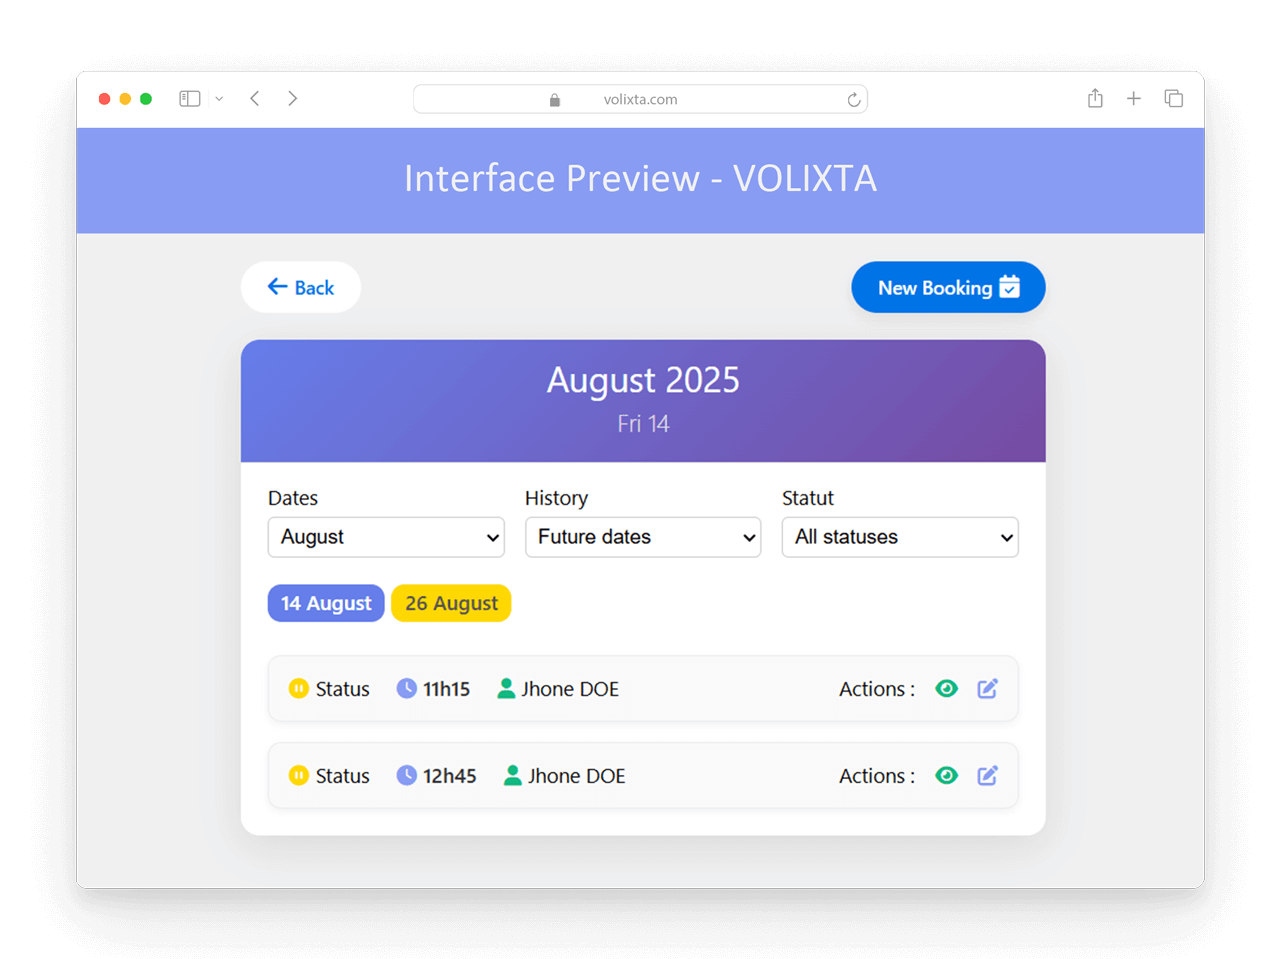
Minimalist Calendar Mode
Switch to a calendar view for a more visual layout, using the same minimalist design as staff dashboards:
- 📅 Only dates with active bookings are shown
- 🧾 Appointments are grouped by day in a compact, mobile-friendly format
- 🕒 Each item shows: time, service, staff, and status — no need to open every detail
🔍 Booking History & Filtering
Inside each client profile, managers can access the full booking history, not just upcoming events.
Features:
- Filters by date range, booking status, or payment status
- Toggle between list view and calendar view
- Useful for reviewing past activity, no-shows, or patterns over time
🧾 Viewing and Editing Individual Bookings
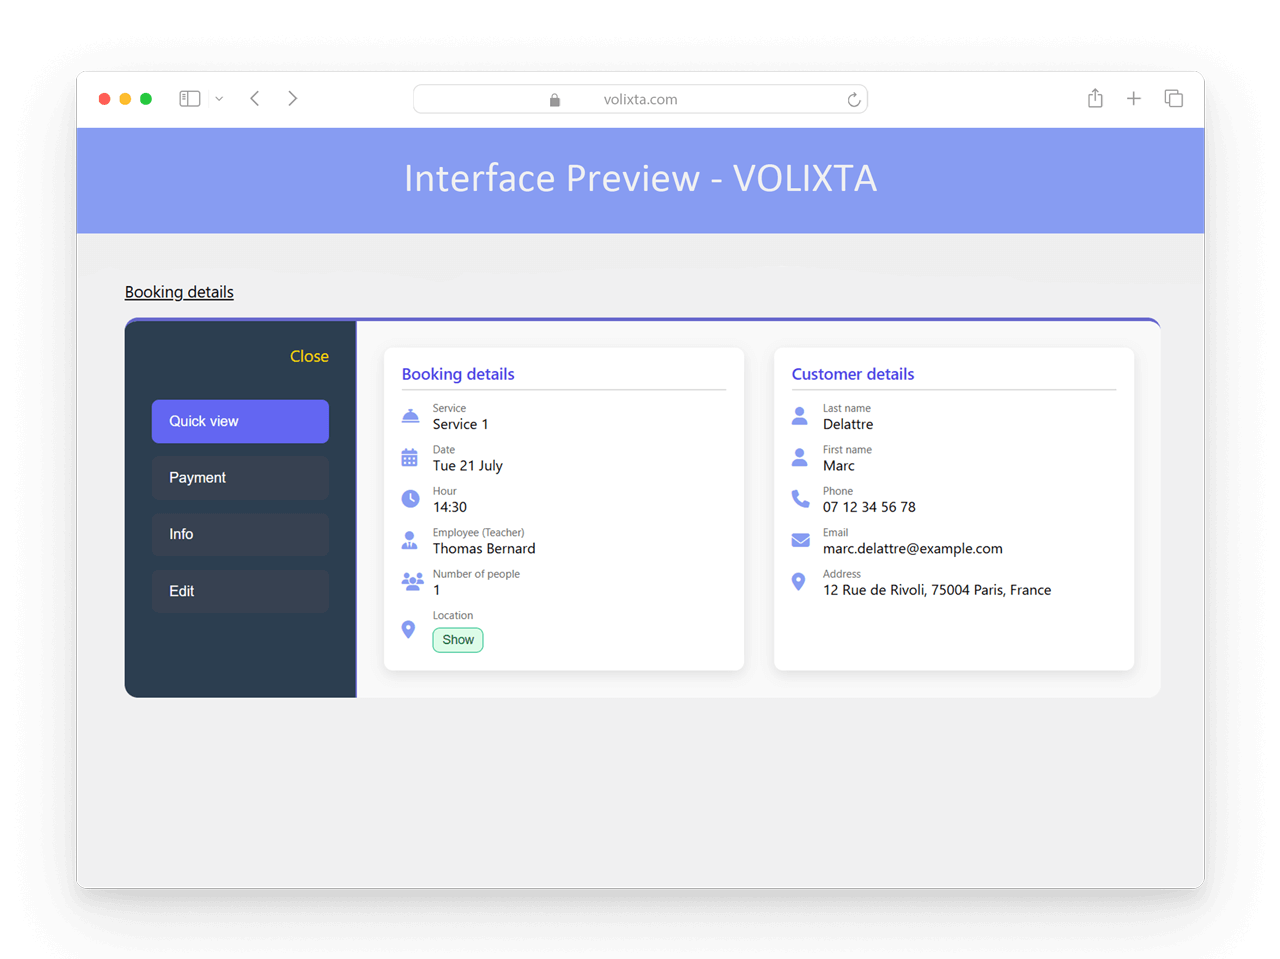
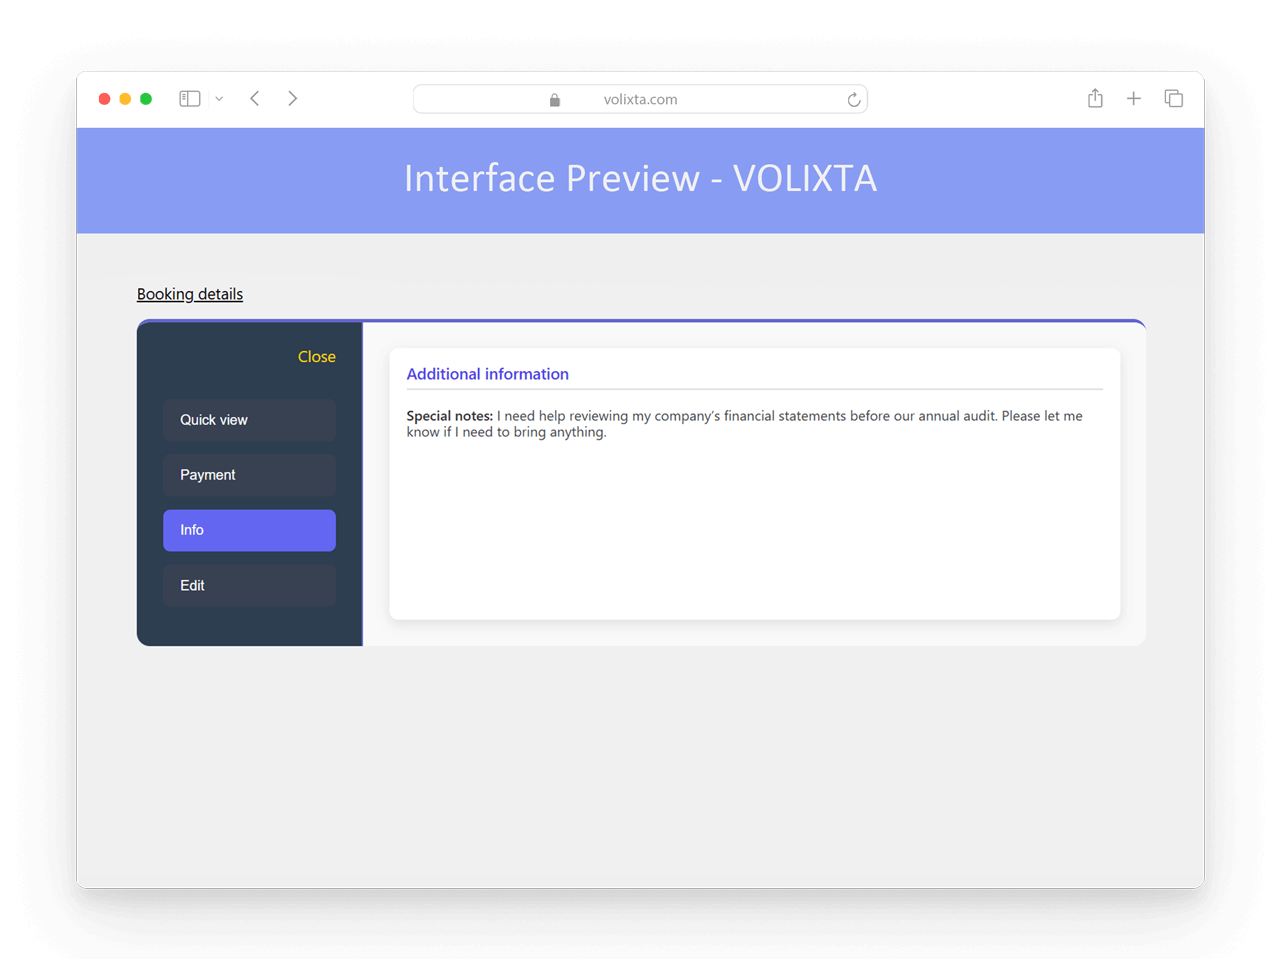
Click any appointment to open the full Booking Details Panel, organized into 4 tabs:
Quick View
Booking Details
Displays the selected service, appointment date and time, number of participants, assigned staff member, and full location address.
If optional services were selected, an “Options” button appears — clicking it opens a popup with additional items.
Customer Information
Shows the client’s full name, phone number, email address, and billing address.
Payment
- Status: paid, unpaid, pending
- Payment Method & History
- Notes
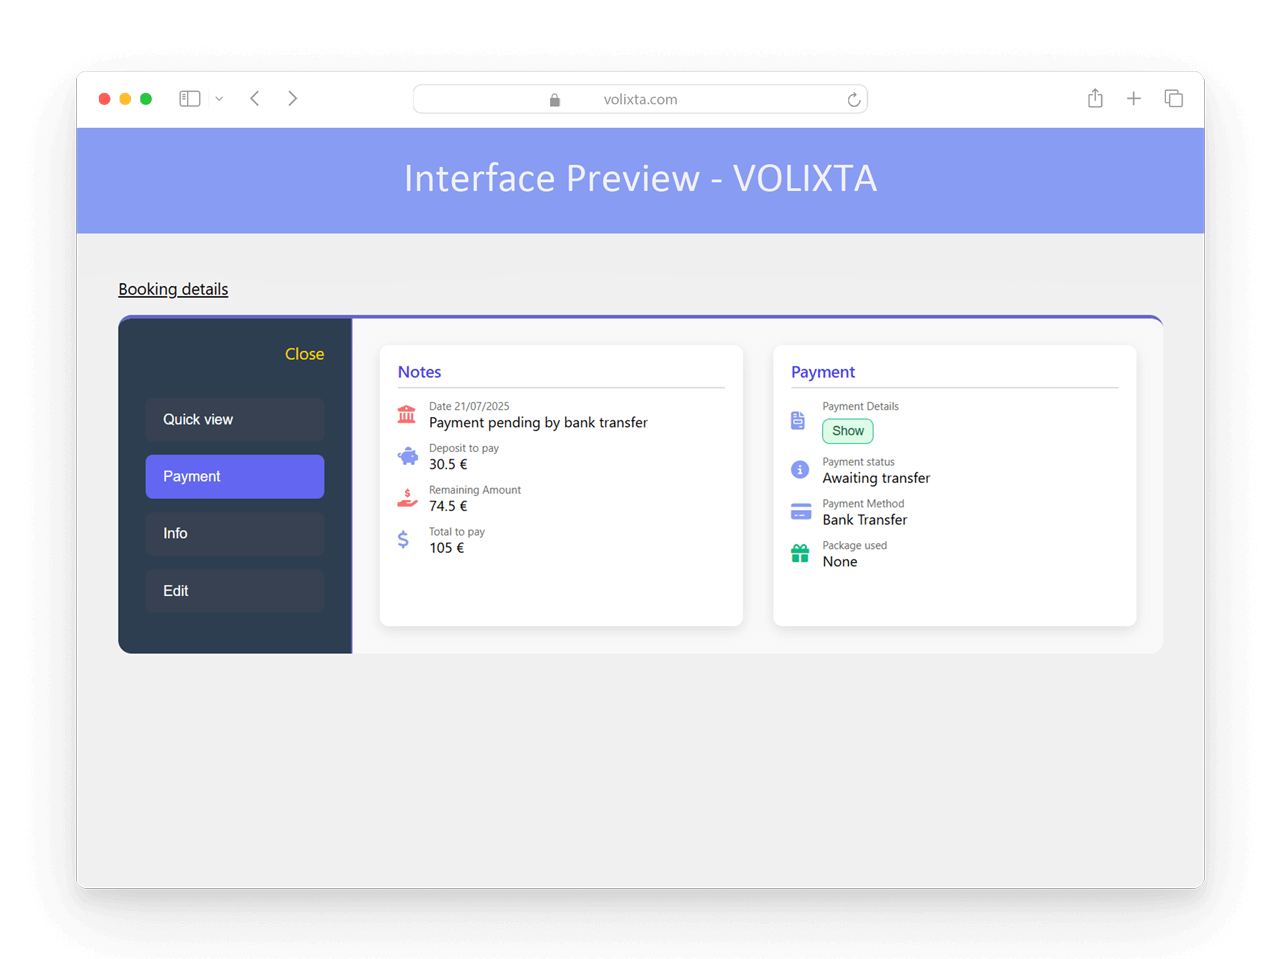
Client Notes
- Displays any notes the client added during the booking process — e.g., preferences, special requests, or instructions.
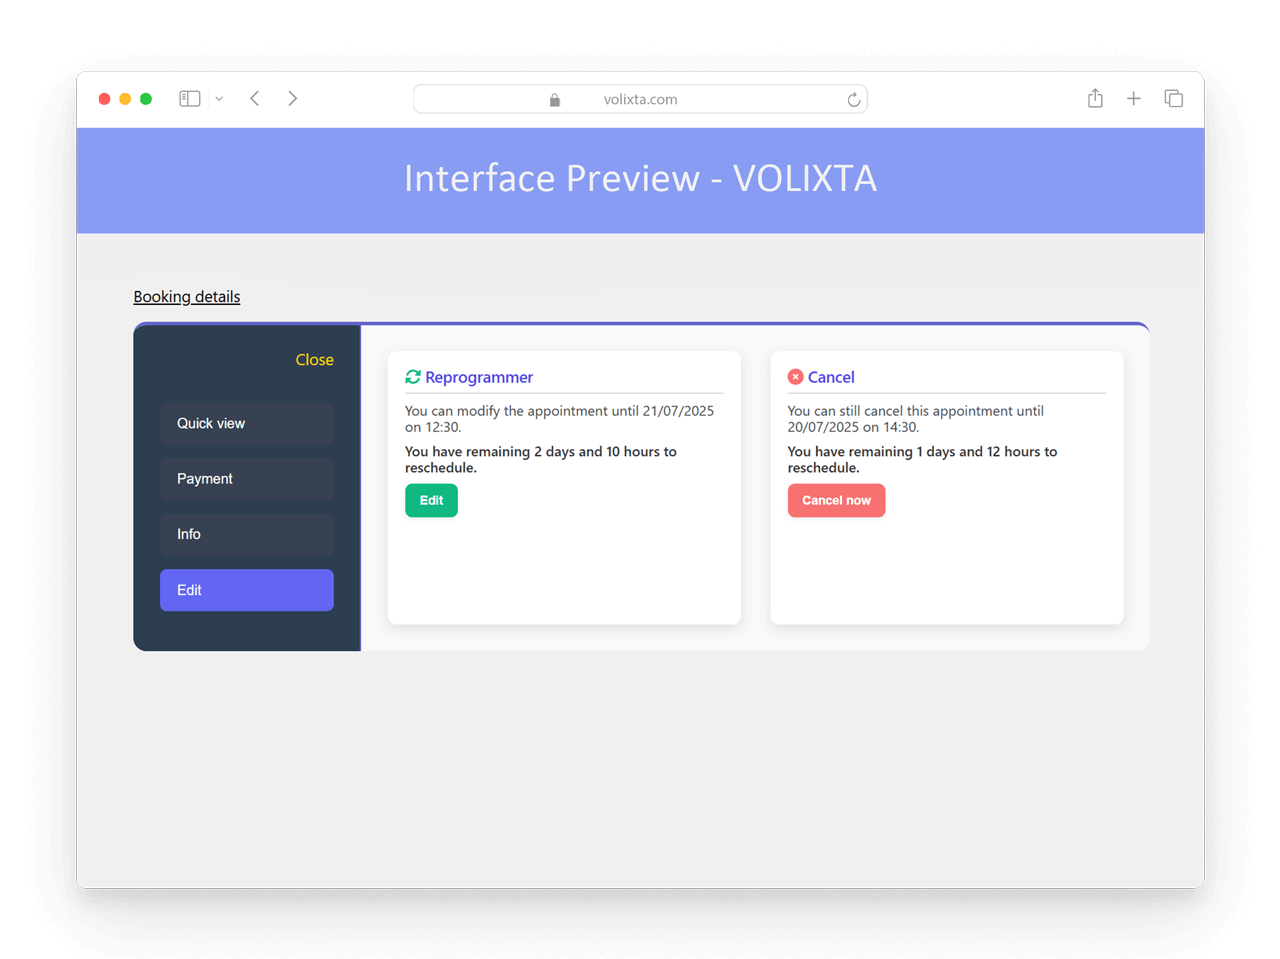
Edit or Cancel
The final tab allows authorized users to reschedule or cancel the appointment.
🔐 Permission-Based Access
To maintain control, booking actions are restricted based on role permissions:
- Employees can reschedule or cancel bookings only if allowed by their role
- Clients can do so only if your rules allow it (e.g., respecting minimum notice)
- Managers can always reschedule or cancel, regardless of any constraints
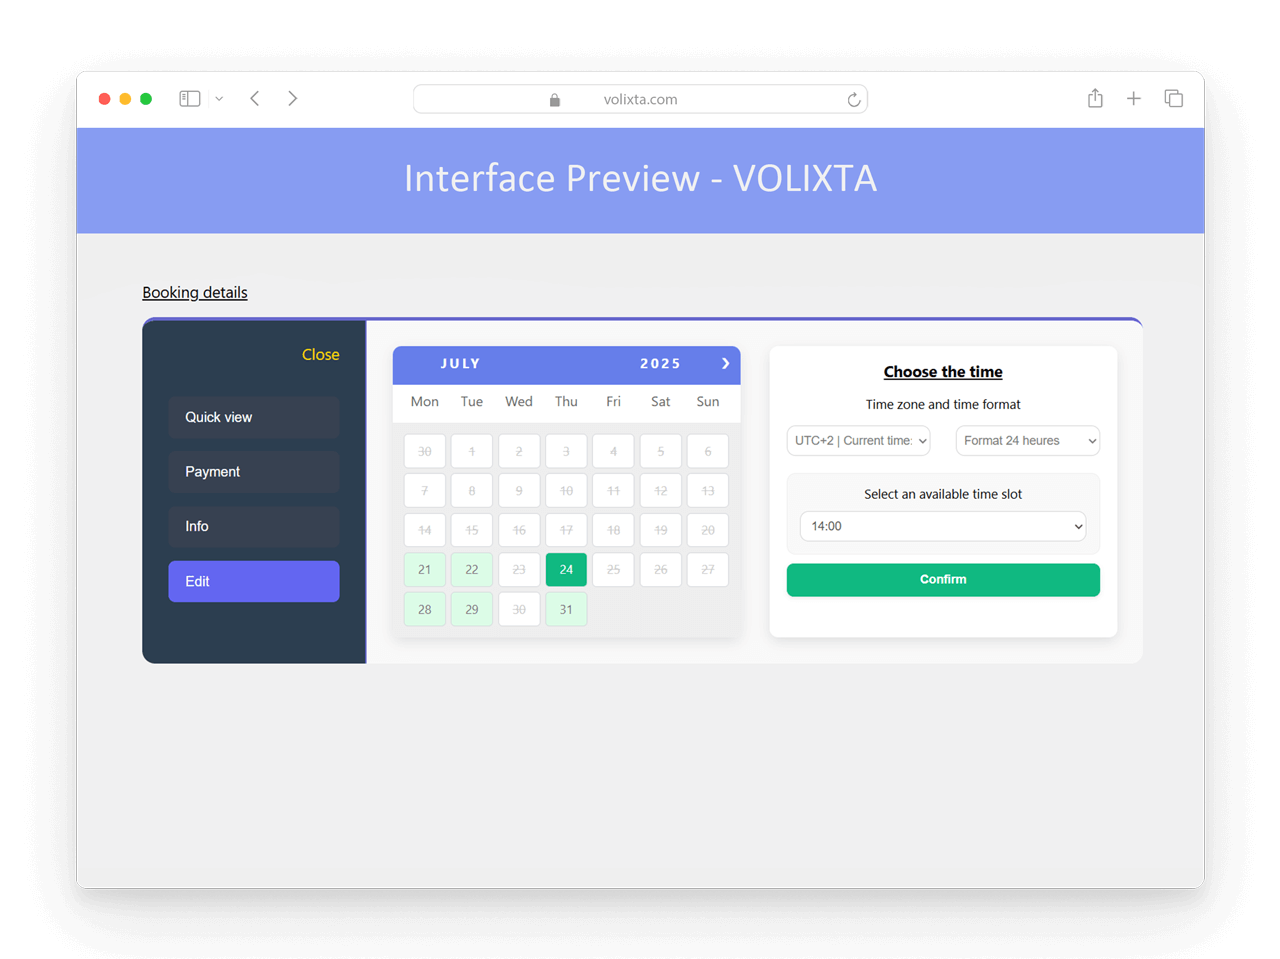
Smart Rescheduling Interface
When rescheduling is triggered, a user-friendly interface appears with:
📅 Date Picker – Choose the new date
🌍 Timezone-Aware Time Picker – Times are shown in the client’s local time
🕒 Time slots — Only valid options are shown based on:
- Employee’s real-time availability
- Service duration and buffer rules
- Assigned location constraints
Everything is updated instantly, and conflicts are automatically avoided.
Buffer Rules Apply
All edits follow your configured Time Rules & Buffers, including:
- Minimum notice before changes are allowed
- Buffer periods before and after bookings
→ Learn more about buffer logic in the Time Rules & Buffers Guide
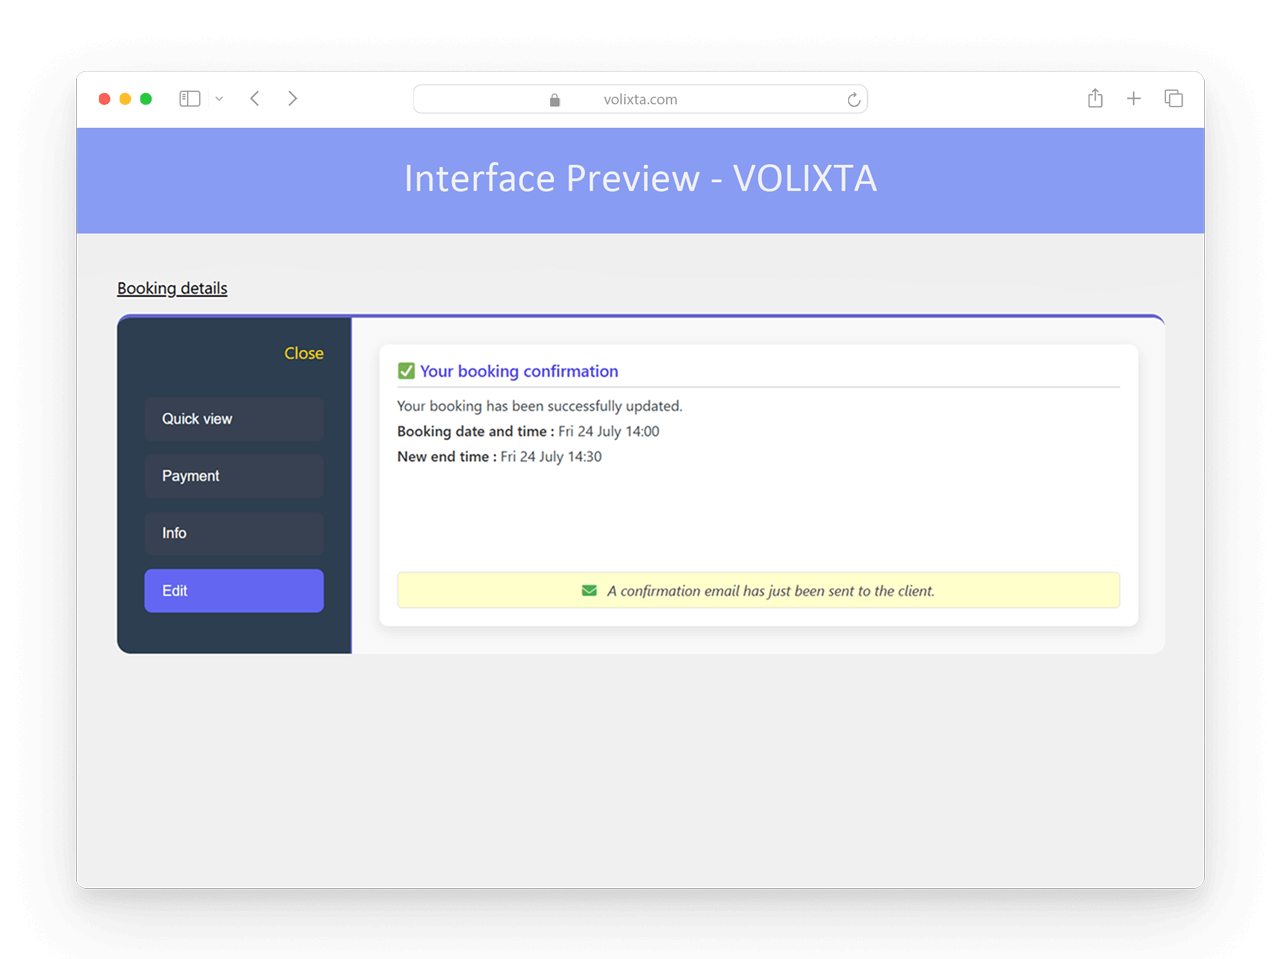
📩 Automatic Notifications
Once a booking is rescheduled or canceled, the system will send:
- An email to the client
- An email to the employee
Each notification clearly states who performed the change (manager or employee), ensuring transparency and avoiding confusion.
📧 Email Notifications for Managers
VOLIXTA helps managers stay in control with real-time email alerts about important booking activity.
Managers receive notifications for:
- ✅ New bookings — includes employee name, client name, service, location, date and time
- ✏️ Rescheduled appointments — shows updated date and time
- ❌ Cancellations — with client and staff details, booking date and time
These emails help managers monitor bookings, staff activity, and customer behavior — without needing to log in constantly.
📆 Booking on Behalf of a Client
As a manager, you can easily create a booking for any client using two flexible methods — both integrated into VOLIXTA’s CRM interface.
Two Ways to Start a Booking
- From the Client Profile
Inside any client profile, click the “New Booking” button to open the full step-by-step booking flow. This version is slightly different from the public form — streamlined for faster admin use and with full control over payment and package usage. - From the Client’s Booking List or Calendar
When you click the “View Bookings” icon from the customer list, a filtered view of that client’s appointments appears. In both the list and calendar modes, you’ll find the same “New Booking” button for quick access.
🧭 Booking Flow — Explained Step-by-Step
The booking flow is divided into 5 clear steps. Don’t worry — each step is lightweight and dynamically adapts to your selections.
Step 1: Choose Service and Details
Step 1: Choose Service and Details
- Service Type — categories grouping the services offered
- Main Service — select the primary service
- Number of People — appears if the service supports group sessions
- Location — only locations available for the selected service
- Staff Member — filtered by service and location
➡️ Each selection dynamically affects the next fields. A helpful assistant panel will guide you along the way.

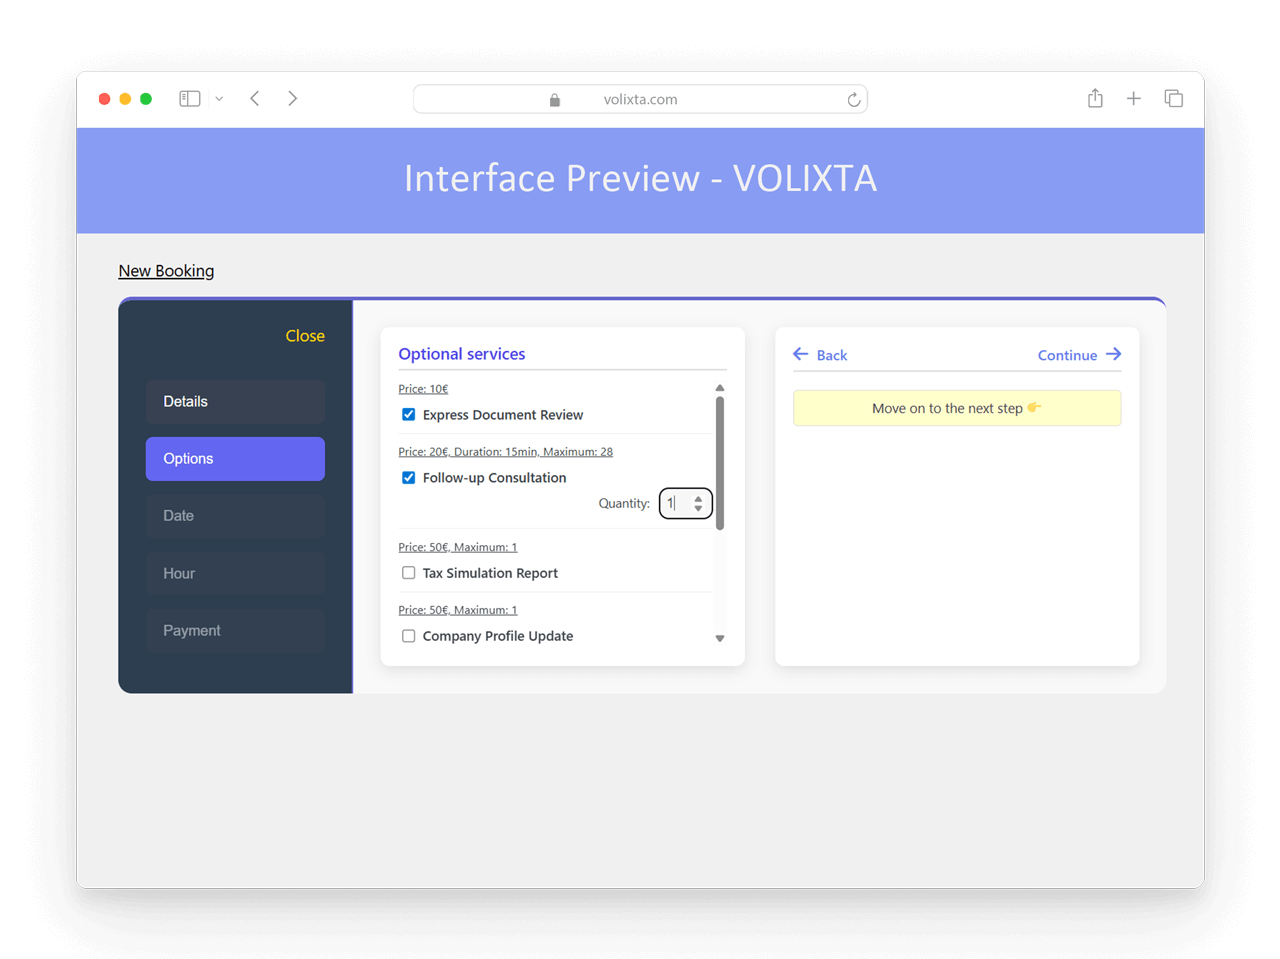
Step 2: Optional Services (if available)
If the selected main service includes optional add-ons, this step appears.
Here you can:
- Select any optional services
- Choose quantity
- Extended durations (if configured) are automatically added
🔁 If there are no related services, this step is skipped entirely.
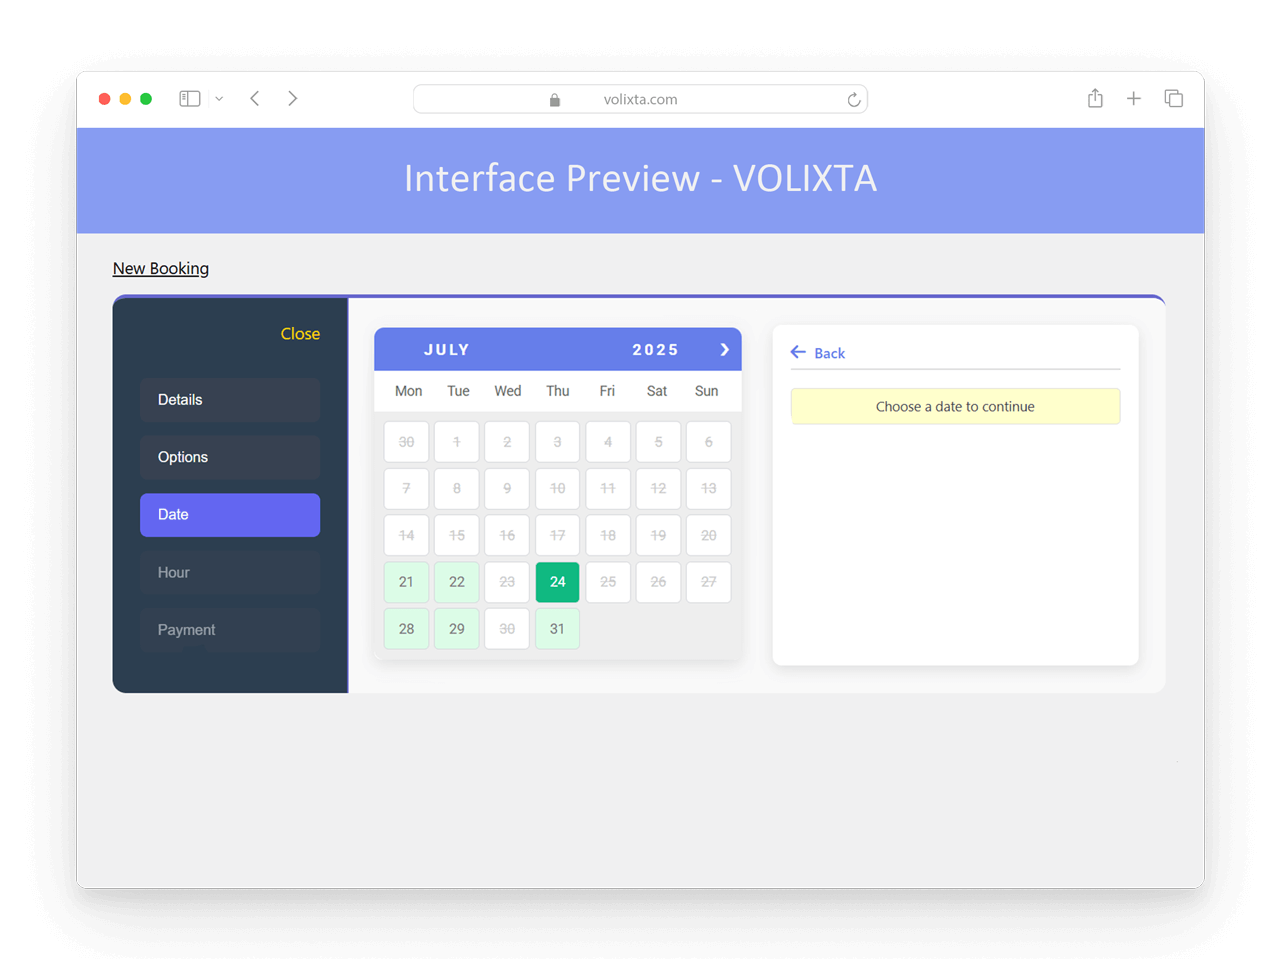
Step 3: Select a Date
A clean, minimalist calendar lets you choose the desired date. Only available days are shown based on:
- Staff availability
- Service duration and scheduling rules
- Selected location constraints
🧭 Each location may offer different working hours and available staff, so the calendar dynamically updates based on your earlier selections.
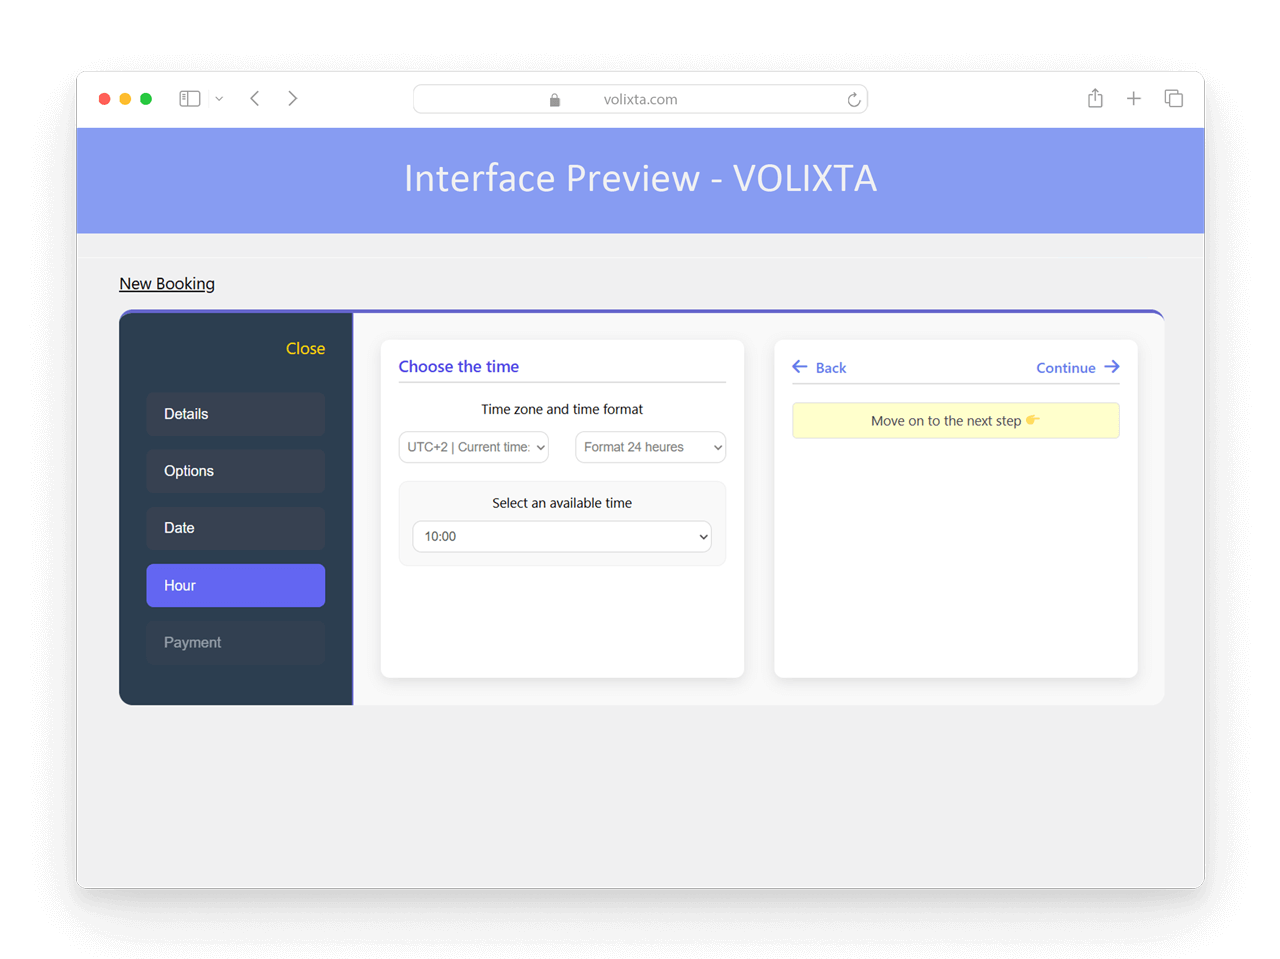
Step 4: Select Time Slot
Timezone selector (automatically matched to your browser or the client’s)
Time format (12h / 24h) auto-adapted
Only valid slots are shown based on:
- Staff availability
- Service duration and buffer rules
- Location constraints
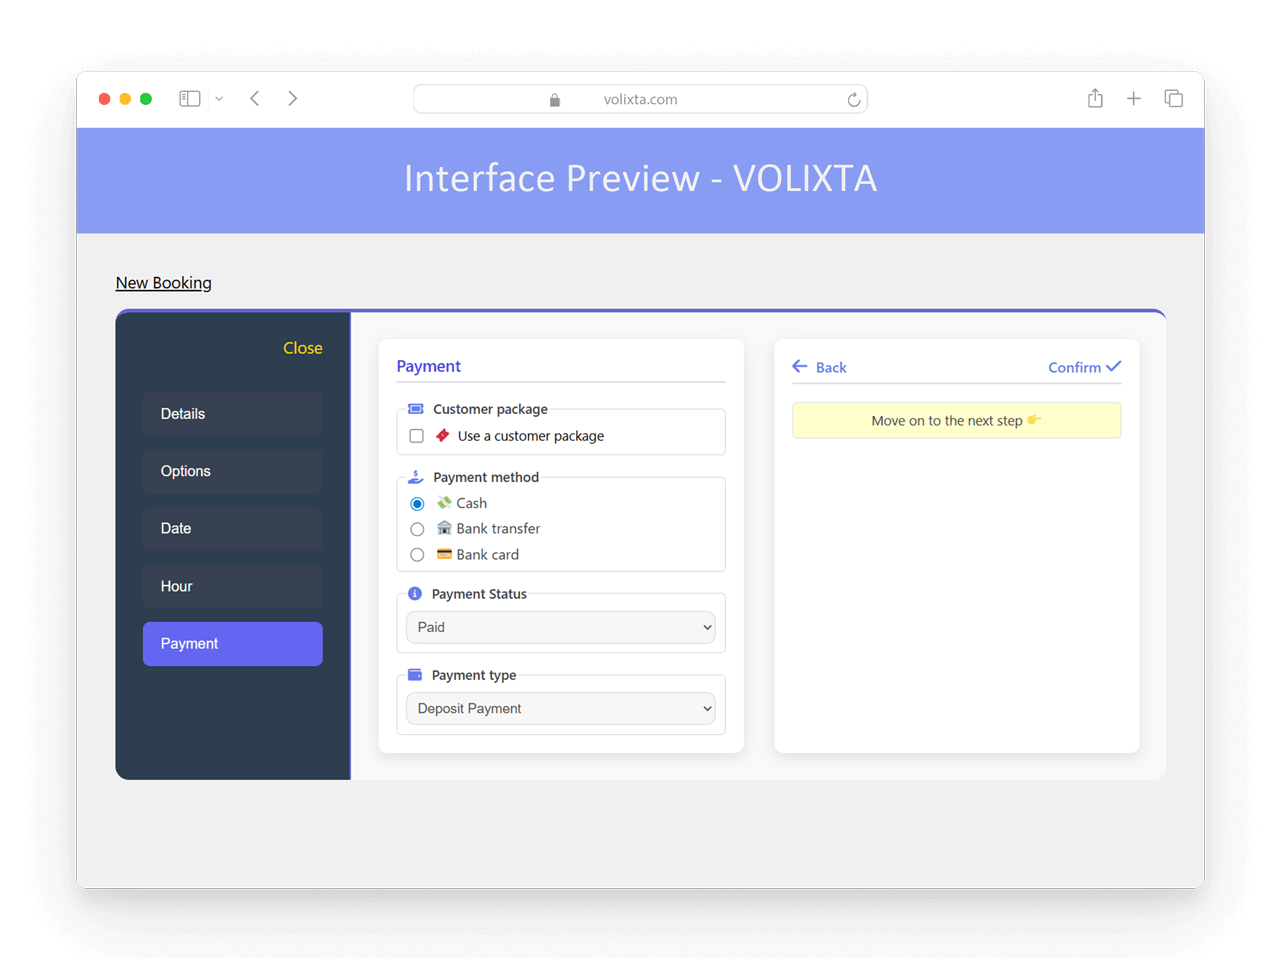
Step 5: Finalize Booking & Payment
You now choose how the booking will be paid.
- 💳 Use available client packages
- 💼 Select a payment method: Cash, Bank Transfer, or Card
- 💸 Choose payment status: Paid, Unpaid, or Pending
- 💰 If deposits are enabled, choose between full or partial payment
⚠️ Not sure about pricing or deposit amounts?
No need to calculate manually — VOLIXTA automatically computes the total based on:
- Service price
- Optional services
- Deposit rules
- Any applicable discounts or taxes
This 5-step process is optimized for managers: flexible, guided, and synced with the client’s package and e-wallet data — making complex bookings simple.
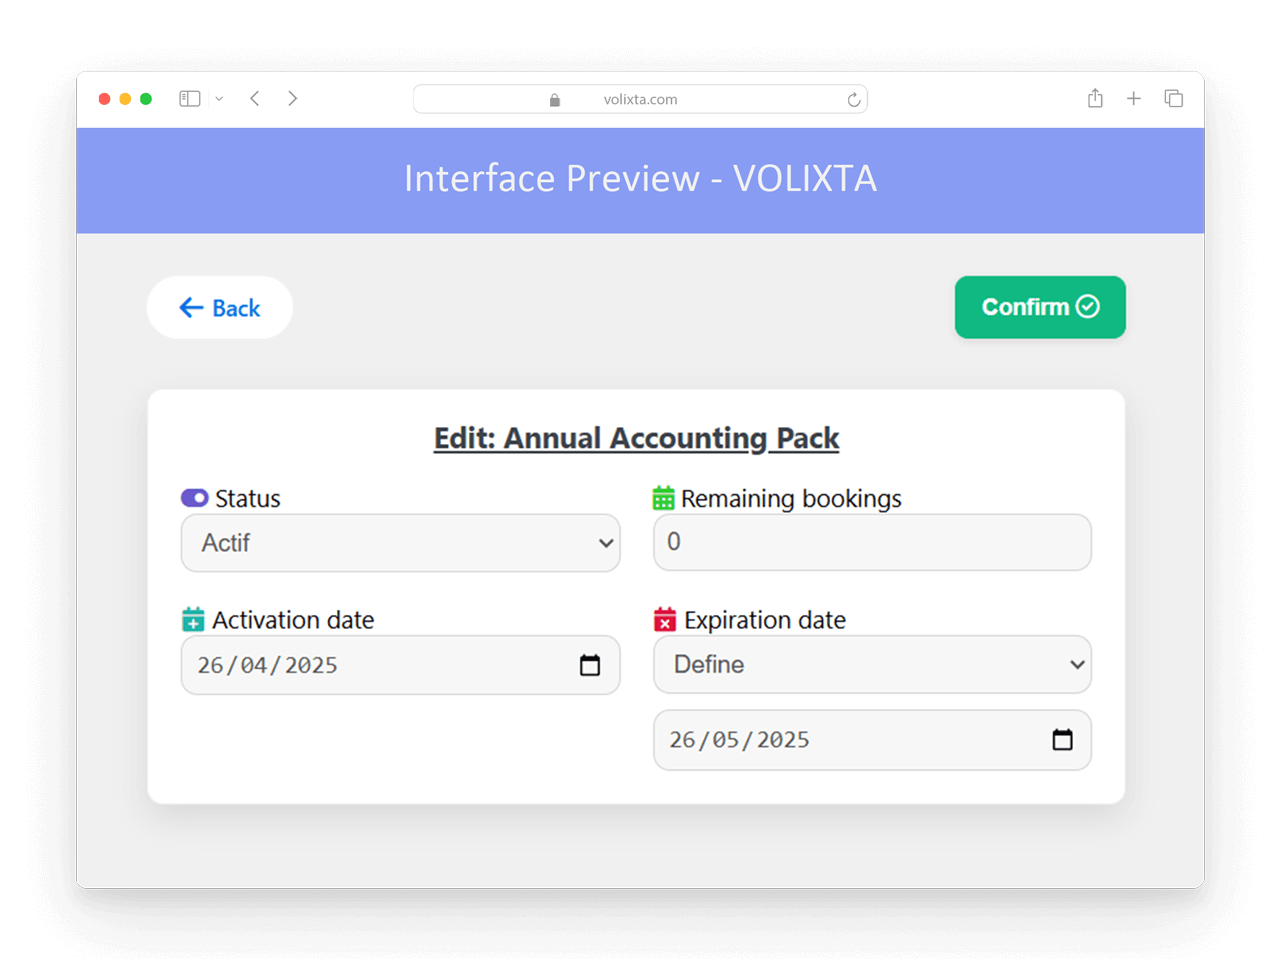
🎁 Package Management
Managers have full control over client packages — beyond just assigning them.
For each package, you can:
- ✅ Assign manually to a client
- 🔄 Activate or deactivate the package at any time
- 🗓️ Modify the activation date — useful if the package should start only after a specific day
- ♾️ Set or remove an expiration date — including unlimited duration
- 🔢 Adjust the number of bookings included
Clients will see all their active packages grouped in their portal, keeping everything organized.
👉 To learn more about building and customizing packages, visit the article: Service & Package Builder.
📦 Package List (Manager View)
This powerful sub-section lets managers view all created packages in a central table. For each package, the list displays:
- Package name
- Quantity available
- Number of bookings per unit
- Validity period (duration)
- A “View” button to explore usage details
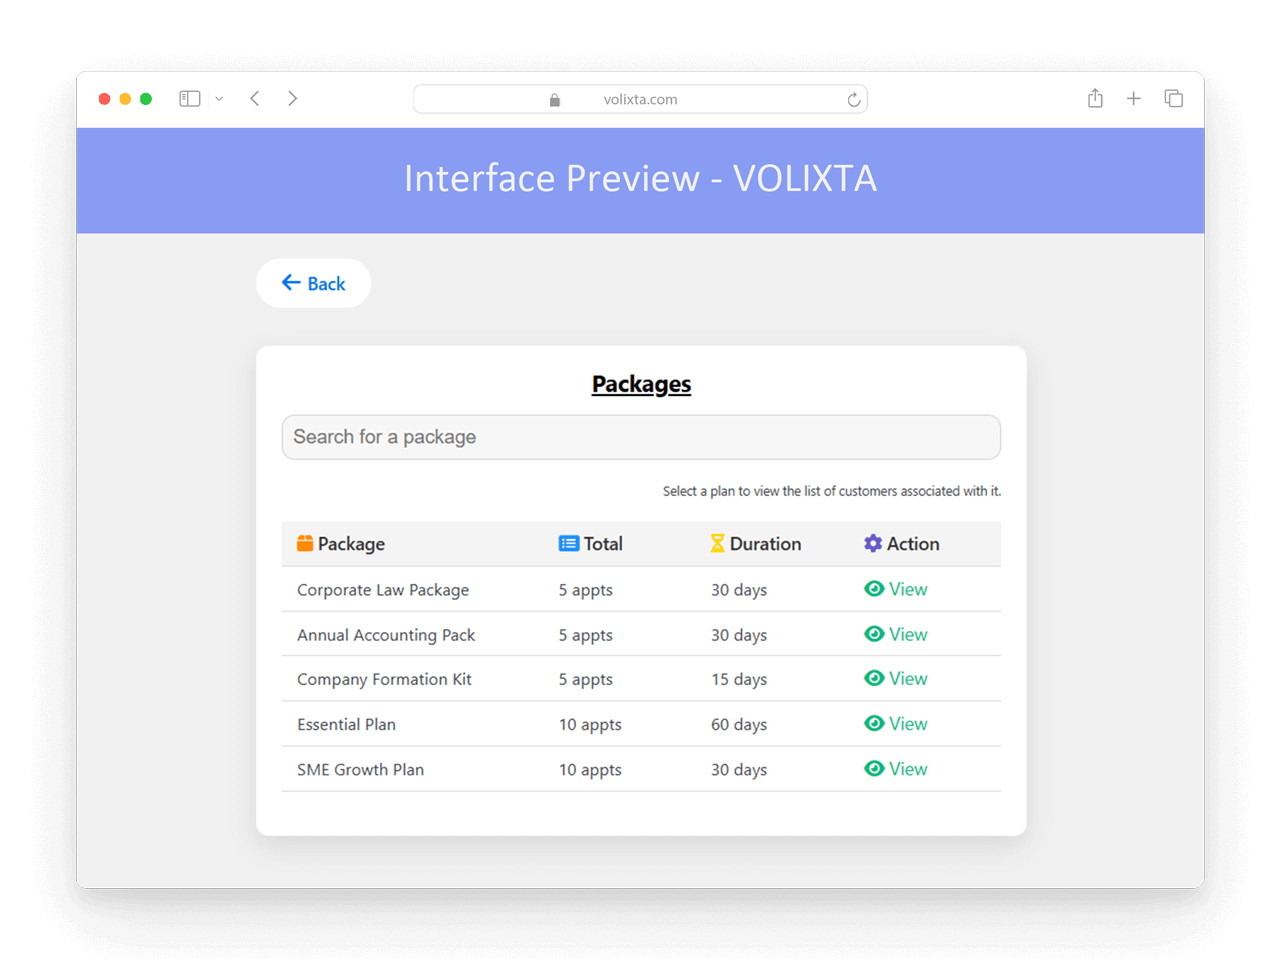
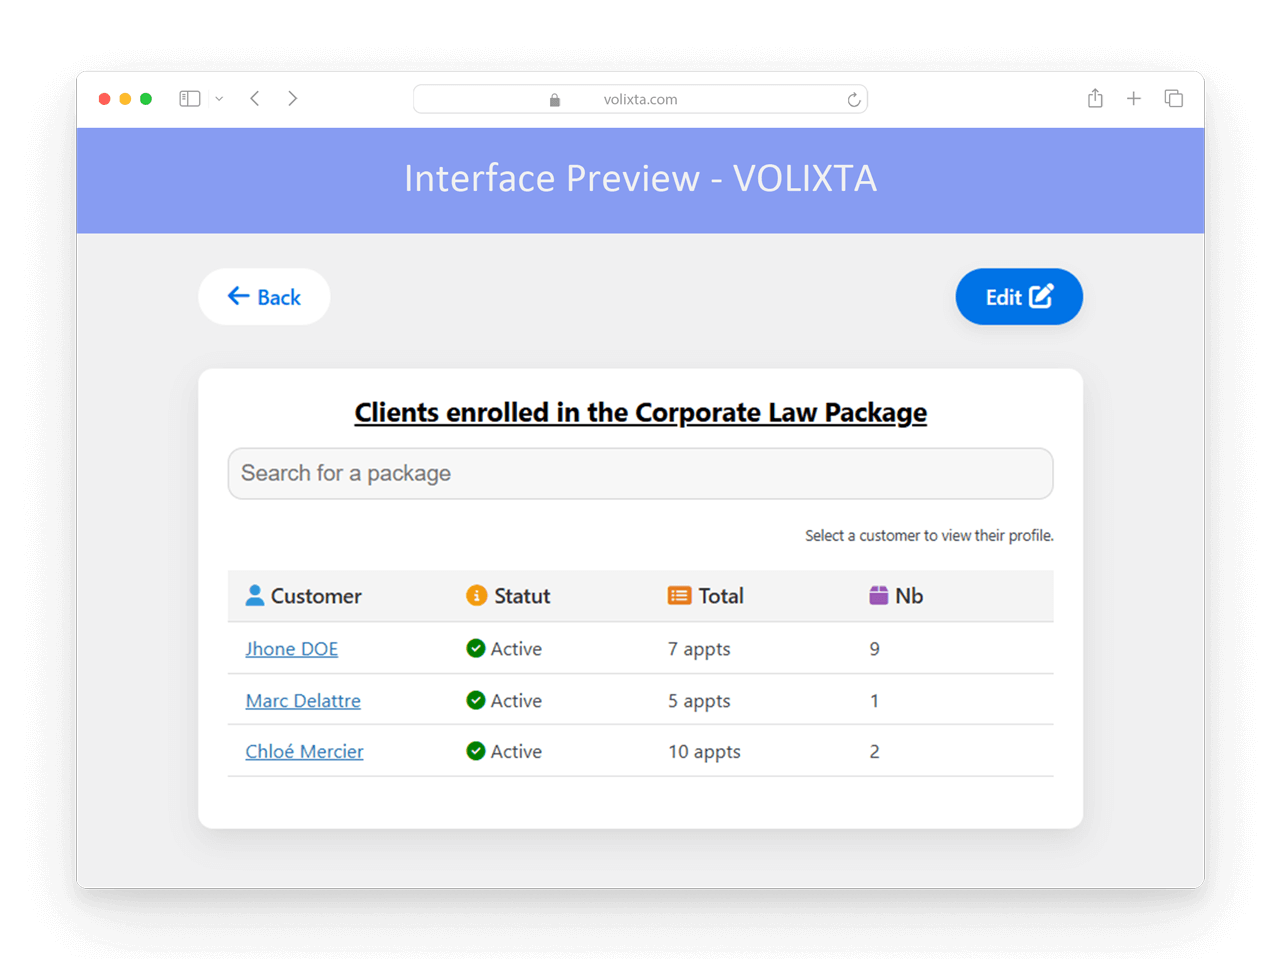
📊 What happens when you click “View”?
A second table appears, showing all clients who currently own the selected package. You’ll see:
- Full name of each client
- Current status of their package (Active, Expired, Pending)
- Number of bookings remaining
- Number of times the same package was purchased
You can click on a client’s name to instantly open their profile — where all their packages and usage history are shown in detail.
⚙️ Bulk Actions from the Package List
This view isn’t just informative — it’s also interactive. Each listed package includes an Edit button that opens bulk management options. From there, you can:
- ✅ Assign the selected package to multiple clients at once (using checkboxes)
- ⛔ Deactivate packages for selected clients in bulk — useful for suspensions or corrections
- 🔎 Jump into individual profiles to manage package details in full
❌ To permanently remove a package from a specific client, you’ll need to do so from their profile. This ensures full traceability and avoids accidental loss of usage data.
💡 Why use the Package List?
Because it allows you to:
- Instantly identify which clients are using a specific package
- Take mass actions (assign, disable) across multiple profiles in seconds
- Monitor package distribution and usage across your entire client base — without jumping between individual profiles
This makes managing packages at scale faster, smarter, and safer.
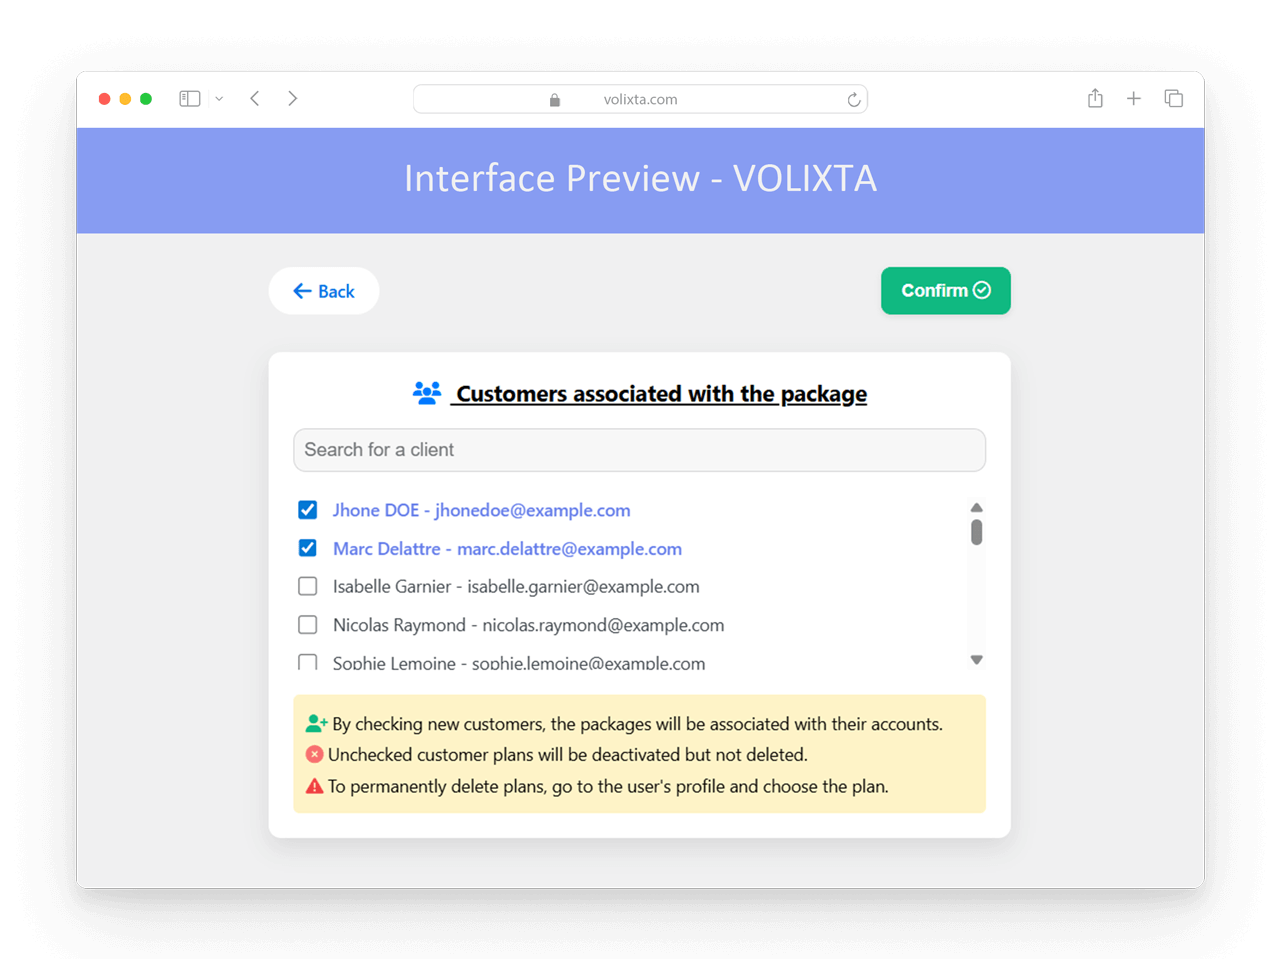
🎯 Assign a Package to Multiple Clients
The Assign Package section is the recommended method for bulk assigning packages. This screen resembles the standard Package List, but instead of a “View” button, each row includes an “Assign” button.
Why this method is preferred:
- 🖼️ When selecting clients to assign a package, you’ll see their profile photo, name, and current status — making it easier to identify the right people at a glance.
- ✅ No risk of accidentally removing the package from clients who already own it — existing packages remain intact.
- 🧠 The interface prevents confusion during bulk operations, especially when clients already have multiple packages.
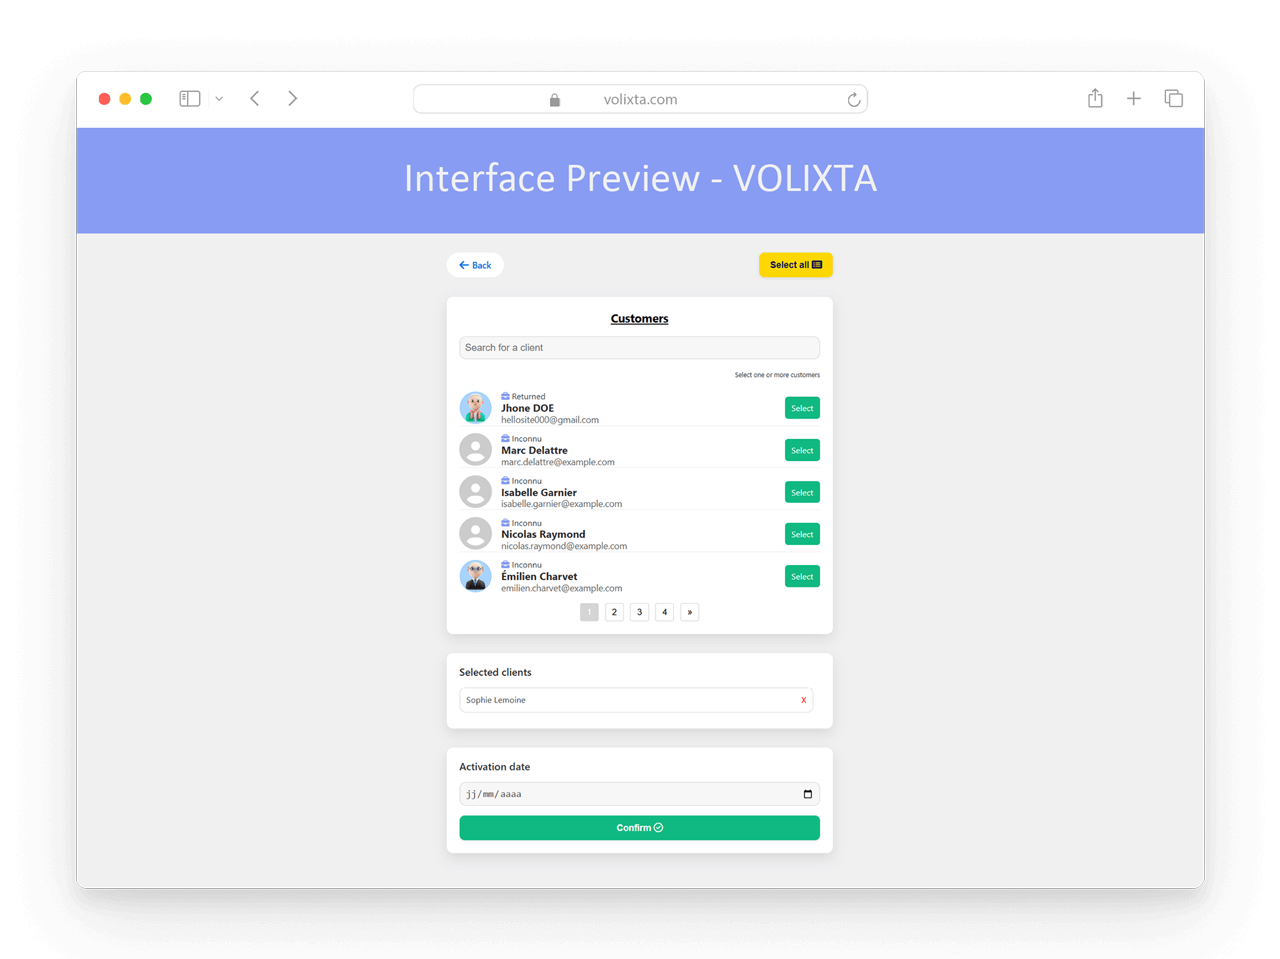
How it works:
- Click the Assign button next to the desired package.
- A customer list appears with profile photos, names, and statuses.
- Select one or more clients.
- Confirm the assignment — the package is added immediately.
This streamlined flow is ideal for:
- Adding packages during promotions or onboarding
- Rewarding loyal clients with prepaid sessions
- Managing package access in bulk without mistakes
💳 Booking Credits & Wallet System
Clients can use virtual credits to pay for bookings — whether gifted, refunded after a cancellation, or reloaded manually.
From the customer profile, managers can add or subtract credits (manually or after a refund).
Clients can also recharge credits directly from their portal.
👉 Learn more in the article: Booking Credits & Gift System
❓ Frequently Asked Questions – Client Management (CRM)
Do clients need a WordPress account to access the portal?
No. VOLIXTA creates a private client account during the booking process or when added by an admin. Clients log in through the VOLIXTA interface — no access to the WordPress backend is needed.
Can I link an existing WordPress user to a client profile?
Yes. During client creation, you can either create a new user or link an existing WordPress account.
Where can I see a client’s booking history?
Booking history is not shown directly in the profile view. Use the 📅 View Bookings icon in the customer list to access a client’s complete appointment list — with filters and optional calendar view.
What details are included in a client profile?
Full name, contact information, address, profile photo, e-wallet balance, and assigned packages. All fields are editable from the admin interface.
Can managers add bookings on behalf of a client?
Yes. From the client profile, managers can create new appointments, apply packages, use credits, reschedule, or cancel existing bookings.
How can I manage a client’s packages?
Packages can be assigned manually, activated/deactivated, edited (e.g. start date, expiration, session count), or removed (from the client profile only). A detailed package history is also available.
What’s the difference between ‘View’ and ‘Assign’ in the Package List?
View: shows all clients who currently own the selected package.
Assign: lets you assign the package to multiple clients, using a visual interface with profile photos and statuses.
The Assign method is safer for bulk actions.
Can clients recharge their own booking credits?
Yes. Clients can recharge their virtual wallet from their portal. Managers can also add or refund credits manually from the client profile.
Can I manage all packages in one place?
Yes. The Package List shows all available packages. From there, you can track usage, assign packages in bulk, and disable them for selected clients — all without opening individual profiles.
What triggers email notifications to managers?
Managers automatically receive emails for:
- New bookings
- Rescheduled appointments
- Cancellations
Each message includes full details: client name, employee, service, time, and location.
💬 Need help?
Visit our Help Center or Contact Support for technical assistance.