
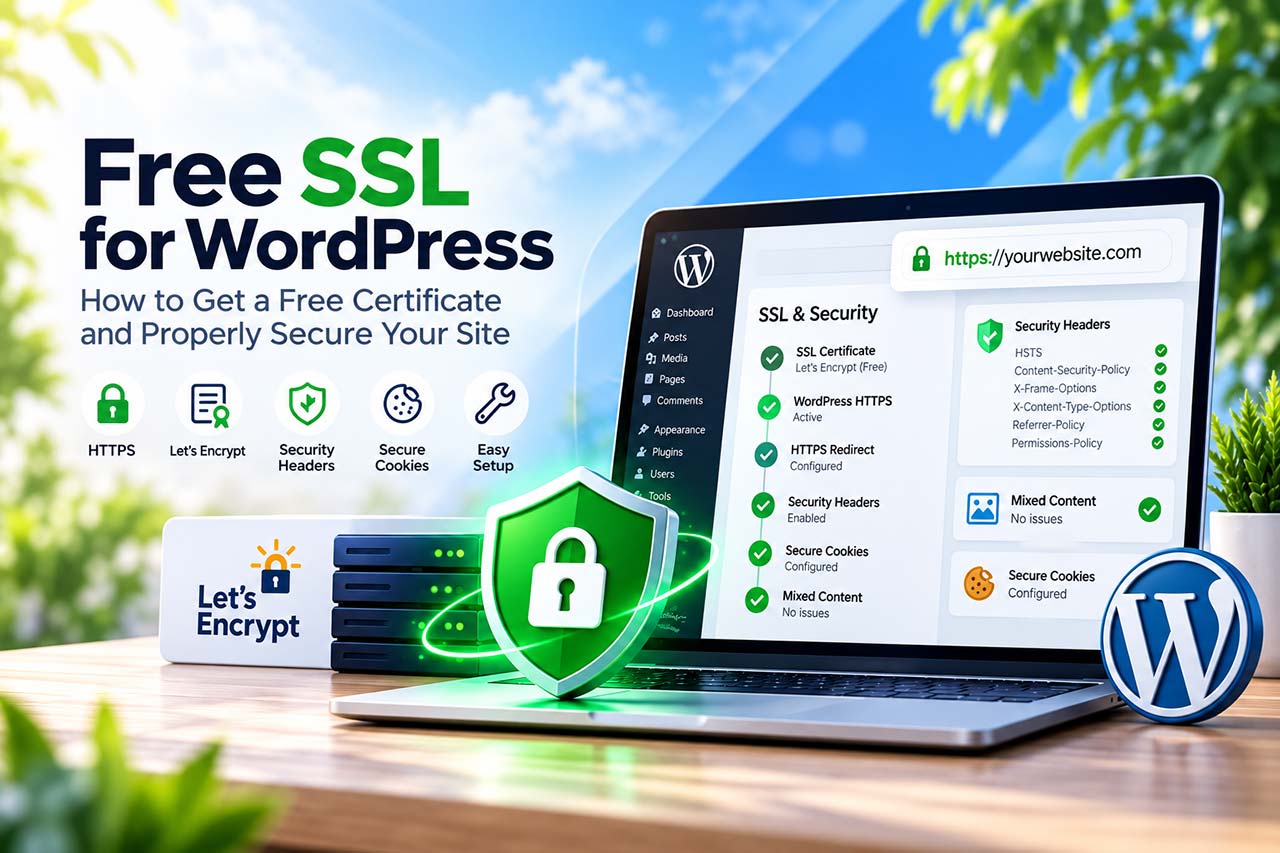
And getting a free SSL certificate is only one part of properly moving a WordPress site to HTTPS.
You still need to think about certificate validation and installation, HTTP-to-HTTPS redirects, mixed content, renewal, secure cookies, HSTS, Content Security Policy and other browser security headers.
So installing a free SSL certificate for WordPress and seeing the padlock in your browser doesn’t necessarily mean the job is finished.
In this guide, we’ll look at how to get a free SSL certificate, what a proper WordPress HTTPS setup actually involves, how free SSL certificates work, and then go through the complete process using Volixta SSL & Security Headers, a free WordPress plugin.
The goal isn’t to enable every security option available.
It’s to understand what each protection does, why you might need it, and how to configure it without blindly changing sensitive server settings.
Can You Really Get a Free SSL Certificate?
Yes.
Let’s Encrypt is a nonprofit Certificate Authority that issues SSL/TLS certificates for free.
That means you can get a free SSL certificate for a WordPress website without purchasing the certificate itself. A Let’s Encrypt certificate provides the trusted HTTPS connection expected by modern browsers.
The certificate itself may be free, but there is still a process around it:
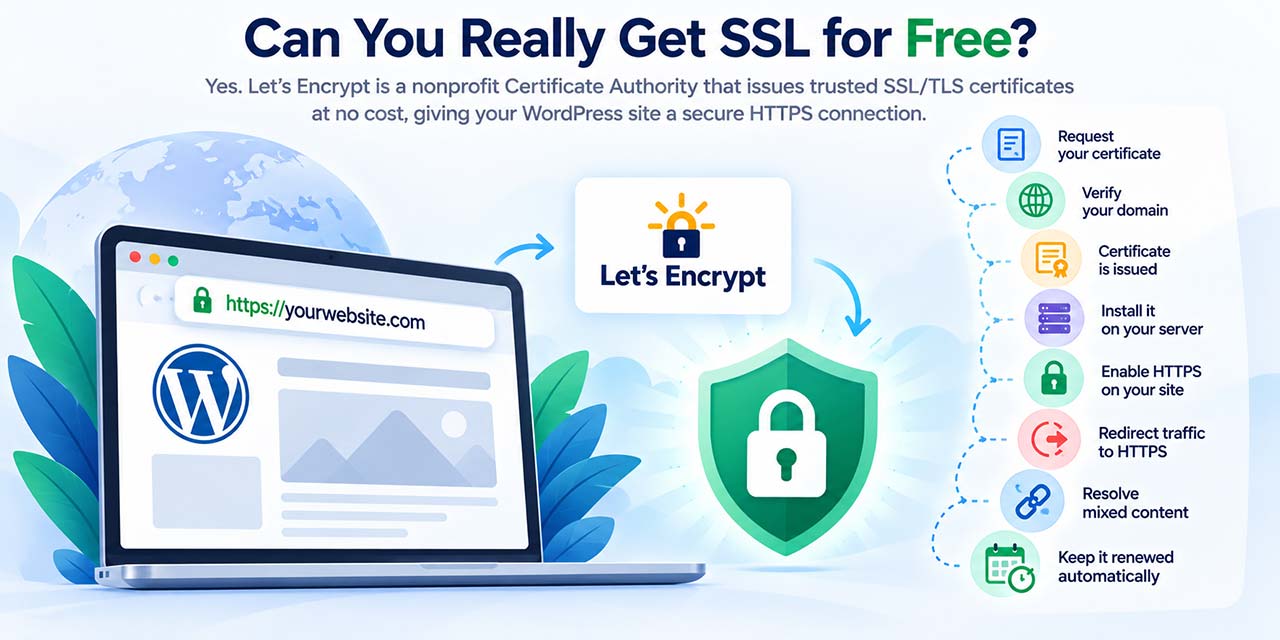
Request certificate
↓
Prove domain ownership
↓
Certificate issued
↓
Install certificate
↓
Enable HTTPS
↓
Redirect HTTP → HTTPS
↓
Fix mixed content
↓
Renew certificate later
Some hosting providers automate almost all of this.
Others don’t.
And sometimes you may want or need to manage the certificate from WordPress itself.
Volixta includes ACME v2 support for requesting free Let’s Encrypt certificates directly from WordPress.
But before getting into the installation process, it’s worth understanding what the certificate actually solves.
Free SSL vs Paid SSL Certificates
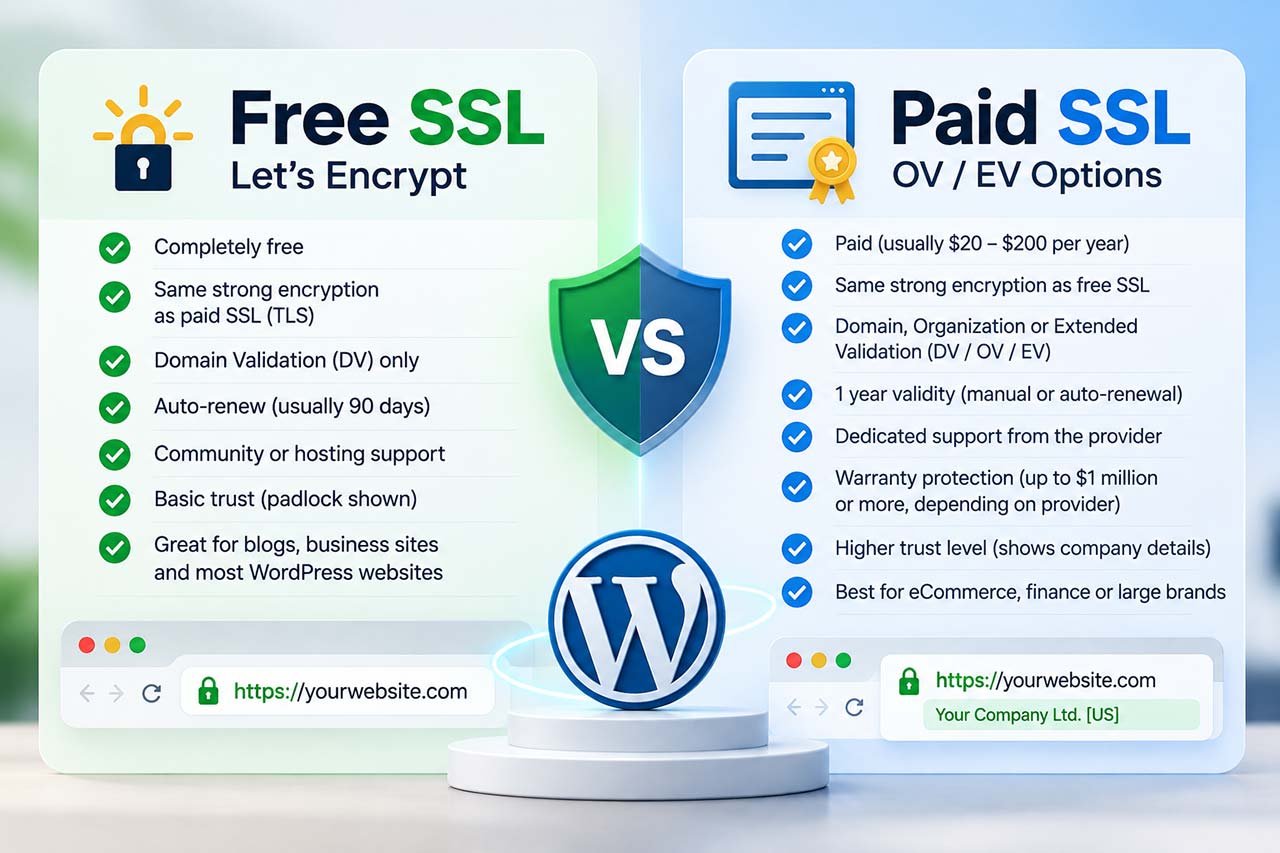
A common question is whether a free SSL certificate is somehow less secure than a paid one.
When it comes to the encryption of the HTTPS connection itself, the answer is generally no.
A free certificate from Let’s Encrypt can provide the same fundamental HTTPS encryption expected by modern browsers. The difference between free and paid certificates is generally not about making the encryption “stronger.”
| Feature | Free SSL Certificate | Paid SSL Certificate |
|---|---|---|
| Cost | Free | Varies by provider |
| HTTPS encryption | Yes | Yes |
| Domain Validation (DV) | Common | Available |
| Organization Validation (OV) | Usually not offered | Available from some providers |
| Extended Validation (EV) | Usually not offered | Available from some providers |
| Renewal | Often automated, depending on the setup | Depends on the provider and setup |
| Commercial support | Depends on the host or service | Often available |
| Warranty | Typically not included | May be included |
| Best suited for | Most WordPress sites that need standard HTTPS | Sites that specifically need additional validation, support or commercial features |
Free SSL certificates such as those issued by Let’s Encrypt use Domain Validation, or DV.
That means the Certificate Authority verifies that you control the domain, but it doesn’t verify the legal identity of the organization behind the website.
Some paid certificates can offer additional validation, such as Organization Validation or Extended Validation.
Paid providers may also include commercial support, warranty programs or additional certificate-management services.
But if the goal is simply to enable trusted HTTPS on a normal WordPress website, a free SSL certificate is often enough.
The important part is what happens after the certificate is issued.
A paid certificate won’t automatically fix mixed content, configure redirects, secure cookies, add browser security headers or make a broken HTTPS setup work correctly.
Those are separate parts of the configuration.
Is Free SSL Enough for WordPress
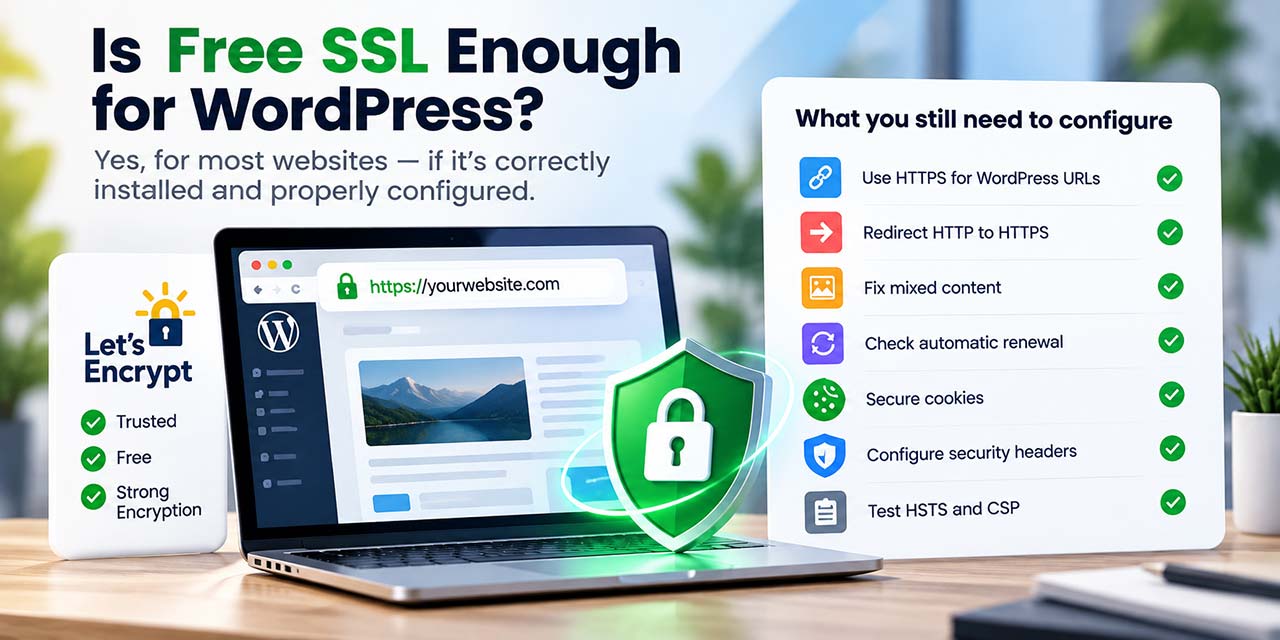
For many WordPress websites, yes.
If you need a trusted HTTPS connection for a blog, business website, portfolio, documentation site or normal WordPress installation, a free SSL certificate from a trusted Certificate Authority such as Let’s Encrypt can provide the encryption you need.
But it’s important to separate two questions:
Is a free SSL certificate enough?
and
Is installing an SSL certificate enough?
Those aren’t quite the same thing.
The certificate can be enough for establishing HTTPS.
But the website may still need additional configuration.
For example, you may still need to:
- Move WordPress URLs to HTTPS
- Redirect HTTP traffic to HTTPS
- Fix mixed content
- Check certificate renewal
- Protect cookies
- Configure Security Headers
- Test HSTS and CSP
So the limitation usually isn’t that the SSL certificate is free.
The limitation is assuming that the certificate alone completes the entire HTTPS setup.
If your free SSL certificate is trusted, correctly installed and renewed before it expires, there’s no reason to replace it simply because it didn’t cost anything.
For most WordPress sites, the more important question is whether HTTPS is configured properly around that certificate.
What Does an SSL Certificate Actually Protect?
When someone opens:
https://example.com
HTTPS establishes an encrypted connection between the browser and the server.
Without HTTPS, traffic traveling between them may potentially be observed or modified by an intermediary.
HTTPS protects that communication and allows the browser to verify the certificate presented for the domain.
But a valid SSL certificate doesn’t automatically mean that everything on the website is correctly configured.
For example, you could have:
https://example.com
while the page still loads an image from:
http://example.com/wp-content/uploads/image.jpg
The SSL certificate is valid.
The main page uses HTTPS.
But one of its resources still uses HTTP.
That’s mixed content.
The same distinction applies to redirects, cookies and browser security headers.
So there are really two different statements:
“I have an SSL certificate.”
and:
“My WordPress website is correctly configured for HTTPS.”
They’re related, but they’re not the same thing.
How Free Let's Encrypt SSL Certificates Work
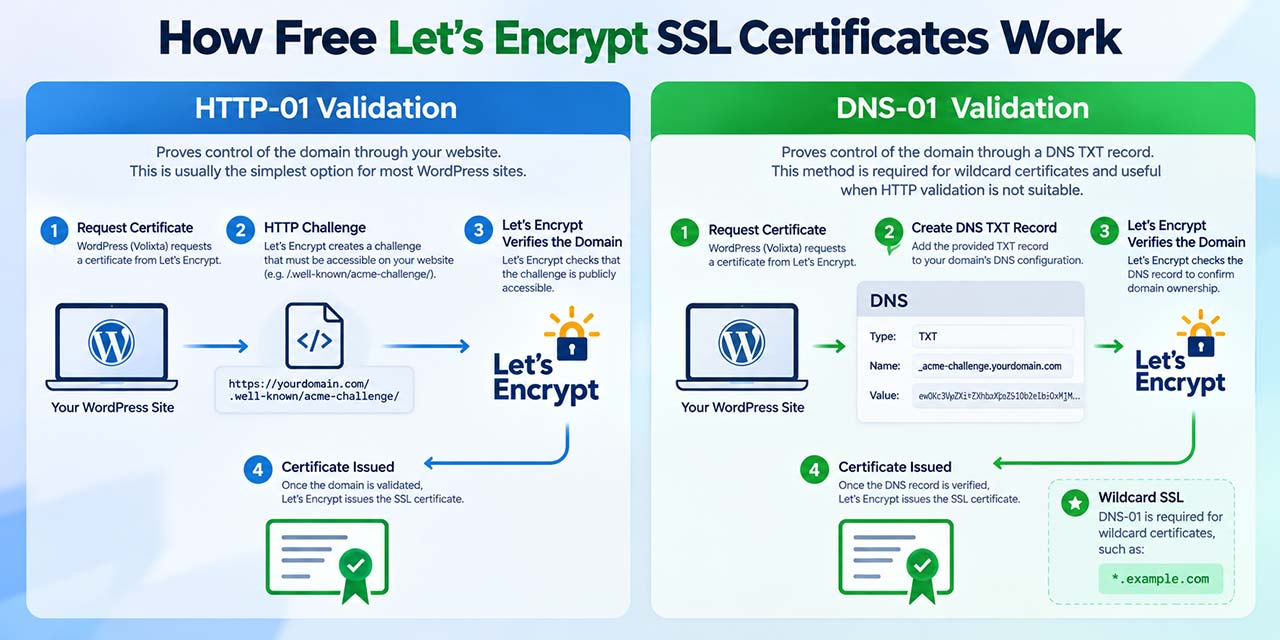
Before Let’s Encrypt can issue a free SSL certificate, you first have to prove that you control the domain.
First, you have to prove that you control the domain.
Volixta supports two ACME validation methods: HTTP-01 and DNS-01.
HTTP-01 Validation
HTTP-01 proves control of the domain through the website itself.
The process looks roughly like this:
WordPress
↓
Certificate request
↓
Let’s Encrypt
↓
HTTP challenge
↓
Let’s Encrypt checks the domain
↓
Domain validated
↓
Certificate issued
A special challenge must be publicly accessible from the domain.
When the environment supports it, Volixta can handle this HTTP-01 validation automatically.
For a normal WordPress website, this is usually the simplest approach.
It also makes later renewal easier for eligible production certificates managed by Volixta.
DNS-01 Validation
DNS-01 proves ownership differently.
Instead of providing a challenge through the website, you publish a TXT record in the DNS configuration for the domain.
It uses a hostname based on:
_acme-challenge.example.com
Volixta gives you the TXT value that needs to be published.
Once the record is publicly visible, Let’s Encrypt can verify the domain.
DNS-01 has another important use: wildcard certificates.
For example:
*.example.com
A wildcard certificate can cover multiple subdomains.
Volixta keeps DNS-01 manual rather than requiring access to your DNS provider account.
That keeps DNS-provider credentials out of WordPress, although it also means that renewal requires manual participation.
Getting a Certificate and Installing It Are Two Different Things
This distinction is easy to miss.
When Let’s Encrypt issues your free SSL certificate, that doesn’t necessarily mean your web server has started using it.
The certificate still needs to be installed in the hosting environment.
Different hosts expose different ways of doing this.
Volixta supports certificate installation through compatible integrations for:
- cPanel
- Plesk
- DirectAdmin
If automatic installation isn’t available, the certificate files can instead be downloaded for manual installation.
This matters because WordPress and the web server aren’t the same thing.
A WordPress plugin shouldn’t pretend to control infrastructure that the server doesn’t actually allow it to control.
What If Your Hosting Already Provides Free SSL?
Then you may not need to request another certificate at all.
This is important.
If your hosting provider already includes a valid free SSL certificate and handles its renewal, there’s usually no reason to replace a working setup just because another certificate option is available.
Volixta can check the certificate currently presented by the public website.
You can keep your existing certificate and still use the other HTTPS, mixed-content, Security Headers and cookie features where they make sense.
In other words:
No Volixta certificate ≠ No SSL
The certificate can come from your hosting provider.
After Free SSL Comes HTTPS Configuration
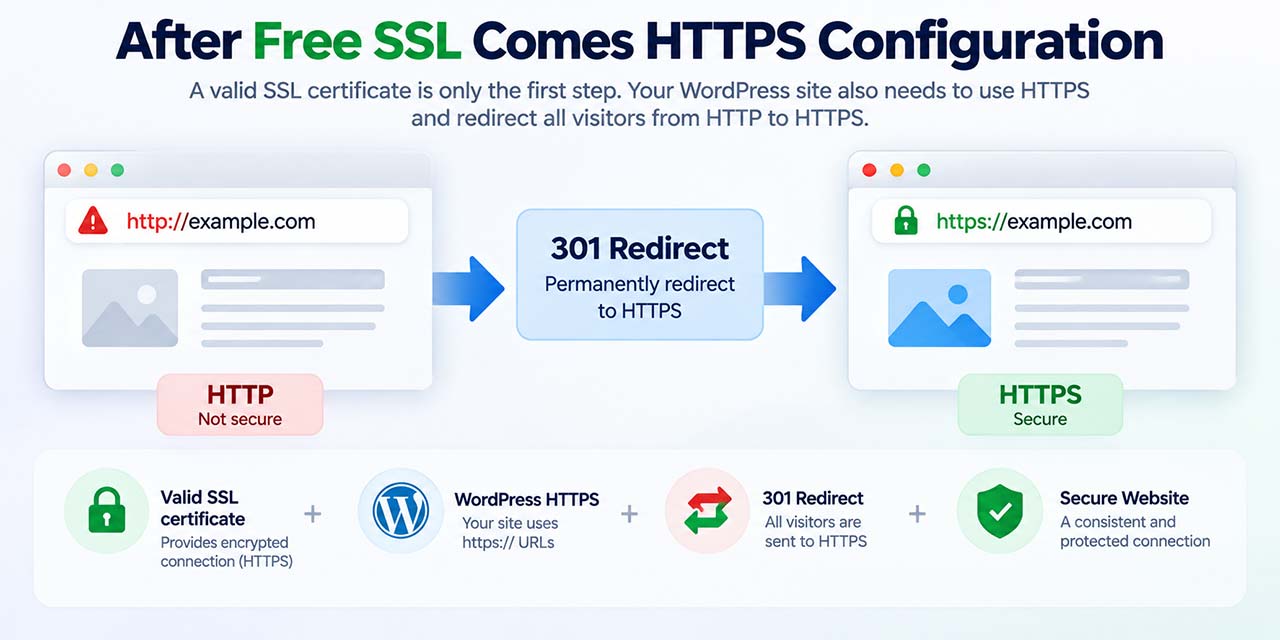
Once your free SSL certificate is installed, WordPress itself still needs to use HTTPS.
Instead of:
http://example.com
the website should use:
https://example.com
Visitors reaching the HTTP version should normally be redirected to HTTPS:
http://example.com
↓
301 Redirect
↓
https://example.com
This sounds simple until different server environments enter the picture.
Apache, LiteSpeed and Nginx Don't Work the Same Way
One WordPress installation might look like:
Browser
↓
Apache
↓
WordPress
Another might use:
Browser
↓
LiteSpeed
↓
WordPress
Another:
Browser
↓
Nginx
↓
WordPress
And a site behind a CDN or reverse proxy could look more like:
Browser
↓
Cloudflare
↓
Reverse Proxy
↓
Web Server
↓
WordPress
Apache and LiteSpeed commonly use .htaccess.
Nginx doesn’t.
A plugin therefore shouldn’t blindly apply the same configuration everywhere.
For supported Apache and LiteSpeed environments, Volixta can manage its own HTTPS redirect rules in .htaccess.
For Nginx and other environments where WordPress can’t safely control the server configuration, it provides the appropriate guidance instead.
Why Editing .htaccess Needs to Be Done Carefully
A WordPress .htaccess file can contain much more than the standard WordPress rewrite rules.
It may contain configuration added by:
- WordPress itself
- caching plugins
- security plugins
- your hosting provider
- redirects
- performance tools
- custom developer rules
Replacing the entire file just to add an HTTPS redirect would therefore be risky.
Volixta manages its own configuration inside identifiable blocks rather than treating the entire .htaccess file as its own.
Conceptually:
Existing configuration
# BEGIN Volixta managed configuration
Volixta rules…
# END Volixta managed configuration
Other existing configuration
The important idea here is ownership.
The plugin should modify the configuration it created without overwriting unrelated server rules.
Before supported managed .htaccess changes, Volixta also uses backups and file consistency checks.
If something can’t safely be changed automatically, leaving it alone and providing guidance is preferable to forcing the change.
Why SSL Doesn't Automatically Fix Mixed Content
Imagine you’ve successfully installed your free SSL certificate.
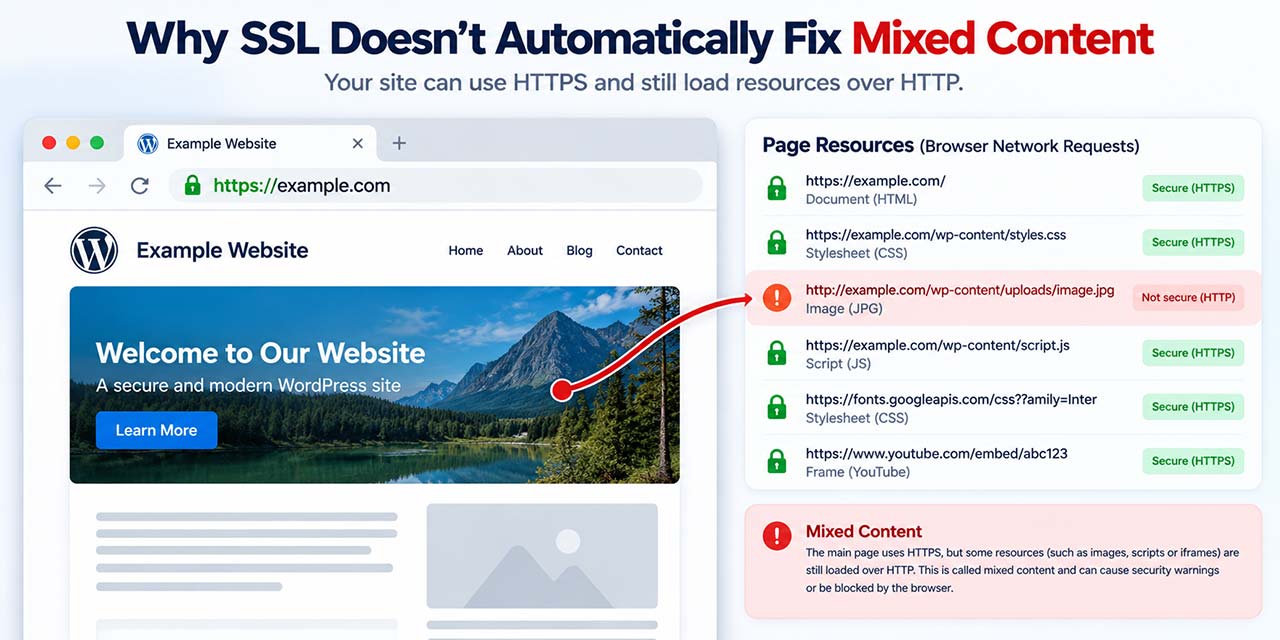
Your website opens correctly at: https://example.com
But somewhere on that page, you still have a resource loaded over HTTP:
<img src="http://example.com/image.jpg">

Or perhaps:

<script src="http://example.com/script.js"></script>
The page uses HTTPS, but those resources still request HTTP.
That’s mixed content.
And on an older WordPress website, finding those URLs can be surprisingly difficult.
They might exist inside posts, pages, page-builder content, theme settings, widgets, custom fields, CSS, JavaScript, plugin options or stored database values.
That’s why mixed content sometimes needs more than one approach.
Why a Normal Search and Replace Can Damage WordPress Data
A tempting solution is to search the database for:
http://example.com
and replace it with:
https://example.com
everywhere.
Unfortunately, WordPress plugins and themes can store PHP serialized data.
Serialized values contain information about string lengths.
A simplified example might look like:
s:18:”http://example.com”;
Changing the content without correctly handling the serialized structure can corrupt the stored value.
A permanent cleanup therefore needs to understand the data being modified rather than treating the entire database as plain text.
We’ll see how Volixta approaches this when we get to the practical setup.
Free SSL Still Isn't the End of Browser Security
At this stage, we have several different layers:
SSL certificate
↓
HTTPS
↓
301 redirect
↓
Mixed content fixed
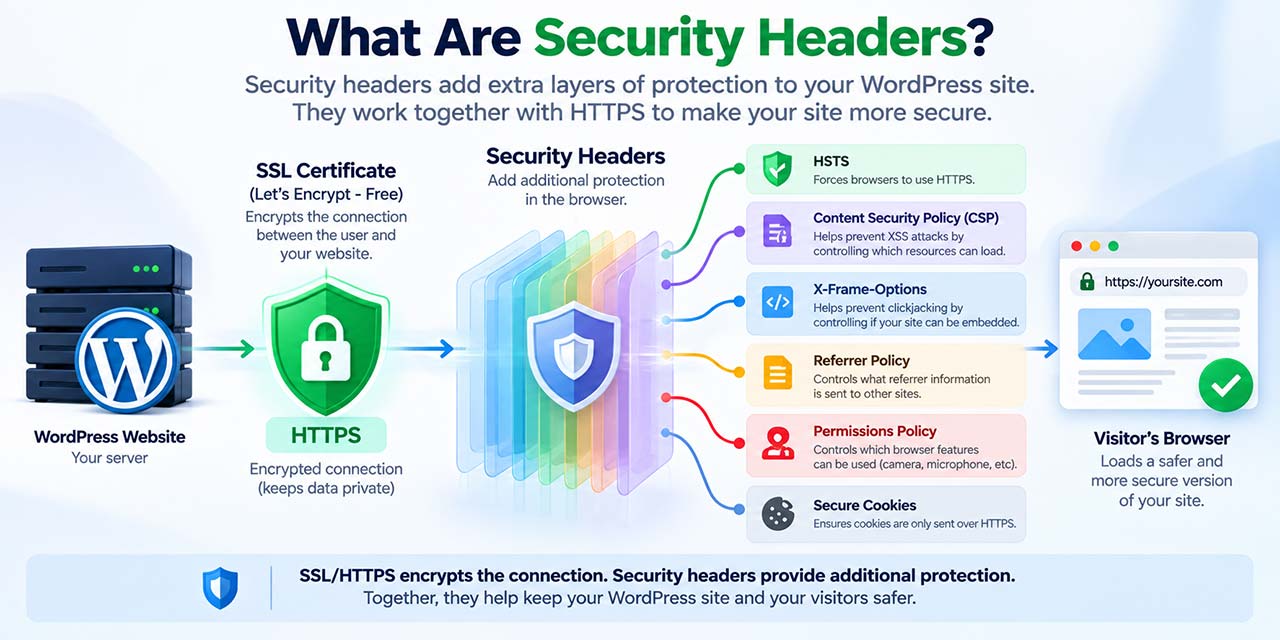
But modern browsers provide additional security mechanisms through HTTP response headers.
These allow the website to tell the browser how certain security-sensitive behavior should work.
What Are Security Headers?
A web server returns more than the HTML page.
It also returns HTTP headers.
For example:
X-Content-Type-Options: nosniff
This tells compatible browsers not to reinterpret a resource as a different MIME type.
Other headers control completely different behaviors.
Volixta supports protections including:
- Strict-Transport-Security
- Content-Security-Policy
- Content-Security-Policy-Report-Only
- X-Frame-Options
- X-Content-Type-Options
- Referrer-Policy
- Permissions-Policy
- Cross-Origin-Opener-Policy
- Cross-Origin-Embedder-Policy
- Cross-Origin-Resource-Policy
These aren’t replacements for SSL.
They’re additional browser-side protections.
And enabling every available header with the strictest possible value isn’t automatically good security.
Sometimes it simply breaks the website.
Content Security Policy Deserves Special Attention
Content Security Policy, usually called CSP, is one of the more powerful browser security mechanisms available through HTTP headers.
It can control which sources are allowed for things such as:
- JavaScript
- CSS
- Images
- Fonts
- Frames
- Connections
- Media
That can help reduce the impact of certain content-injection attacks.
But CSP can also block legitimate website functionality.
A typical WordPress site might depend on Google Fonts, YouTube, payment providers, analytics services, CDNs, page builders, third-party widgets or external APIs.
A policy that doesn’t account for those resources can break them.
That’s why Volixta supports both CSP enforcement and CSP Report-Only.
Instead of immediately enforcing:
- Content-Security-Policy: …
you can test a policy using:
- Content-Security-Policy-Report-Only: …
The general principle is simple:
security configuration should be tested, not blindly enabled.
What About HSTS?
HSTS stands for HTTP Strict Transport Security.
When a website sends a valid: Strict-Transport-Security: …
header over HTTPS, compatible browsers can remember that the domain should only be accessed through HTTPS.
A normal redirect says:
- You requested HTTP.
- Go to HTTPS instead.
HSTS allows the browser to remember something closer to: Use HTTPS for this domain.
That’s useful, but it also means HSTS should be enabled only after HTTPS is working correctly.
HSTS preload deserves even more care because it can affect how browsers handle the domain before the first connection to the website.
Secure Cookies Are Another Part of HTTPS
WordPress authentication relies heavily on cookies.
Once HTTPS is correctly configured, sensitive cookies can receive additional protection using attributes such as:
- Secure
- HttpOnly
- SameSite=Lax
Secure restricts the cookie to HTTPS transport.
HttpOnly prevents normal client-side JavaScript from reading it.
SameSite controls some circumstances in which cookies are sent during cross-site requests.
These protections solve a different problem from SSL certificates, but they fit naturally into a complete HTTPS setup.
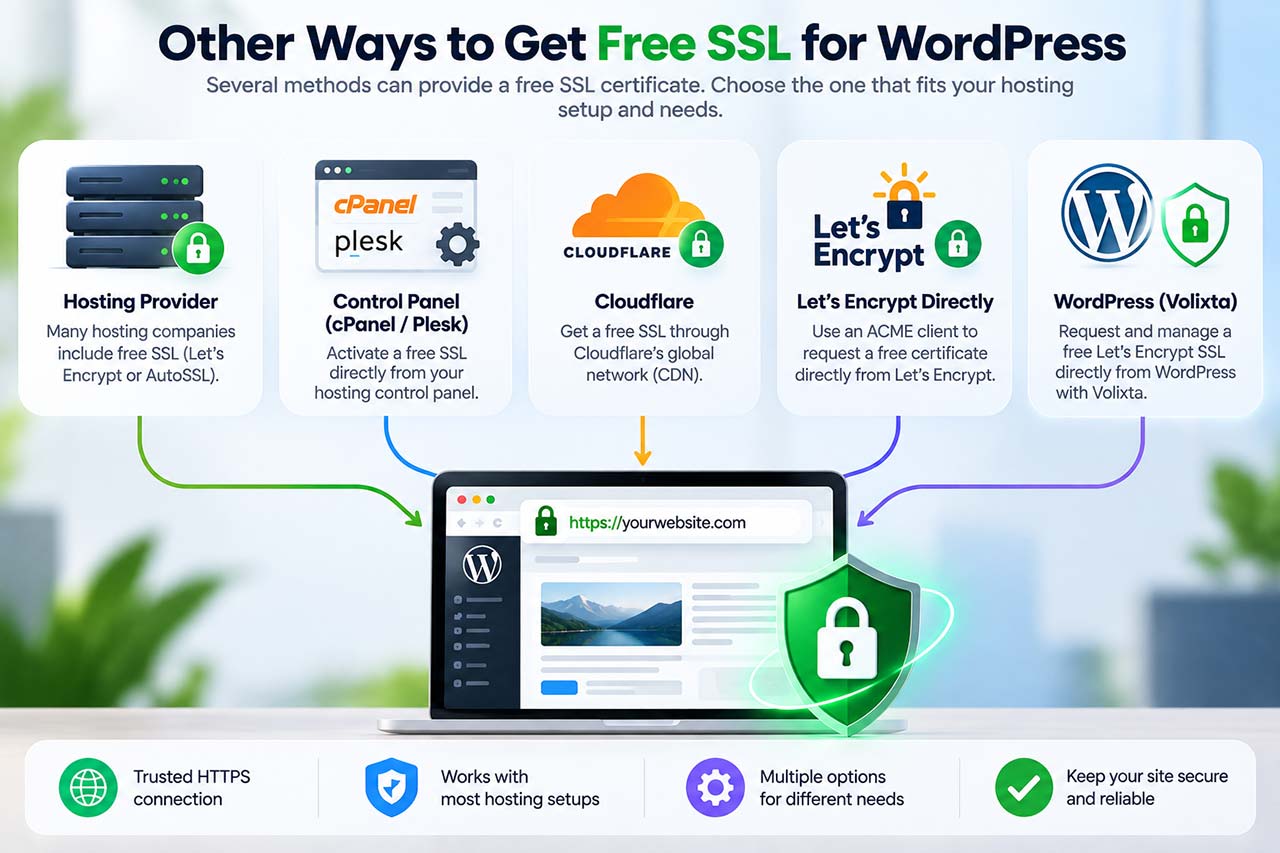
Other Ways to Get Free SSL for WordPress
Volixta isn’t the only way to get free SSL on WordPress.
In fact, your hosting provider may already be handling the certificate for you.
Before requesting another certificate, it’s worth checking what your current hosting environment already provides.
Free SSL from Your Hosting Provider
Many hosting providers include free SSL as part of the hosting account.
Depending on the platform, this may be powered by Let’s Encrypt, AutoSSL or another trusted Certificate Authority.
In that situation, certificate issuance and renewal may already be automated by the host.
If the certificate is valid and renewal is being handled correctly, there’s usually no reason to replace it.
You can keep the hosting certificate and focus on the rest of the HTTPS configuration.
Free SSL Through a Hosting Control Panel
Some hosting environments let you request or activate a certificate directly through a control panel such as cPanel, Plesk or DirectAdmin.
This can be a convenient option because the hosting platform already controls the web server where the certificate needs to be installed.
The exact process depends on the provider and the features they expose.
Free SSL Through Cloudflare
Cloudflare can also provide HTTPS for domains using its network.
This is a different architecture from installing a certificate directly on the WordPress server.
Traffic may pass through Cloudflare before reaching your hosting environment, so the SSL mode and origin-server configuration matter.
A Cloudflare certificate at the edge doesn’t automatically mean the connection between Cloudflare and your origin server is configured the way you expect.
That’s why it’s important to understand where encryption starts and ends in the actual hosting setup.
Free SSL Through Let's Encrypt Directly
You can also work directly with Let’s Encrypt through an ACME client.
This gives you more control, but it also means you need to handle domain validation, certificate installation and renewal yourself or through your hosting environment.
For someone comfortable managing the server, this can be a perfectly good approach.
Free SSL Through WordPress
Another option is to manage the process from WordPress itself.
That’s the approach used by Volixta.
It can request a free Let’s Encrypt SSL certificate through ACME v2, handle supported HTTP-01 validation, provide manual DNS-01 validation, and then help with the HTTPS configuration that comes after certificate issuance.
The important point is that you don’t need to replace a working certificate just to use the rest of the plugin.
If your host already provides free SSL, keep it.
If you don’t have a certificate yet, you can request one.
And if your server requires manual installation, the certificate files can still be downloaded and installed through the hosting environment.
The best method isn’t necessarily the one with the most automation.
It’s the one that fits your hosting setup and gives you a reliable path for installation, renewal and HTTPS configuration.
How to Get a Free SSL Certificate on WordPress with Volixta
Now that we know what the different pieces actually do, let’s put them together and see how to get a free SSL certificate on WordPress.
We’ll use Volixta SSL & Security Headers, available for free from the official WordPress plugin directory.
We’ll start by requesting or detecting the certificate, then continue through installation, HTTPS, mixed content, Security Headers and Secure Cookies.
The complete workflow looks like this:
Check website
↓
Get or detect SSL certificate
↓
Install and verify certificate
↓
Activate WordPress HTTPS
↓
Enable HTTPS redirect
↓
Check mixed content
↓
Configure Security Headers
↓
Configure Secure Cookies
↓
Verify everything
You don’t necessarily need every step.
If your hosting provider already has SSL working, for example, you can skip certificate creation.
Step 1: Install Volixta SSL & Security Headers
Install and activate Volixta SSL & Security Headers in WordPress.
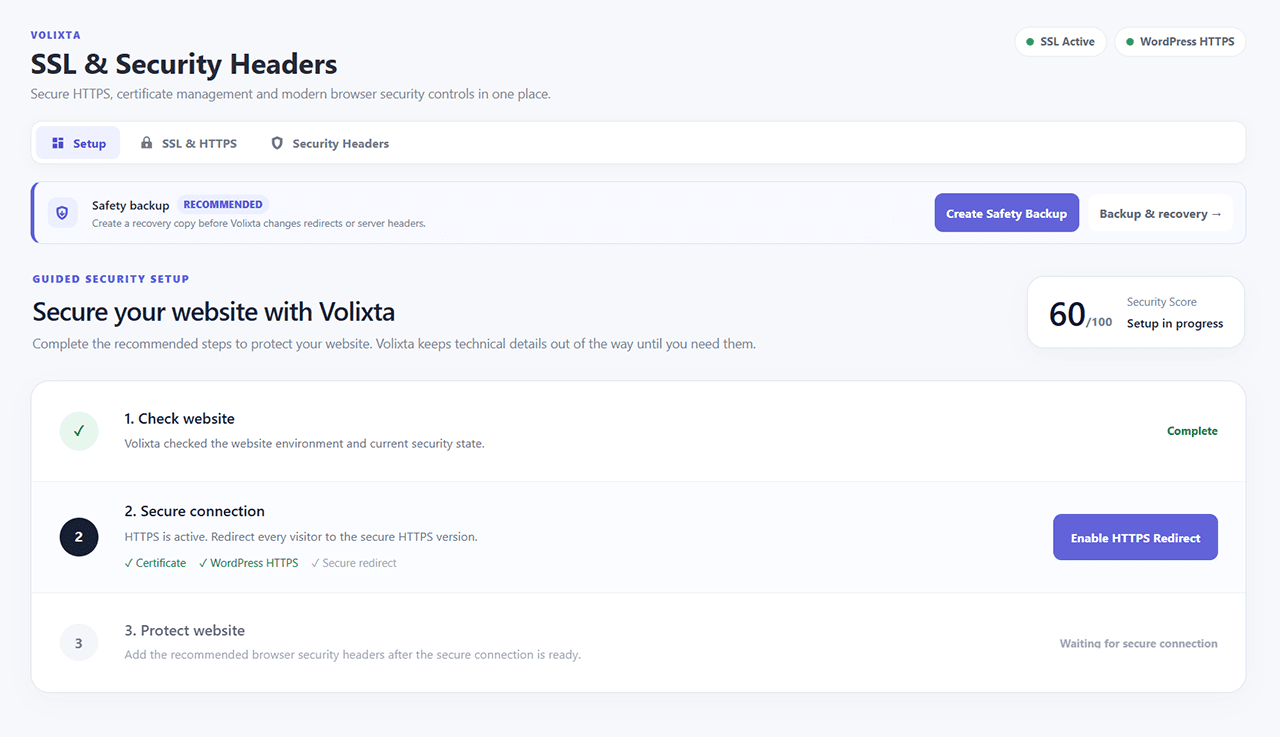
When you open the plugin, Guided Setup begins by checking the website environment and current protection state.
The first stage is:
1. Check website
Once that check is complete, Guided Setup moves to:
2. Secure connection
Here Volixta tracks three things separately:
- Certificate
- WordPress HTTPS
- Secure redirect
This separation is useful because they’re not interchangeable.
A valid certificate doesn’t necessarily mean WordPress is configured for HTTPS.
And WordPress using an HTTPS URL doesn’t necessarily mean HTTP visitors are being redirected.
Step 2: Check Whether an SSL Certificate Is Already Active
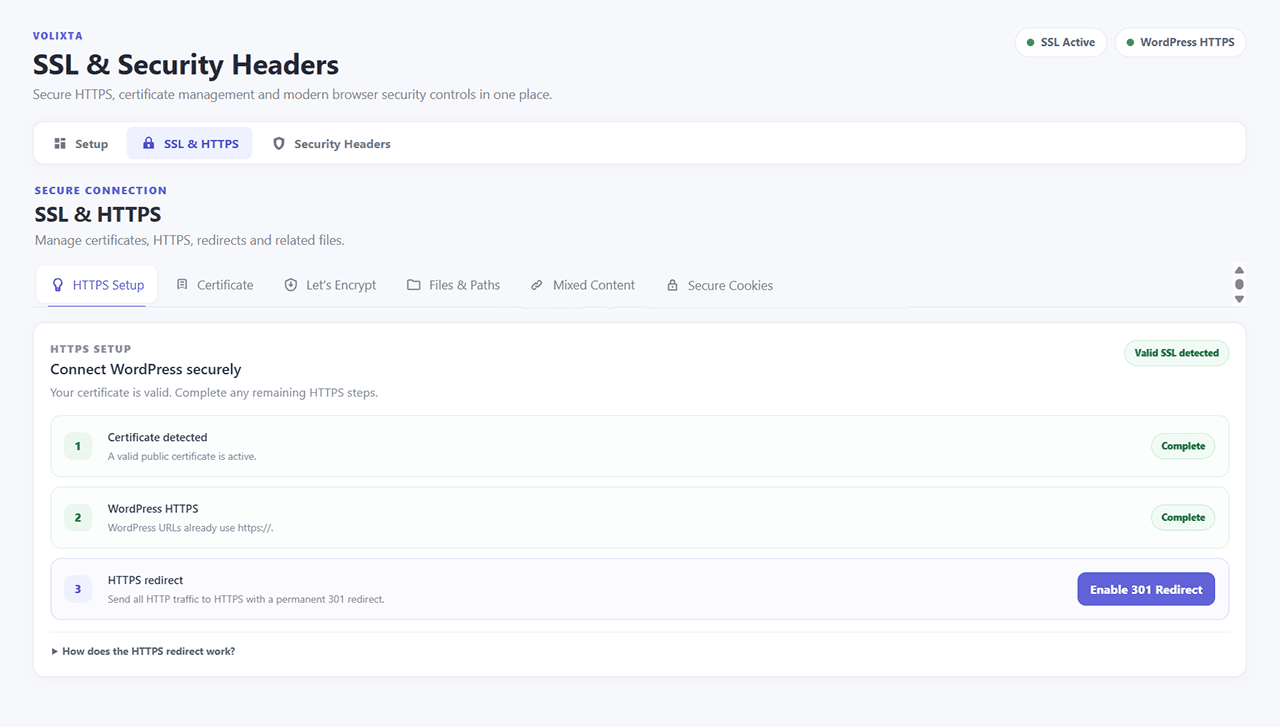
Before requesting a new certificate, check what’s already being served by the website.
If the hosting server already provides a valid certificate, Volixta can report: Your SSL certificate is active
In that situation, keep the existing certificate if it’s already being managed correctly.
There’s no benefit in replacing a working hosting certificate simply because another certificate can be generated.
You can continue directly to the HTTPS configuration.
If no valid certificate is active, Volixta instead reports: No SSL certificate is active yet
and provides: Create Free Certificate
This starts the Let’s Encrypt workflow.
Step 3: Choose HTTP-01 or DNS-01
Before Let’s Encrypt issues the certificate, you need to prove control of the domain.
Volixta offers two methods.
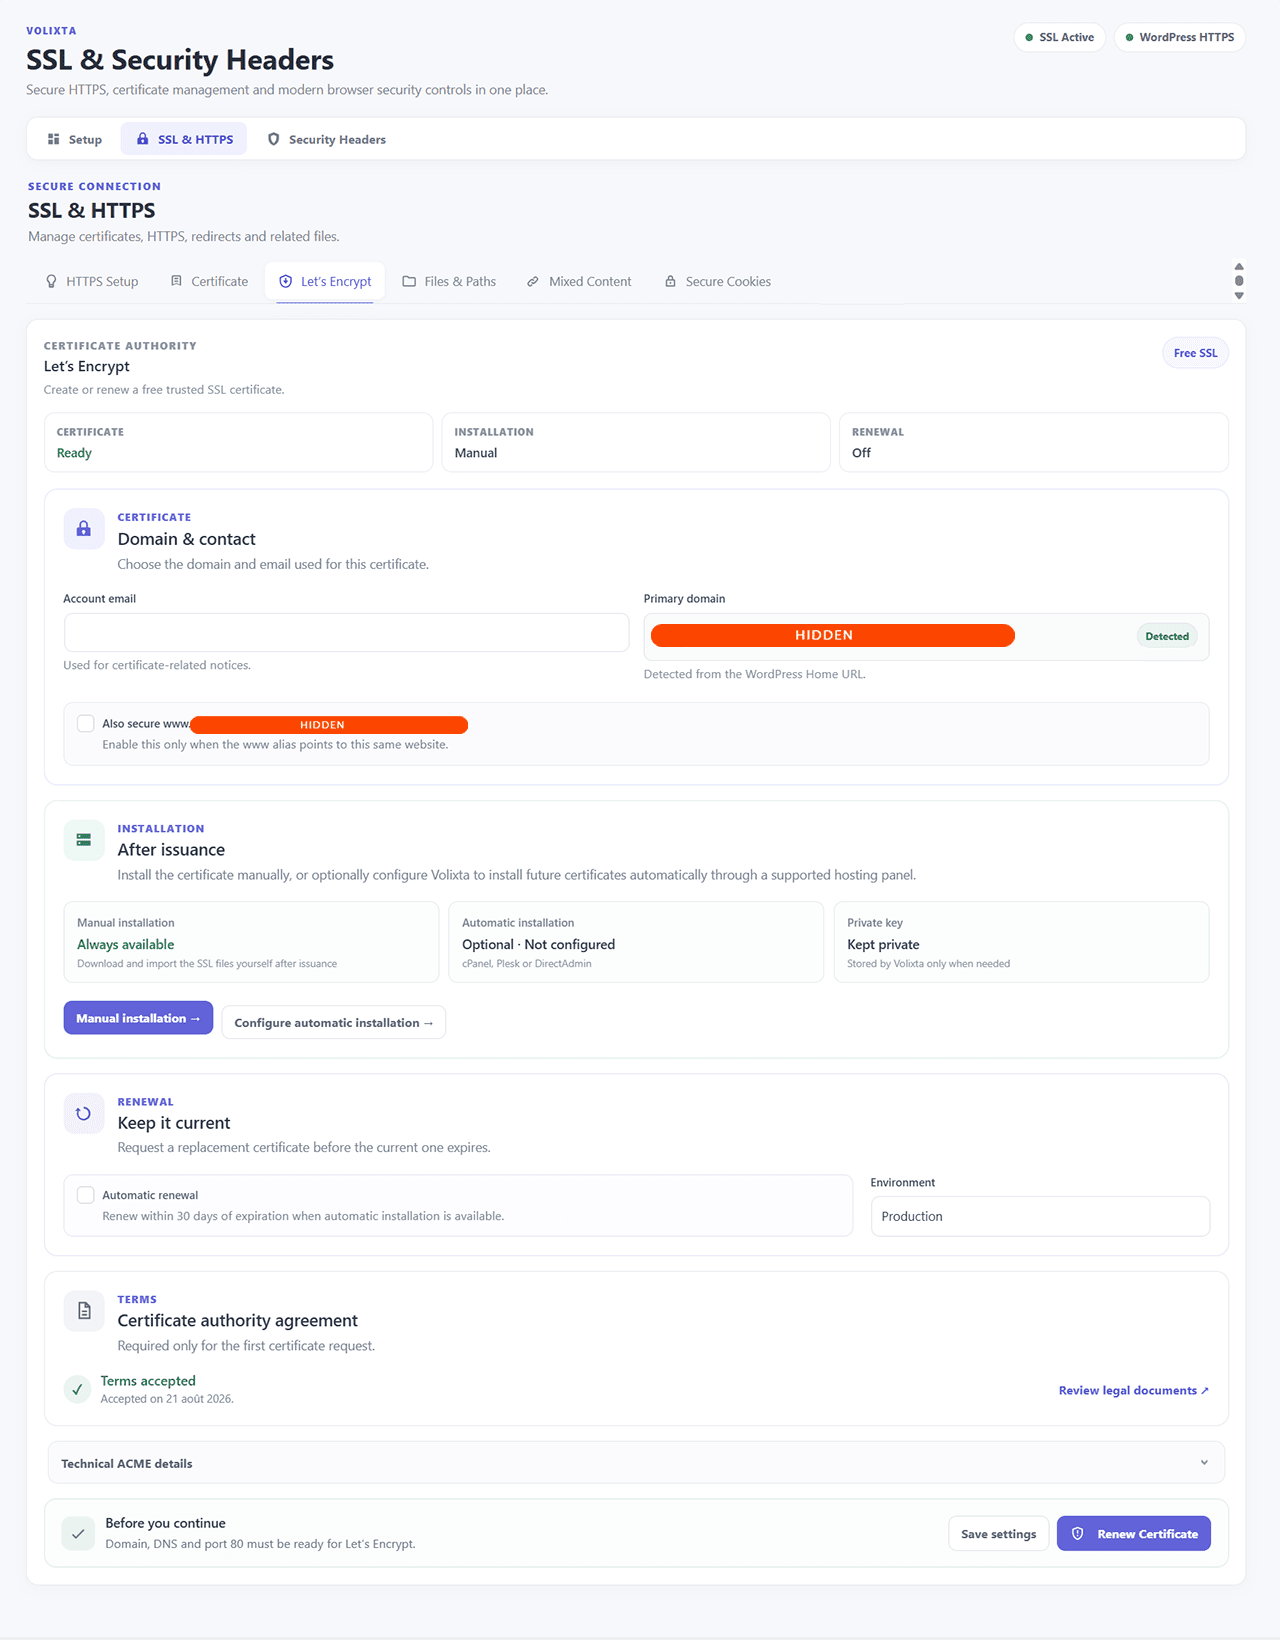
Use HTTP-01 for a Normal WordPress Website
For most standard WordPress websites, HTTP-01 is the simpler option.
Volixta handles the ACME challenge through the website when the hosting environment permits it.
The action is:
Request Certificate
The process is essentially:
Volixta
↓
Let’s Encrypt
↓
HTTP-01 challenge
↓
Let’s Encrypt checks the domain
↓
Certificate issued
HTTP-01 is also the more convenient option for eligible Volixta-managed production certificates that can later participate in automatic renewal checks.
Use DNS-01 for DNS Validation or Wildcard SSL
If HTTP validation isn’t suitable, select:
DNS-01
The workflow provides:
Create DNS Challenge
Volixta generates the information required for a DNS TXT record.
You’ll need to publish that record through whoever manages the domain’s DNS.
The record uses a hostname based on:
_acme-challenge.example.com
Once the TXT record is publicly visible, validation can continue.
DNS-01 is also required if you want a wildcard certificate such as:
*.example.com
Because Volixta’s DNS-01 workflow is manual, you don’t have to give the plugin credentials for your DNS provider.
The trade-off is that manual DNS validation also requires manual participation during renewal.
Step 4: Request the Free SSL Certificate
After selecting the validation method, you can request your free SSL certificate from Let’s Encrypt.
With HTTP-01, Volixta can perform the challenge and request the certificate from Let’s Encrypt.
With manual DNS-01, publish the provided TXT record and wait until it becomes publicly visible before continuing validation.
Once Let’s Encrypt successfully validates the domain, the certificate is issued.
At this point, Volixta can report:
Your certificate is ready to install
Remember what we discussed earlier:
issued doesn’t mean installed.
The certificate files now exist, but the hosting server still needs to use them.
Step 5: Install the SSL Certificate
The next step depends on the hosting environment.
Volixta supports compatible integrations with:
- cPanel
- Plesk
- DirectAdmin
When the configured hosting environment supports certificate installation, use:
Install Certificate
The certificate can then be sent to the hosting environment for installation.
If automatic installation isn’t available, Volixta provides an:
Installation Guide
and allows the certificate files to be downloaded for manual installation.
This makes the workflow usable even when the hosting provider doesn’t expose an installation API that WordPress can access.
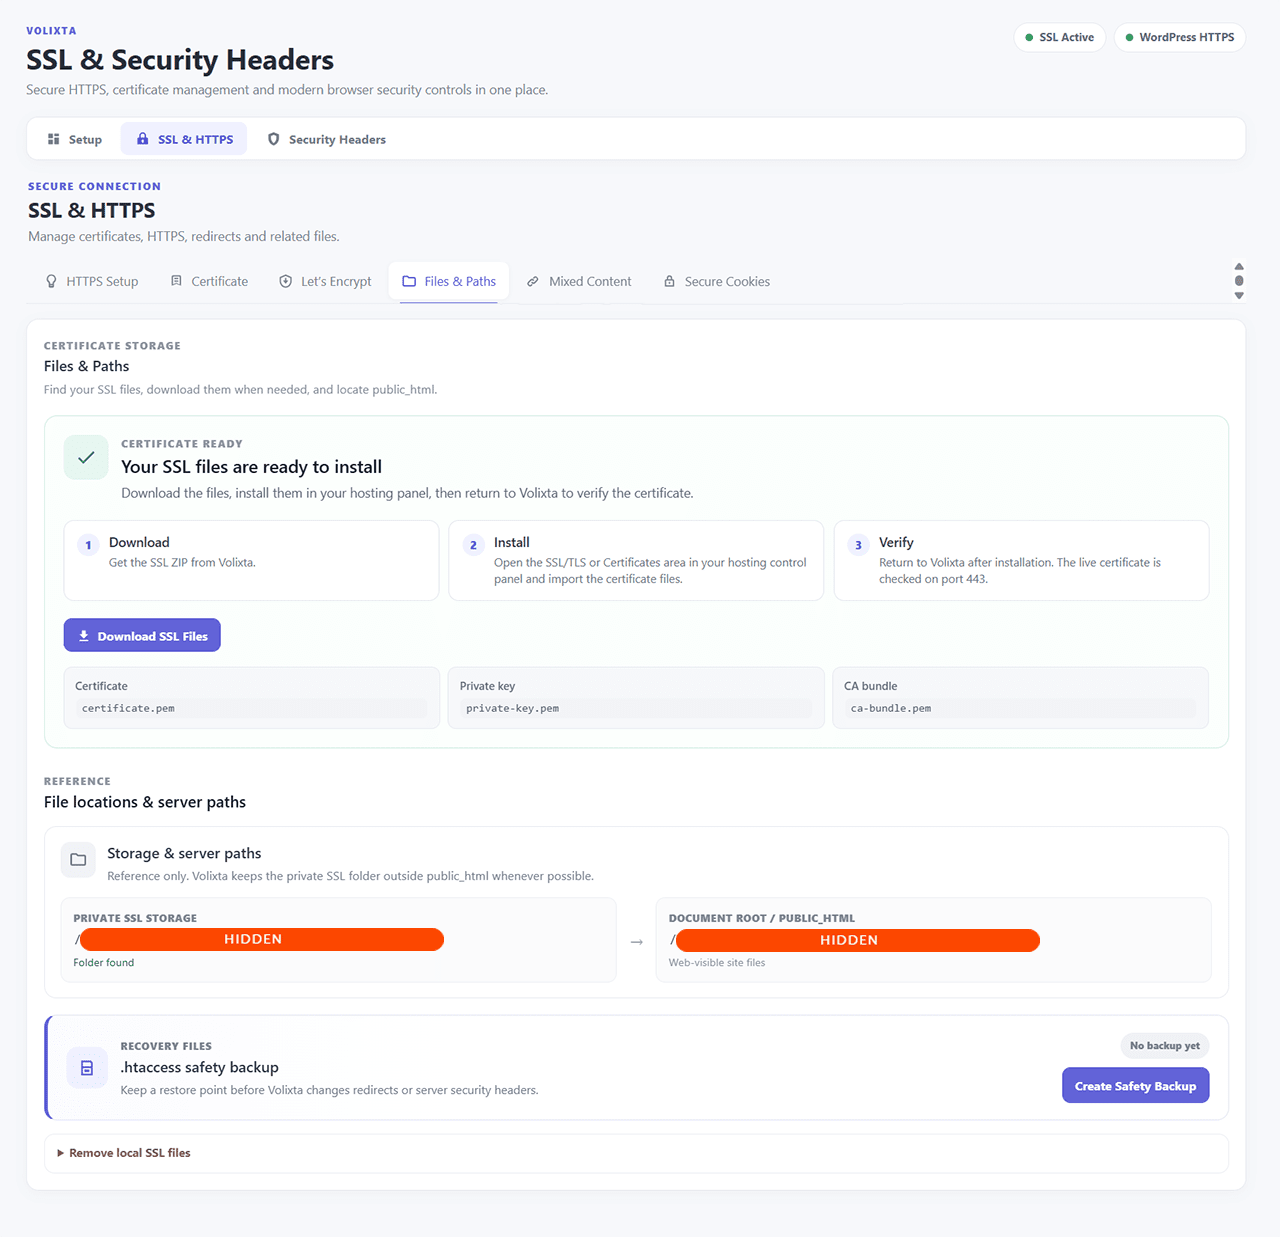
Step 6: Verify the Certificate Visitors Actually Receive
After installation, don’t rely only on the fact that certificate files exist.
What matters is the certificate the public website actually presents to visitors.
Volixta checks the live TLS certificate served by the domain.
Once the server is correctly presenting it, the certificate section can report:
Your SSL certificate is active
and:
A valid SSL certificate is active. No action is required.
Now we know that HTTPS is actually available at the server level.
Step 7: Activate WordPress HTTPS
The next Guided Setup state is:
The certificate is valid. Connect WordPress to HTTPS.
Use:
Activate WordPress HTTPS
This changes the WordPress configuration from:
http://example.com
to:
https://example.com
At this point, Guided Setup can show:
- ✓ Certificate
- ✓ WordPress HTTPS
- ○ Secure redirect
There’s still one piece missing.
Someone can still explicitly request the HTTP version of the site.
Step 8: Enable the HTTPS Redirect
The next step is:
HTTPS is active. Redirect every visitor to the secure HTTPS version.
Use:
Enable HTTPS Redirect
The goal is:
http://example.com/page
↓
301 Redirect
↓
https://example.com/page
On supported Apache and LiteSpeed environments, Volixta can manage its redirect rules inside .htaccess.
It uses its own marked configuration and safety mechanisms rather than simply replacing unrelated rules.
On Nginx and environments where WordPress can’t safely make the required server-level change, the plugin provides environment-aware guidance instead.
Once the connection is correctly configured, Guided Setup can report:
Certificate, WordPress HTTPS and secure redirect are ready.
with:
- ✓ Certificate
- ✓ WordPress HTTPS
- ✓ Secure redirect
Now we can check what the HTTPS pages themselves are loading.
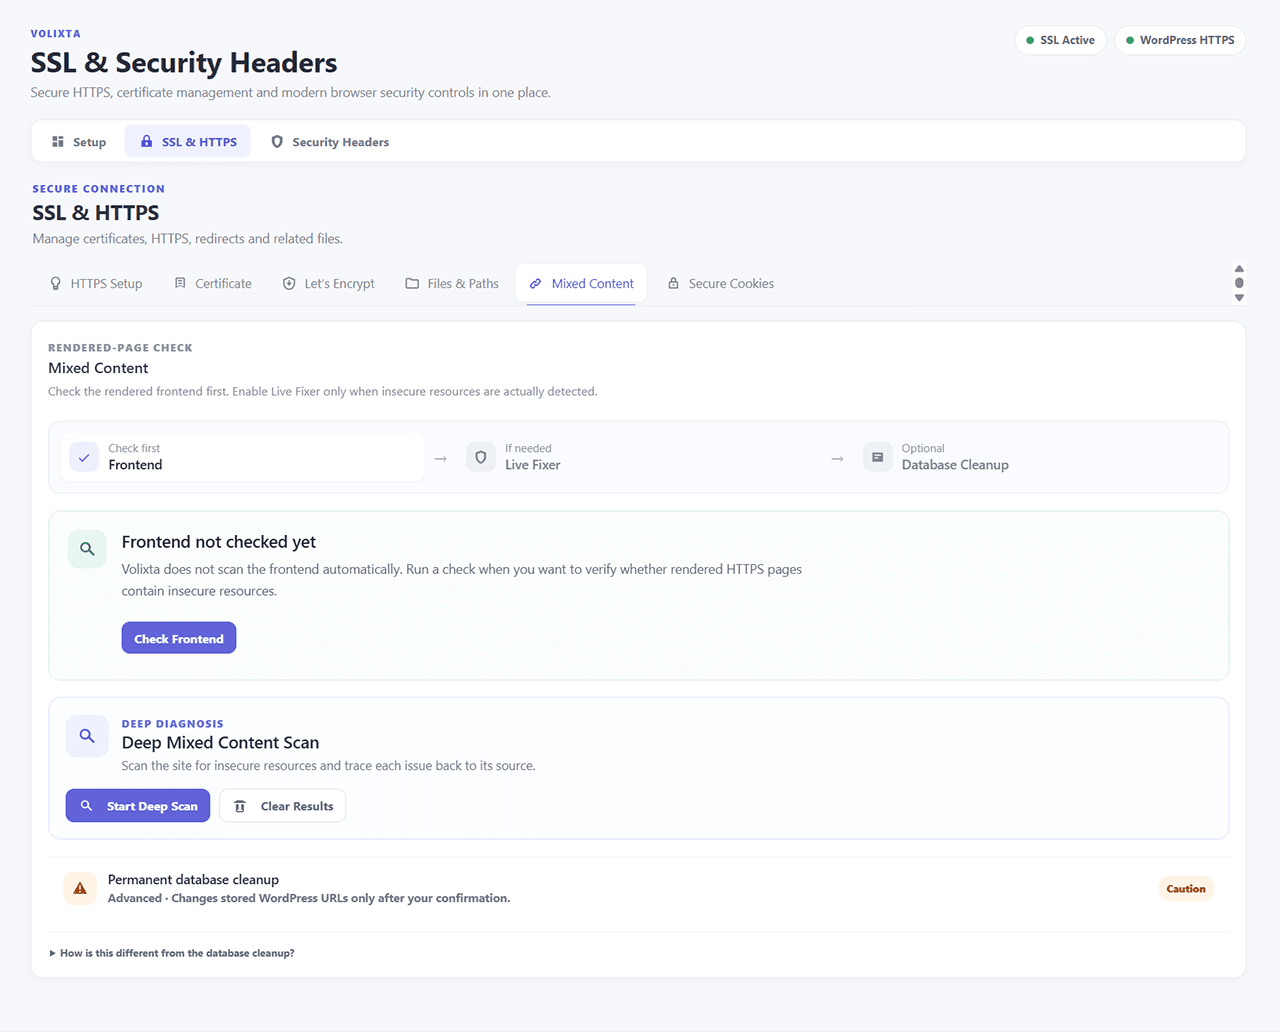
Step 9: Check for Mixed Content
Open the Mixed Content section.
Start with: Check Frontend
This is preferable to immediately enabling a fixer.
If Volixta reports: No mixed content detected
there’s no reason to enable another runtime feature just because it’s available.
If insecure resources are found, the plugin can report: Mixed content detected on the frontend
Now we know there’s actually something to investigate.
Step 10: Use Deep Scan When You Need to Find the Source
For a deeper investigation, use:
Start Deep Scan
This can help find old HTTP references that aren’t immediately obvious.
They may be stored in:
- posts
- pages
- theme data
- plugin settings
- metadata
- CSS
- stored WordPress content
After completing a scan, it can be repeated with:
Run Deep Scan Again
Scanning and modifying are deliberately separate actions.
Finding an HTTP URL shouldn’t automatically mean rewriting stored website data.
Step 11: Use Live Fixer Only When It's Actually Needed
If mixed content exists in the rendered frontend, Volixta can use:
Enable Live Fixer
Live Fixer works while WordPress generates the page.
Conceptually:
Stored content
↓
WordPress renders page
↓
Live Fixer
↓
Eligible HTTP resource → HTTPS
↓
Page sent to visitor
This is different from permanently modifying the database.
It can be useful as a compatibility layer when the rendered page needs fixing without immediately rewriting stored content.
If the frontend check says there is no mixed content, leave it disabled.
Step 12: Permanently Clean Old HTTP URLs When Appropriate
Sometimes a runtime fix isn’t what you want.
You may want old same-site HTTP URLs permanently changed to HTTPS.
That’s where database cleanup becomes useful.
As we saw earlier, WordPress can contain serialized PHP data, so this isn’t something that should be handled with a blind database-wide string replacement.
Volixta’s cleanup is designed to handle eligible serialized WordPress values safely.
The distinction is useful:
- Frontend Check → Is there a problem?
- Deep Scan → Where is it?
- Live Fixer → Correct eligible output at runtime
- Database Cleanup → Permanently clean eligible stored URLs
Different tools for different situations.
Step 13: Move to Protect Website
Once the certificate, WordPress HTTPS and secure redirect are ready, Guided Setup moves to:
3. Protect website
This is where the browser security configuration begins.
The order matters:
Certificate
↓
HTTPS
↓
Redirect
↓
Browser protections
For example, it wouldn’t make much sense to enforce HSTS before confirming that HTTPS works correctly.
Continue to Security Headers.
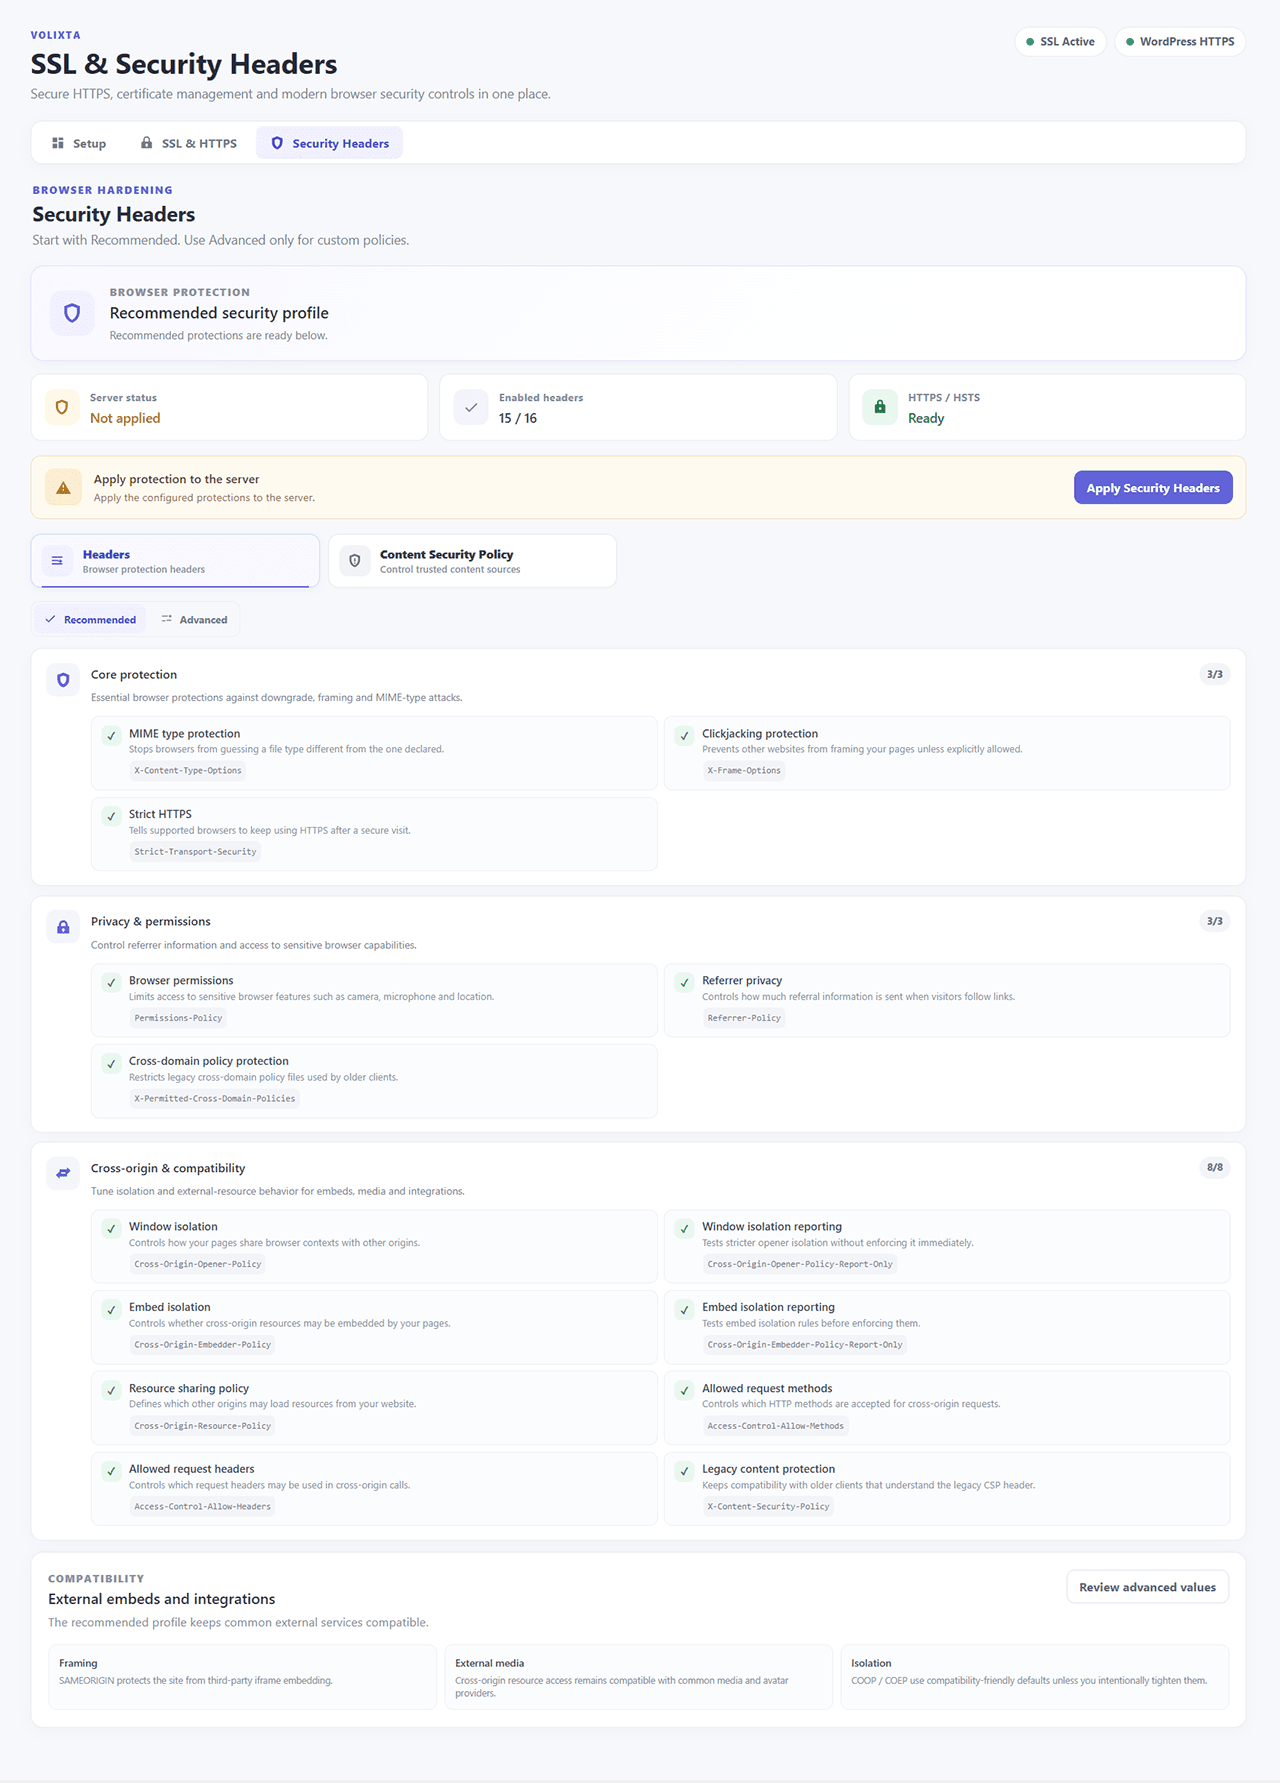
Step 14: Start with the Recommended Security Profile
The Security Headers section separates a recommended starting point from more advanced customization.
You’ll see guidance along the lines of:
Start with Recommended. Use Advanced only for custom policies.
The recommended profile can be applied using:
Apply Recommended Profile
This gives you a starting configuration without requiring you to manually construct every security header.
You can then review the individual protections and move into advanced configuration when the site actually needs it.
Step 15: Understand the Headers Before Making Them Stricter
Volixta can manage protections including:
- HSTS
- Content-Security-Policy
- CSP Report-Only
- X-Frame-Options
- X-Content-Type-Options
- Referrer-Policy
- Permissions-Policy
- COOP
- COEP
- CORP
These aren’t ten versions of the same protection.
Each affects a different part of browser behavior.
This is why the objective shouldn’t be:
Turn everything to maximum
It should be:
Understand
↓
Configure
↓
Test
↓
Verify
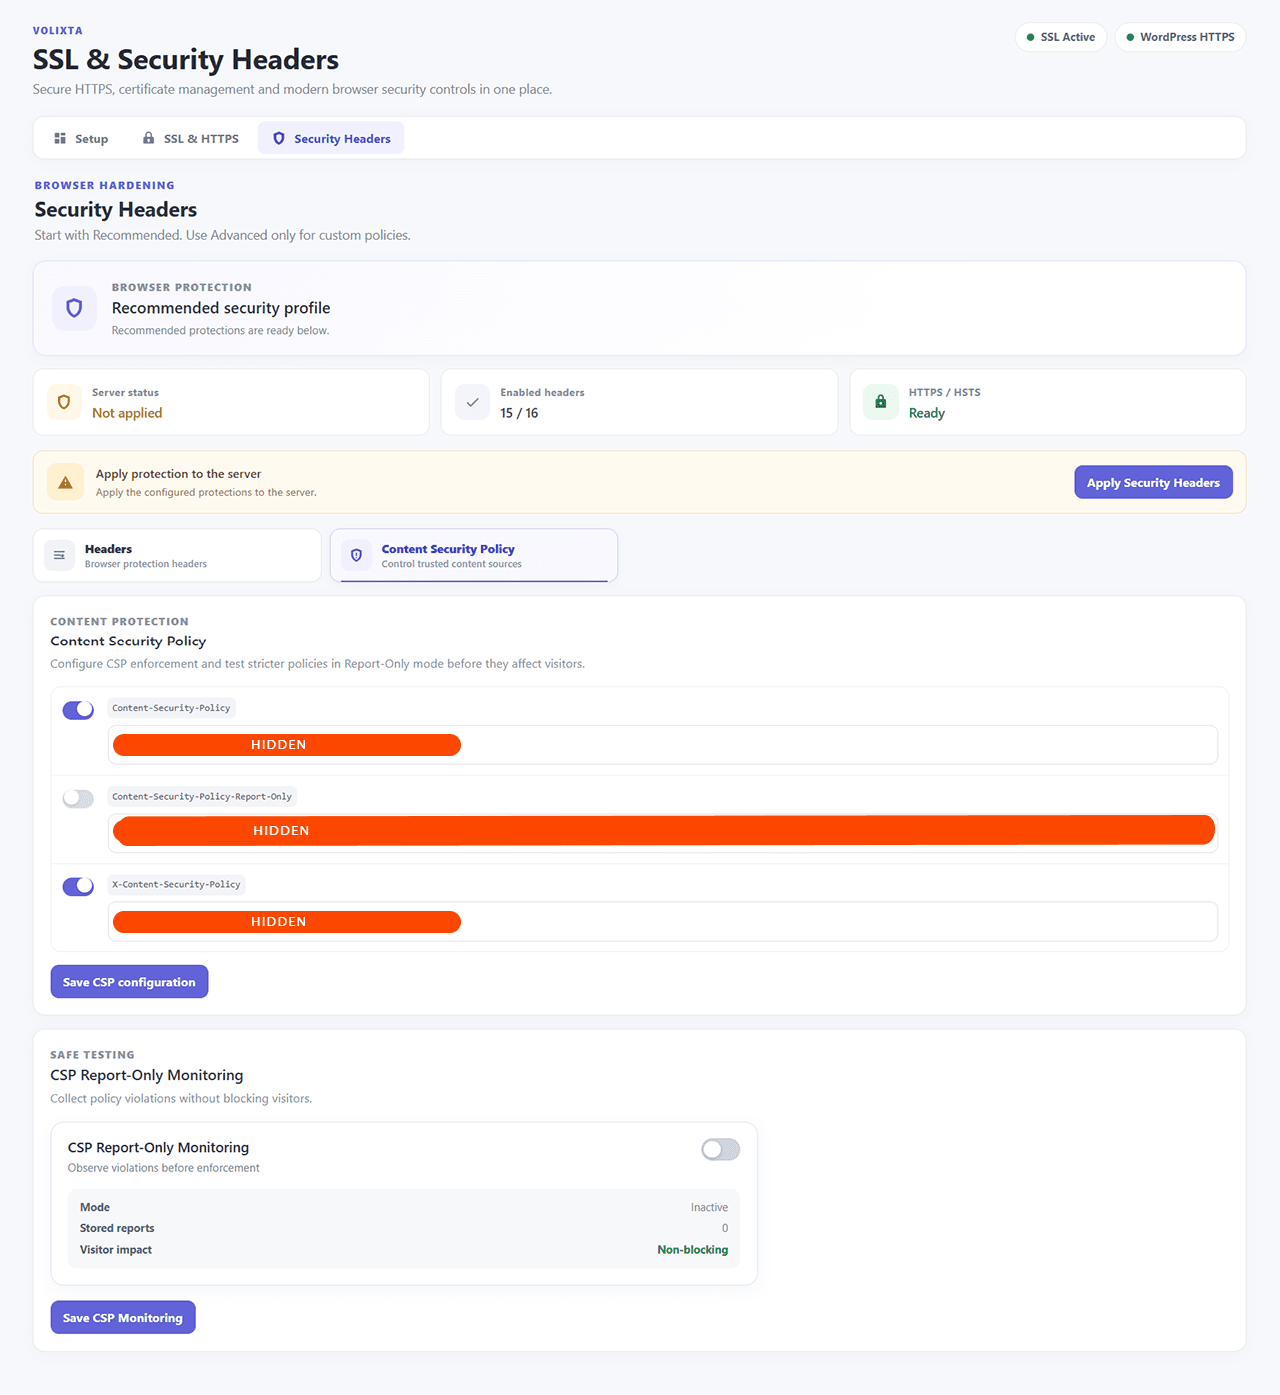
Step 16: Test CSP Before Enforcing a Strict Policy
If you need a custom Content Security Policy, use the CSP configuration.
WordPress sites often depend on external resources such as:
- Google Fonts
- YouTube
- Vimeo
- payment providers
- CDNs
- analytics services
- external APIs
- page builders
- third-party widgets
A strict policy that doesn’t account for these resources can block them.
Instead of immediately enforcing:
Content-Security-Policy: …
you can first test a policy using:
Content-Security-Policy-Report-Only: …
Volixta supports Report-Only specifically so a stricter policy can be tested before it affects visitors.
Once you’ve reviewed the configuration, use:
Save CSP configuration
Then test the actual website.
Don’t just test the homepage.
Check forms, embeds, checkout pages, account pages and anything else that depends on external resources.
Step 17: Configure HSTS Only After HTTPS Is Stable
Once you’re confident that HTTPS works correctly, you can consider HSTS.
Volixta includes an: HSTS preload assistant
Instead of simply checking whether an HSTS option is enabled inside WordPress, the assistant verifies conditions on the public website.
These include things such as:
- HTTP redirects to HTTPS
- Public HSTS header verified
- Public HSTS max-age is at least one year
That distinction matters.
A CDN, reverse proxy or hosting configuration may alter the response after WordPress generates it.
What matters is what the visitor’s browser actually receives.
Volixta also provides: Use one-year HSTS profile
This kind of configuration should be used deliberately, particularly when includeSubDomains and preload are involved.
Before applying such a policy, make sure the affected subdomains can remain available over HTTPS.
And checking HSTS preload readiness doesn’t mean Volixta automatically submits the domain to an external browser preload service.
It verifies readiness; the external submission remains a separate decision.
Step 18: Protect WordPress Cookies
Now open: Secure Cookies
Once HTTPS is working, Volixta can add additional protection to WordPress authentication and PHP session cookies using attributes such as:
- Secure
- HttpOnly
- SameSite=Lax
These attributes solve different problems.
Secure
Secure tells the browser to send the relevant cookie only over HTTPS.
HttpOnly
HttpOnly prevents normal client-side JavaScript from reading the cookie.
SameSite
SameSite restricts certain cross-site cookie behavior.
For PHP session protection, SameSite=Lax provides useful cross-site restrictions without applying the more aggressive behavior of a strict policy.
After configuring the appropriate options, use:
Save Secure Cookies
For persistent changes involving wp-config.php, Volixta provides a backup workflow where the backup can be downloaded directly to your computer rather than being left stored by Volixta on the web server.
Step 19: Verify the Final WordPress HTTPS Setup
At this point, don’t assume everything works just because every setup step has been completed.
Test the website.
The final structure should look roughly like:
WordPress
   │
   ▼
Valid SSL certificate
   │
   ▼
HTTPS activated
   │
   ▼
301 HTTPS redirect
   │
   ▼
Mixed content check
   │
   ├──────────────┐
   │              │
   ▼              ▼
No problem    Fix if needed
   │              │
   │              ▼
   │     Deep Scan / Live Fixer
   │       / Database Cleanup
   │              │
   └──────┬───────┘
          │
          ▼
   Security Headers
          │
   ┌──────┼──────────┐
   │      │          │
   ▼      ▼          ▼
 HSTS    CSP    Other policies
   │      │          │
   └──────┼──────────┘
          │
          ▼
    Secure Cookies
          │
          ▼
  Public verification
Visit several frontend pages.
Open the WordPress administration area.
Test important forms.
If you use WooCommerce, test the cart, checkout and customer account.
Check third-party embeds.
Check JavaScript-heavy functionality.
And if you’ve changed CSP, verify everything that depends on external resources.
A configuration is only useful if the actual website continues to work correctly.
What Happens When the Free SSL Certificate Needs Renewal?
Let’s Encrypt certificates don’t last forever.
Renewal is therefore part of certificate management.
For eligible production certificates managed by Volixta through HTTP-01, the plugin can perform automatic renewal checks through WordPress WP-Cron.
When an eligible certificate enters its renewal window, Volixta can request a replacement.
If a supported hosting integration is configured, the renewed certificate can also be installed through that environment.
Manual DNS-01 certificates are different.
Because the validation is manual and Volixta doesn’t store third-party DNS-provider credentials, another DNS confirmation is required when renewing those certificates.
Instead of pretending that a manual process is automatic, the plugin shows the appropriate renewal state.
What If Something Changes Later?
HTTPS isn’t necessarily something you configure once and never look at again.
Certificates expire.
Hosting configurations change.
A CDN might be added.
A plugin update can introduce an HTTP resource.
A server rule can disappear.
A security header that used to reach visitors may stop appearing in the public response.
Volixta includes opt-in alerts for situations such as:
Certificate approaching expiration
Recent renewal failure
Protection regression
This doesn’t replace full server or uptime monitoring.
It simply makes important SSL and protection-related changes visible from the same WordPress environment where they’re being managed.
A Few Things You Shouldn't Do
After going through the entire process, there are a few principles worth keeping in mind.
Don't Replace a Working Hosting Certificate for No Reason
If your host already provides a valid certificate and manages its renewal correctly, keep it.
You can still use the other parts of Volixta without replacing the certificate.
Don't Enable Live Fixer When There Is Nothing to Fix
Run Check Frontend first.
If there is no mixed content, don’t add another runtime layer unnecessarily.
Don't Enable a Strict CSP Without Testing
A security policy isn’t useful if it prevents legitimate parts of the website from working.
Use Report-Only while developing a stricter policy.
Don't Enable HSTS Preload Just Because the Option Exists
Make sure HTTPS is permanent for the domain and every subdomain affected by the policy.
HSTS has consequences beyond a normal WordPress option.
Don't Assume WordPress Controls the Entire Server
Your actual infrastructure might be:
Browser
↓
Cloudflare
↓
Load balancer
↓
Nginx
↓
Apache
↓
WordPress
The browser sees the final result of that entire chain.
That’s why public verification is more useful than simply checking whether an option is enabled in the WordPress database.
What Does Volixta SSL & Security Headers Actually Do?
After going through the process, the purpose of the plugin becomes easier to describe.
It’s not simply a “free SSL button.”
It brings the different parts of a WordPress HTTPS setup into one place.
Free SSL Certificate Management
Volixta can request a free SSL certificate from Let’s Encrypt through ACME v2 using HTTP-01 or manual DNS-01 validation, including wildcard certificates through DNS validation.
Certificate Installation and Verification
Supported certificates can be installed through compatible cPanel, Plesk and DirectAdmin integrations, while certificate files remain available for manual installation when needed.
The public certificate can then be checked to confirm what visitors actually receive.
HTTPS and Redirects
WordPress can be moved to HTTPS and the HTTP-to-HTTPS redirect configured according to the server environment.
Security Headers
HSTS, CSP, CSP Report-Only, X-Content-Type-Options, Referrer-Policy, Permissions-Policy and cross-origin policies can be configured from WordPress.
Secure Cookies
WordPress authentication and PHP session cookies can receive additional Secure, HttpOnly and SameSite protection.
Safety Backups
Managed .htaccess changes use backups and consistency checks.
For supported wp-config.php changes, the backup can be downloaded directly to your computer rather than being stored by Volixta on the server.
Certificate and Protection Alerts
Upcoming expiration, recent renewal failures and protection regressions can be surfaced through opt-in alerts.
Hosting-Aware Configuration
Apache, LiteSpeed, Nginx, reverse proxies, Cloudflare, localhost and manual certificate workflows aren’t treated as though they’re all the same environment.
Does Every WordPress Site Need All of This?
No.
And that’s an important point.
If your host already manages SSL perfectly, keep its certificate.
If the website has no mixed content, don’t enable a mixed-content fixer.
If you don’t need a custom CSP, you don’t have to create one.
If you’re not ready to commit to HSTS preload, don’t use it.
And if your infrastructure requires server-level configuration that WordPress can’t safely modify, follow the server-specific workflow instead of trying to force WordPress to control it.
More security options don’t automatically mean more security.
A better approach is:
Understand
↓
Check
↓
Configure
↓
Test
↓
Verify
Is Volixta SSL & Security Headers Free?
Yes.
Volixta SSL & Security Headers is a free WordPress plugin, and it can request free SSL certificates from Let’s Encrypt without requiring you to purchase a certificate.
You don’t need to purchase an SSL certificate from Volixta in order to use the HTTPS, mixed-content or browser-security functionality.
The plugin also doesn’t include analytics, usage tracking or visitor tracking.
Configuration required for enabled features is stored inside the WordPress installation.
Some operations naturally require communication with an external service.
For example, requesting a free SSL certificate requires communication with Let’s Encrypt.
Installing a certificate through cPanel, Plesk or DirectAdmin requires communication with the hosting integration you’ve configured.
Only the information required for the requested operation needs to be involved.
FAQ
Is a free SSL certificate really free?
Yes. Let’s Encrypt issues SSL/TLS certificates for free. You may still need a compatible hosting environment or installation method, but the certificate itself does not require a purchase.
Is free SSL enough for a WordPress website?
For many WordPress sites, yes. Free SSL provides the HTTPS encryption needed for a secure connection. Redirects, mixed content, Security Headers and other protections are separate parts of the website configuration.
Do I need Volixta if my hosting already provides free SSL?
Not necessarily for the certificate. If your host already installs and renews SSL correctly, you can keep it. Volixta can still be used for HTTPS configuration, mixed-content tools, Security Headers and other supported protections.
Does installing an SSL certificate automatically make WordPress use HTTPS?
No. Installing the certificate makes HTTPS available on the server. WordPress still needs to use HTTPS, and HTTP traffic normally needs to be redirected to the HTTPS version.
Free SSL Is the Beginning, Not the End
If you arrived here looking for free SSL or wondering how to get a free SSL certificate for WordPress, the good news is that the certificate itself doesn’t need to cost anything.
Let’s Encrypt can provide a trusted free SSL certificate.
But what starts as:
“I need free SSL.”
quickly becomes a more complete HTTPS setup:
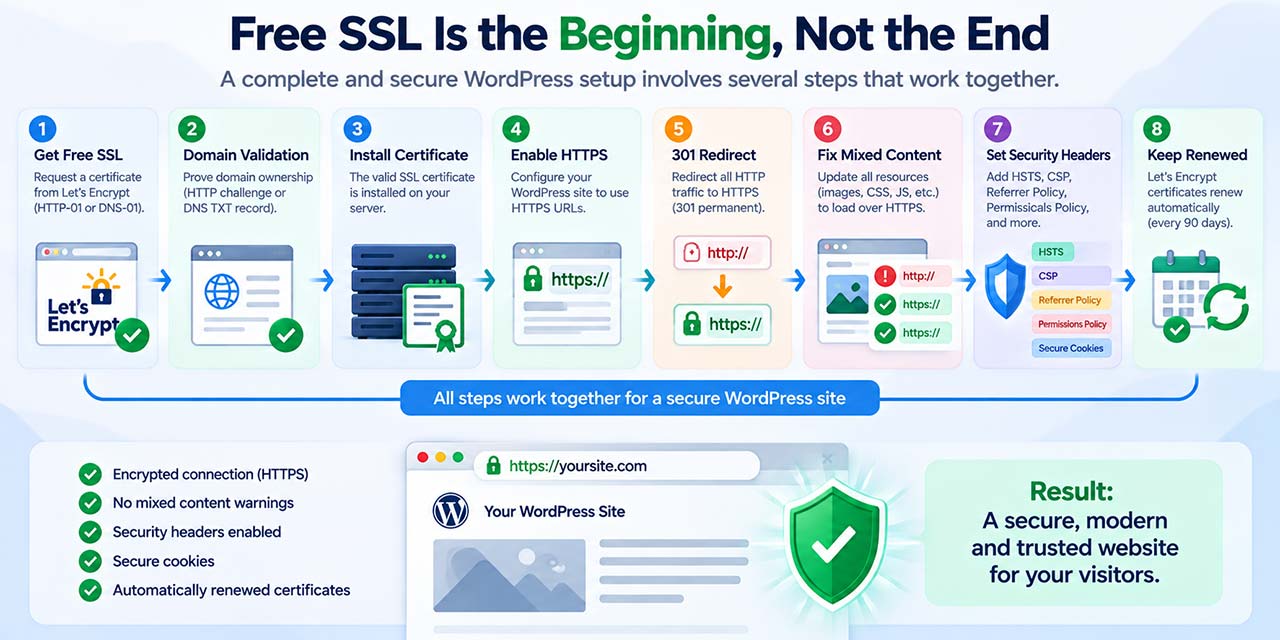
Free Let’s Encrypt SSL certificate
+
Domain validation
+
Certificate installation
+
Public certificate verification
+
WordPress HTTPS
+
301 HTTPS redirect
+
Mixed content checking
+
Security Headers + CSP / Report-Only
+
HSTS verification
+
Secure Cookies
+
Certificate renewal
The SSL certificate establishes the encrypted connection.
HTTPS configuration makes WordPress use it.
The redirect sends visitors to the secure version.
Mixed-content checks help prevent individual resources from falling back to HTTP.
Security Headers give browsers additional instructions about how the site should be handled.
Secure Cookie settings add protection around authentication and session data.
And renewal matters because an expired certificate stops being useful.
That’s ultimately the problem Volixta SSL & Security Headers is intended to solve.
Not “install one plugin and your website is magically secure.”
And not “enable every security option you can find.”
The idea is much simpler: bring the different pieces surrounding SSL and HTTPS into one place, explain their state, automate the parts that can reasonably be automated, and provide a safer path when something still requires manual configuration.
Getting a free SSL certificate for WordPress is a very good place to start.
It just shouldn’t be where your WordPress HTTPS setup ends.